Mix balancer
Download On Tools Site:
https://www.renoise.com/tools/mix-balancer
What it`s for
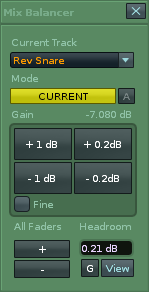
This tool is to help you achieve a balanced mix more quickly. It features 4 Gain-Nudge Buttons, which apply to the tracks post-faders. There are two modes of action:
-
INVERSE mode: The Gain Nudge buttons effect the current track post-faders and all other tracks post-faders will be moved in the opposite direction. Similar to a Tilt EQ.
-
CURRENT mode: The Gain Nudge buttons effect the current track post-faders only.
Controls
/////////////////////////////////////////////////////////////////////
![]()
Pressing the INVERSE button changes the mode to CURRENT. In current mode the main large buttons will only effect the current track.
When in INVERSE mode, Automatic Headroom Control is enabled with the [A] button. When the mode is enabled the button turns orange. It means that the tool will keep the maximum fader automatically at around 0dB so you don’t have to keep making headroom adjustments via the ‘All Faders’ buttons. This feature only reduces volume, not increases so that you dont get any unexpected/unwanted volume boosts
/////////////////////////////////////////////////////////////////////
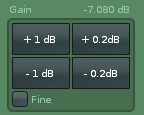
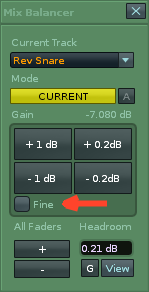
There is a value readout for the current tracks dB level on the top right of the main Gain Buttons. Below the Gain Buttons there is a checkbox labelled ‘Fine’ which halves the values for each of the gain buttons, so you can make even smaller adjustments.
/////////////////////////////////////////////////////////////////////
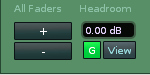
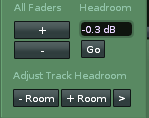
Beneath that are 2 ‘All Faders’ buttons [+] [-] that will adjust all instrument tracks in 1dB increments up and down; basically a macro for all your mixer instrument-track faders, so you can boost/ reduce all tracks at once.
The Headroom textbox shows you the current value of the highest fader/faders in the mixer and when you get close to maximum (+3dB) the minus button on the left will change colour first to yellow and then red to prompt you to press it to reduce all the faders at once. This ensures you retain your relative balances and gives you some headroom back.
Press the [G] button to go to the first track that has the maximum fader position. This will be the same as the headroom readout. When that track is selected the [G] button turns green as confirmation.
The View button toggles between the pattern editor and mixer view.
/////////////////////////////////////////////////////////////////////
Note: The tool works on instrument tracks and does not effect master/send tracks, leaving you to adjust these manually if needed. When you use the tool on a group track it will effect the group post fader but not the faders of the grouped track. Otherwise group tracks will not be effected either. The main target for the tool is instrument tracks.
Shortcut / Menus
Tools: ~ Mix Balancer
Tools menu: ~ Ledger`s Scripts: Mix Balancer
DSP menu: : ~ Mix Balancer
Changelog
v1.0
-now up on tools site:
v0.92
- New ‘Fine’ Checkbox added.
When enabled the gain button values halve to +/- 0.5dB and +/- 0.1dB for even smaller nudgers of the Post Faders
v 0.8
- New automatic headroom control when in INVERSE mode.
This is enabled with the [A] button next to the Inverse button. When the mode is enabled the button turns orange. It means that the tool will keep the maximum fader automatically at around 0dB so you dont have to keep making headroom adjustments via the All Faders` buttons. This feature only reduces volume, not increases so that you dont get any unexpected/unwanted volume boosts.
- New Goto [G] button
Press this to goto the first track that has the maximum fader position. This will be the same as the headroom readout. When that track is selected the [G] button turns green as confirmation.
v 0.81
-toned down green button so better with darker themes
-default auto limit mode changed to on. (still saves as user preference after though)
-“A” button disabled when in current mode"
Related / Tips
- May be useful to use in conjunction with a reference track of the same genre to keep aim in the right direction.
- afta8 has written a tool that allows you to drag multiple faders in the mixer via pattern matrix selection
- An alternative free mac/pc spectrum analyser:
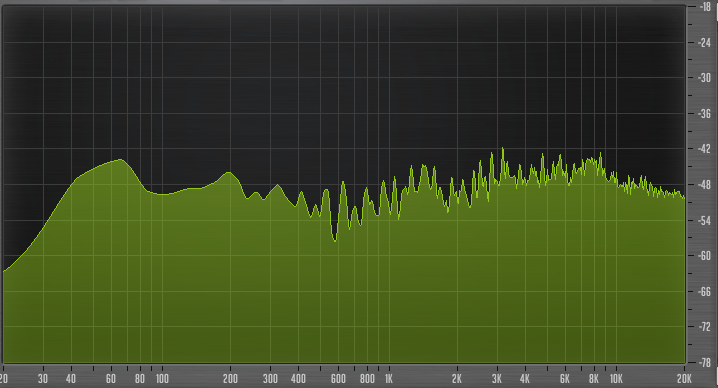
A tip I picked up on KVR a while ago was to set the frequency response slope on Gliss EQ (similar to Span), to around 4.5. This can show a fairly horizontal response on a balanced mix. Not an absolute rule as you can tell by looking at different commercial mixes through it, there is variation, but a handy rule of thumb.
With setting Avg. time to 2000 works for me, but of course settings are there to be experimented with!
Snapshot of a track from Daft Punks Discovery with a slope of 4.5 in Span:
https://files.renoise.com/forum/uploads/5932-Daft%20Punk%20Freq.PNG
My Other Scripts:
 Again - thank you so much for spending time making these tools, I can not thank you enough!