Looks impressive, might even attract more people that are used or coming from other piano-roll based DAWS.
1 Like
Thanks to you. Enjoy it!
1 Like
Yes. But it is also useful for any type of composer, also for those experts in trackers. It really helps a lot visually, and editing is extremely fast when you learn the keyboard commands combined with the click of the mouse.
I am aware that the PRS has many things. It’s a matter of learning the commands. If I have time, I will leave instructions in this forum on how to use it without having to study the User’s Manual so much.
Enjoy it!
2 Likes
looks great, thanks!
Thanks to you. Enjoy it!
How to quickly get started with Piano Roll Studio?
The PRS has an extensive User Manual (in Spanish and English), accessible from the tool itself. Pretty much everything is detailed there. But if you want to quickly start controlling it you can follow these few steps (Remember that it is better to obtain a License for the best experience)…
- Previous configuration. Consider configuring Renoise with the following options:
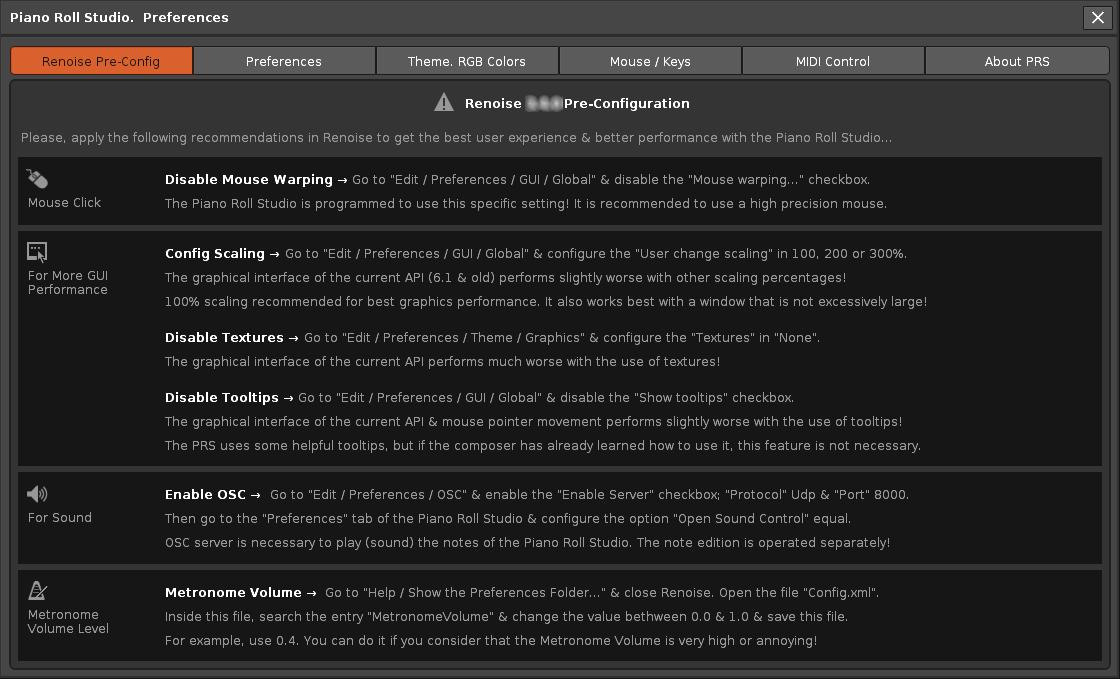
This information panel is in PRS: Preferences (button) / Renoise Pre-Config
- Control commands. The PRS is divided into several panels or control surfaces (vertical left piano, ruler, navigator, note editor grid, and parameter editor panel). Each surface has specific keyboard + mouse action commands. Basically, you just have to learn the available combinations. In the installation folder of the tool you will find the following image with all the controls. You can even print it out on paper to learn:
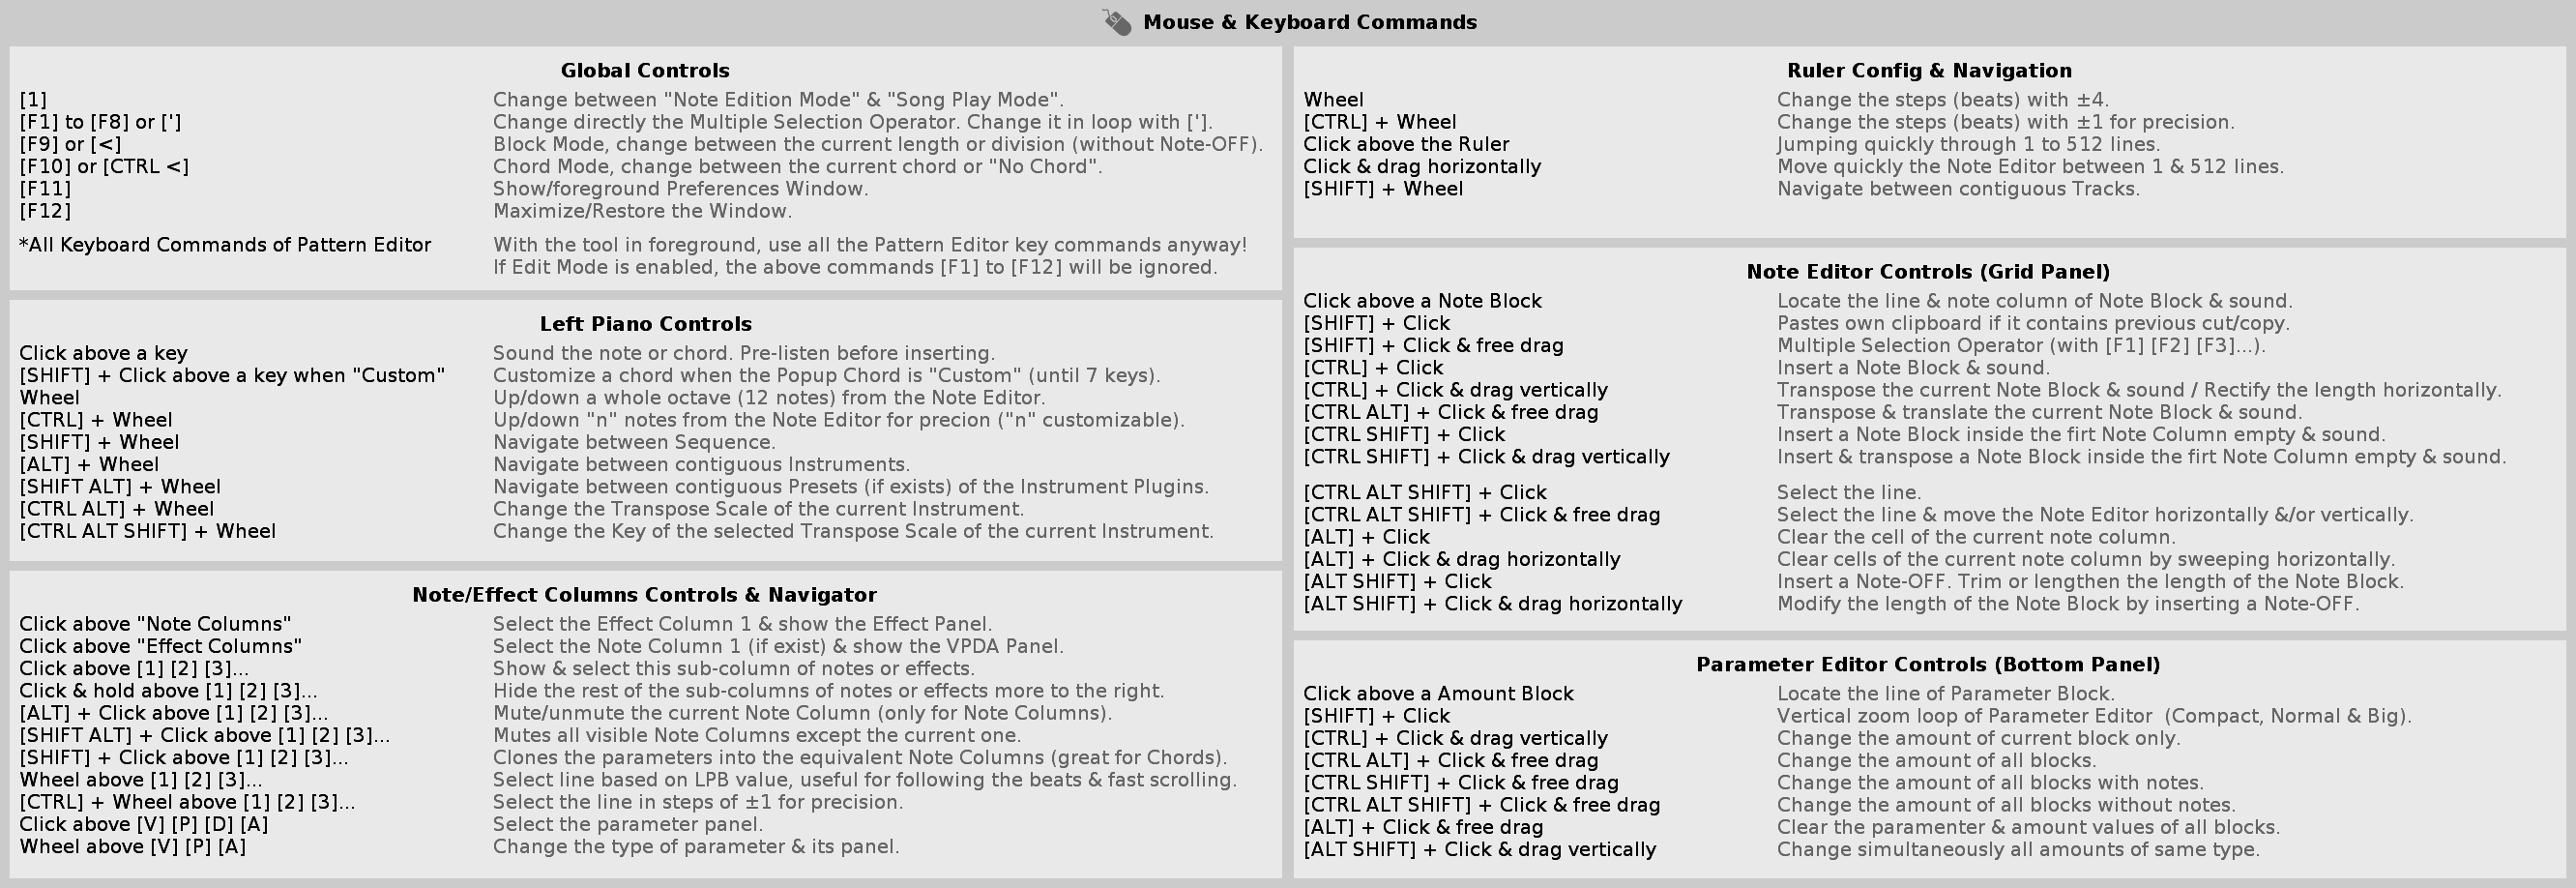
*This image is available inside the installation folder: …\ com.ulneiz.PianoRollStudio.xrnx \ keys *
Go to Renoise: Tools / Tools Browser. Select “com.ulneiz.PianoRollStudio (Piano Roll Studio)”. Right click on “Reveal in Explorer…”
Basically it is about combining the commands SHIFT - CTRL - ALT + the mouse click or turning the wheel (or equivalent for Mac). There are also a few global shortcut key commands for certain functions.
Parts of a note block: head, body and foot
Each note block is divided into 3 parts: head, body and foot:
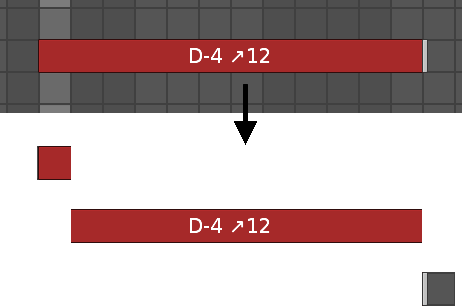
These 3 parts are extensively detailed in the User Manual. Acting with the mouse on each part will solve a different operation. Always keep this matter in mind.
Examples of basic control commands
There are a wide variety of control commands for multiple editing functions. But the essence of control is always the same. The following examples are classified as “simple editing”…
-
Insert a note block. With CTRL + simple click on a cell of the grid:
-
Delete a note block (or several). With ALT + simple click on the head of the note block, or with ALT + click and drag horizontally:
- Humanize notes with the delay value. With SHIFT + CTRL + Click and drag horizontally. With the same operation you can apply a volume value only on the notes.
- Quickly create curves with parameter values. With CTRL + ALT + Click and drag horizontally.

These are just some examples of control commands. In the user manual you will find many more operations of this type, which follow the same control philosophy.
Advanced operations with Multiple Selection Modes
In addition, the PRS has an advanced editing system based on multiple selection, always using SHIFT + click and drag freely. This allows up to 4 diagonal strokes to be used to trigger different operations. There are a total of 32 + 3 different operations with the Multiple Selection Modes. In the upper bar there are the buttons [1]…[8] to change mode.
- Modo 1, Cut, copy, paste, continuous paste…
The 8 modes are different, but are controlled in a similar way, with the selection. All the details are in the user manual.
The Preferences Panel. Change what you want.
In the next panel you can customize a multitude of options that change the behavior of the PRS.
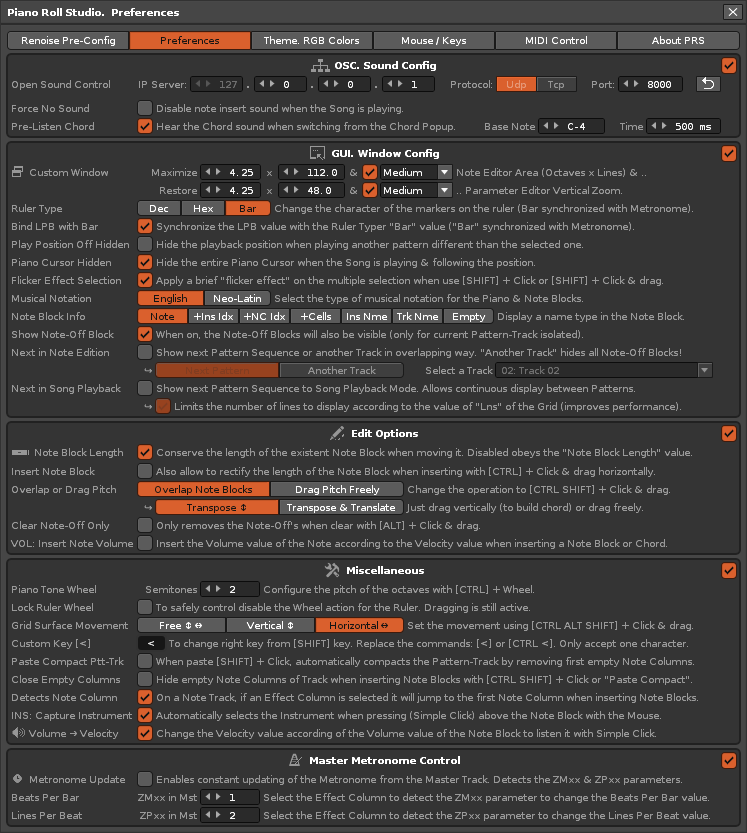
This configuration panel is in PRS: Preferences (button) / Preferences
For example, use the Note Block Info option to change to change the information displayed in the note blocks, or Ruler Type option to change the ruler. Things like that. You can experiment with each option to understand it better…
All this is a small part of everything you can do with Piano Roll Studio. If you learn these basic things, the rest will be very easy for you. Of course, the PRS has much more. It needs a small period of adaptation by the composer, like any other editor. However, when you learn the control commands you will go like a bullet.
2 Likes
This looks amazing, I bought a licence for PRE a month ago, is it possible to exchange the licence for this version?
Hi @fineprimitivesounds
The Piano Roll Studio is a completely new tool (totally new code and all that…). You need a completely new Personalized Use License, valued at 20 € (euros). It is not linked to the PRE tool. If you are interested send me a PM. You can try the Piano Roll Studio before. Enjoy it!
Send me a PM with this matter and we will find a solution…
I copy here more information available in the first post for those who might be interested…
Attention: 40% discount until June 30, 2022.
If you have a Personalized Use License for PRE (Piano Roll Editor), you can get the Piano Roll Studio with a 40% discount. The “Registration File” costs 12€ (euros). Discount available until June 30, 2022. If this is your case, let me know with a PM if you are interested…
I would like to buy the upgrade license since I have PRE. Thank you!
This is already resolved through PM. Thank you for contacting! Enjoy it!
I have searched. In the manual it shows the scale being used in the top bar. I cannot figure out how to make it appear. Can anyone point me in the right direction? Thanks
- Go to: Piano Roll Studio: Preferences Window (second right button inside the superior bar).
- Go to “Mouse/ Keys tab”.
- Go to “Left Piano Controls”, and read the two last lines.
You simply have to use above the left piano:
- [CTRL ALT] + Weel for instrument scale.
- [CTRL ALT SHIFT] + Weel for key scale.
This action appears in Section 3.3 of the User Manual. It changes chords first, and then changes the scale of the selected instrument.
Remember that the scale is a characteristic of the instrument. Each instrument uses its own scale.
Always visit this “Mouse / Keys” panel to remember the keyboard commands depending on the control surface used.
*This image is available inside the installation folder: …\ com.ulneiz.PianoRollStudio.xrnx \ keys *
Go to Renoise: Tools / Tools Browser. Select “com.ulneiz.PianoRollStudio (Piano Roll Studio)”. Right click on “Reveal in Explorer…”
You can print it in black and white to have all the keyboard commands on one piece of paper.
Unfortunately the alt key is not working. Not sure why…
Are you on MAC? PRS works fine on Windows. The ALT key works fine. Make sure the window is in the foreground.
On MAC or Linux it should work exactly the same.
On MAC. Cmd key takes place of ALT on MAC. That key does not respond when the wind has focus
Maybe you should map your Cmd key as Alt key on your Mac? Or do you already have it done?
The API of Renoise use three commands to control inside Windows, as “modifier”:
- “control”
- “shift”
- “alt”
These names are the ones used by the tool to work. I don’t know if on Mac, instead of “alt” it is a different name. However, if there is a problem here, I will investigate it and it will be resolved. But I need to know if on Mac, those “modifier” names are the same for all 3 operating systems, Windows, Linux and Mac.
Actually alt is option on the Mac. Searching for solution.
1 Like
When I press the ctrl or shift with prs in focus the buttons highlight at the top
Alt is Option on Mac. THIS IS THE WAY.

Yes. With “alt” the same thing should happen. Maybe some Mac user can test it with the “alt” key and confirm here that it works perfectly on their machine.
Anyone with Mac who can test this?