I just can’t contain it any longer! Let me share the love for this little gem freebie VST effect called blockfish.

Let’s face it, all DSP compressors sound different and behave differently to what the settings say they should be acting like. Compression is such a fundamental part of mix management at the channel level, not only for shaping dynamics, but also for shaping tone colour. Here’s where I share a little trade secret: I’m a blockfish junkie and proud of it!
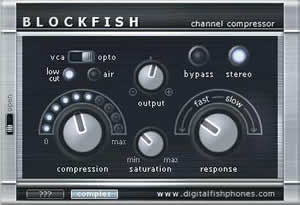
…And no, this compressor isn’t the cure all for all mix needs, so let’s clear that assumption immediately. However, once you learn how to use this little tool you may just find that it quickly becomes you ‘goto compressor’ for many things. And there are a gazillion different ways you could set it up, but I’m going to share with you my settings that more or less get what I like. First, let’s look at all the parameters:
Front Panel (what you see in front of you when you open up the plugin’s UI)
-
VCA / OPTO Switch > This switches the compressor between it’s two modes of reacting to the input signal. VCA stands for Voltage Controlled Amplitude a refers to how standard compressors simply react in real-time. OPTO is short for Optical, which refers to a classic method where the compressor uses an optical sensor to read the input signal and govern how the compressor works. How the plugin emulates this magical mode is to use a buffer of a short amount of input signal to read the input data. More on this later…
-
Low Cut > This switch when active tells the compressor to ignore below a certain frequency and compress signal only above that cut. When off, the compressor acts on the entire frequency range of the input.
-
Air > When on the Air button engages an exciter that works in tandem with the compressor action, so it effectively makes up for ‘brightness’ lost due to the hardness of the compression (which is common in all DSP compressors).
-
Output > A simple post-volume knob that effects the output volume.
-
Bypass > Simply bypasses the effect for A/B testing.
-
Stereo > When off the plugin mixes the L and R channel of the input signal into a two channel mono output.
-
Compression > This knob does two things at once. Firstly, the more you add to this parameter the ‘deeper’ the threshold where dynamics are altered. Secondly, the more you add to this parameter the post-gain markup is added in respect to how deep the threshold is. Put simply, the more you turn this knob, the more you squash the sound without general gain loss. The amount of compression effects the other aspects of the plugin, as will be explained further down.
-
Saturation > The knob effects how much saturation the compressor employs, both generally over the whole input sound, as well as on transient dynamics (like peaks) depending on how much ‘compression’ is selected.
-
Response > A curious parameter that seems to combine both ‘attack’ and ‘release’ aspects of compression. The lower the setting on this knob the faster the response. The response is also related to what mode the compressor is in, which is static in VCA mode, but configurable in OPTO mode: see below.
-
Complex > This button is down on the bottom left of the plugin interface. It allows you to select two modes of adjustment that affect the sound of the ‘Compression’ parameter. Disengaged it sounds like most DPS compressors, generally transparent; but when engaged Complex sounds fuller and pleasantly louder depending on how much compression you employ.
-
Open switch > On the very left of the plugin interface there is a tiny switch to access the back panel controls. Let’s look at them now.
Back Panel
-
Low Cut Freq > When the ‘Low Cut’ button is active you can select the frequency cut point here with this knob. The higher it is set the more lower end is let through un-compressed.
-
Air Freq > When the ‘Air’ button is active you can select the frequency of the general air emphasis. Pushing it right up shows that it can go up to the very high audible frequencies.
-
Air Level > Related to the ‘Air’ aspect of the compressor, this knob controls the amount of exciter emphasis relative to the amount of compression set. The more you add to the level the more boosted the selected air frequency you have chosen. This makes up beautifully for produced dullness from DSP compression and different input sounds can benefit from different amounts of compensation.
-
Opto Memory > When the compressor is set to OPTO mode, this knob controls the buffer size for reading the input signal. This in turn effects how snappy or quick the ‘Response’ of the compressor is, and is quite useful for getting the right attack when using a really short response time. The amount of memory also effects how gracefully the OPTO mode works, a smaller buffer compromises the sound.
-
Sat Emph Freq > This controls the frequency that the compressor’s saturation process places an emphasis. Think of it as a tone control that determines the colour of the ‘rip’ of the saturation.
-
Dynamic Sat > This controls the amount of saturation that is applied relative to three other parameters: the amount of compression; the amount of saturation; and the saturation emphasis frequency. The more of this parameter you apply the more it naturally softens transient peaks in the input signal.
OK! So that’s all the parameters explained… Now let’s look at how I generally like to use Blockfish - my default settings if you will. I’m a fan of smooth vintage analog sounds, so this may not be necessarily for you, but do try it out on a few things and you may just find it sounds pretty sweet:
- OPTO mode.
- Low Cut on.
- Air on.
- Complex on.
- Stereo processing.
- Compression on as hard as appropriate.
- Response set as low as it can go.
- Saturation set at half or higher.
- Low Cut Freq around the middle, depending on input sound.
- Air Freq usually right up as high as it can go.
- Air Level usually up all the way, but sometimes not much if the input is bright already.
- Opto Memory at midway, although less if I need a snappier sound.
- Sat Emph Freq as low as it can go: this is really the BEST spot for this setting, especially if you’re grinding sound hard into the compressor, like megaphoning dub echo etc.
- Dynamic Sat as high as it can go.
- Output set at the appropriate level - sometimes I automate this depending on mix flow/dynamics.
This brings to life so many dull or cold things in my mix like no other compressor can. I usually don’t venture too far from the above settings: maybe a little less air for processing my tube-mic-pre recordings; a lot more saturation for beefing up drums; different low cut positions for keeping bass and kicks punching; and so on…
Try it out! Let me know if you find this of use.
![]()
