Build a perfect Virtual Piano using buttons only

There is a surprisingly simple and repetitive way to build a perfect virtual piano just by using buttons with Viewbuilder.I share it because I have not seen any tool that uses this method.

Main elements:

  1. button (id, height, width, color, bitmap or text, pressed & released or notifier, tooltip… )
  2. row
  3. row with negative spacing
  4. space with width
vb:row { --row(0)
      margin = 5, -- general margin for all piano.
      spacing = -2, -- space between octaves ( 12 keys ! space ! 12 keys... )
      
      --- --- OCTAVE 0 (0-11)
      vb:row { spacing = -131, --row(1)
        vb:row { spacing = -3, --row(2)
          vb:button { id = "KEY_0", height = 66, width = 23, color = { 255,255,255 } },
          vb:button { id = "KEY_2", height = 66, width = 23, color = { 255,255,255 } },
          vb:button { id = "KEY_4", height = 66, width = 23, color = { 255,255,255 } },
          vb:button { id = "KEY_5", height = 66, width = 23, color = { 255,255,255 } },
          vb:button { id = "KEY_7", height = 66, width = 23, color = { 255,255,255 } },
          vb:button { id = "KEY_9", height = 66, width = 23, color = { 255,255,255 } },
          vb:button { id = "KEY_11", height = 66, width = 23, color = { 255,255,255 } },
        },
        vb:row { --row(3)
          vb:button { id = "KEY_1", height = 40, width = 15, color = { 001,000,000 } },
          vb:space { width = 8 }, --vb:row { width = 8 },
          vb:button { id = "KEY_3", height = 40, width = 15, color = { 001,000,000 } },
          vb:space { width = 22 },
          vb:button { id = "KEY_6", height = 40, width = 15, color = { 001,000,000 } },
          vb:space { width = 7 },
          vb:button { id = "KEY_8", height = 40, width = 15, color = { 001,000,000 } },
          vb:space { width = 7 },
          vb:button { id = "KEY_10", height = 40, width = 15, color = { 001,000,000 } },
        }
      },
      --- --- OCTAVE 1 (12-23)
      vb:row { spacing = -131, --row(1)
        vb:row { spacing = -3, --row(2)
          vb:button { id = "KEY_12", height = 66, width = 23, color = { 255,255,255 } },
          vb:button { id = "KEY_14", height = 66, width = 23, color = { 255,255,255 } },
          vb:button { id = "KEY_16", height = 66, width = 23, color = { 255,255,255 } },
          vb:button { id = "KEY_17", height = 66, width = 23, color = { 255,255,255 } },
          vb:button { id = "KEY_19", height = 66, width = 23, color = { 255,255,255 } },
          vb:button { id = "KEY_21", height = 66, width = 23, color = { 255,255,255 } },
          vb:button { id = "KEY_23", height = 66, width = 23, color = { 255,255,255 } },
        },
        vb:row { --row(3)
          vb:button { id = "KEY_13", height = 40, width = 15, color = { 001,000,000 } },
          vb:space { width = 8 },
          vb:button { id = "KEY_15", height = 40, width = 15, color = { 001,000,000 } },
          vb:space { width = 22 },
          vb:button { id = "KEY_18", height = 40, width = 15, color = { 001,000,000 } },
          vb:space { width = 7 },
          vb:button { id = "KEY_20", height = 40, width = 15, color = { 001,000,000 } },
          vb:space { width = 7 },
          vb:button { id = "KEY_22", height = 40, width = 15, color = { 001,000,000 } },
        }
      },
      --- --- OCTAVE 2 (24-35)
      vb:row { spacing = -131,
        vb:row { spacing = -3,
          vb:button { id = "KEY_24", height = 66, width = 23, color = { 255,255,255 } },
          vb:button { id = "KEY_26", height = 66, width = 23, color = { 255,255,255 } },
          vb:button { id = "KEY_28", height = 66, width = 23, color = { 255,255,255 } },
          vb:button { id = "KEY_29", height = 66, width = 23, color = { 255,255,255 } },
          vb:button { id = "KEY_31", height = 66, width = 23, color = { 255,255,255 } },
          vb:button { id = "KEY_33", height = 66, width = 23, color = { 255,255,255 } },
          vb:button { id = "KEY_35", height = 66, width = 23, color = { 255,255,255 } },
        },
        vb:row {
          vb:button { id = "KEY_25", height = 40, width = 15, color = { 001,000,000 } },
          vb:space { width = 8 },
          vb:button { id = "KEY_27", height = 40, width = 15, color = { 001,000,000 } },
          vb:space { width = 22 },
          vb:button { id = "KEY_30", height = 40, width = 15, color = { 001,000,000 } },
          vb:space { width = 7 },
          vb:button { id = "KEY_32", height = 40, width = 15, color = { 001,000,000 } },
          vb:space { width = 7 },
          vb:button { id = "KEY_34", height = 40, width = 15, color = { 001,000,000 } },
        }
      },
      --- --- OCTAVE 3 (36-47)
      vb:row { spacing = -131,
        vb:row { spacing = -3,
          vb:button { id = "KEY_36", height = 66, width = 23, color = { 255,255,255 } },
          vb:button { id = "KEY_38", height = 66, width = 23, color = { 255,255,255 } },
          vb:button { id = "KEY_40", height = 66, width = 23, color = { 255,255,255 } },
          vb:button { id = "KEY_41", height = 66, width = 23, color = { 255,255,255 } },
          vb:button { id = "KEY_43", height = 66, width = 23, color = { 255,255,255 } },
          vb:button { id = "KEY_45", height = 66, width = 23, color = { 255,255,255 } },
          vb:button { id = "KEY_47", height = 66, width = 23, color = { 255,255,255 } },
        },
        vb:row {
          vb:button { id = "KEY_37", height = 40, width = 15, color = { 001,000,000 } },
          vb:space { width = 8 },
          vb:button { id = "KEY_39", height = 40, width = 15, color = { 001,000,000 } },
          vb:space { width = 22 },
          vb:button { id = "KEY_42", height = 40, width = 15, color = { 001,000,000 } },
          vb:space { width = 7 },
          vb:button { id = "KEY_44", height = 40, width = 15, color = { 001,000,000 } },
          vb:space { width = 7 },
          vb:button { id = "KEY_46", height = 40, width = 15, color = { 001,000,000 } },
        }
      },
      --- --- OCTAVE 4 (48-59)
      vb:row { spacing = -131,
        vb:row { spacing = -3,
          vb:button { id = "KEY_48", height = 66, width = 23, color = { 255,255,255 } },
          vb:button { id = "KEY_50", height = 66, width = 23, color = { 255,255,255 } },
          vb:button { id = "KEY_52", height = 66, width = 23, color = { 255,255,255 } },
          vb:button { id = "KEY_53", height = 66, width = 23, color = { 255,255,255 } },
          vb:button { id = "KEY_55", height = 66, width = 23, color = { 255,255,255 } },
          vb:button { id = "KEY_57", height = 66, width = 23, color = { 255,255,255 } },
          vb:button { id = "KEY_59", height = 66, width = 23, color = { 255,255,255 } },
        },
        vb:row {
          vb:button { id = "KEY_49", height = 40, width = 15, color = { 001,000,000 } },
          vb:space { width = 8 },
          vb:button { id = "KEY_51", height = 40, width = 15, color = { 001,000,000 } },
          vb:space { width = 22 },
          vb:button { id = "KEY_54", height = 40, width = 15, color = { 001,000,000 } },
          vb:space { width = 7 },
          vb:button { id = "KEY_56", height = 40, width = 15, color = { 001,000,000 } },
          vb:space { width = 7 },
          vb:button { id = "KEY_58", height = 40, width = 15, color = { 001,000,000 } },
        }
      },
    }

The basic steps to create a octave:

  1. Create a general row(1) for each octave. Then insert two rows, row (2) and row (3).
  2. Group the 7 white buttons in row(2) (the buttons must be sorted in scale: C-, D-, E-, F-, G-, A-, B-. color = { 255,255,255 } for pure white.
  3. Group the 5 black buttons in other row(3)(the buttons must be sorted in scale: C#, D#, F#, G#, A# ) . color = { 0,0,0 } according with your theme of Renoise or color = { 1,0,0 } for pure black.

Without using spacing, the white and black buttons are placed on the same line.Use negative spacing to overlap the row (3) above the row (2), for example: vb:row { spacing = -131,. Then, all black overlap with white.
5.
Finally, inside the row(3), uses rows with a given width to separate the black buttons correctly, for example: vb:space { width = 7 }

Repeat steps to create up to 10 octaves.You can group all octaves in another row and use a concrete spacing among them.

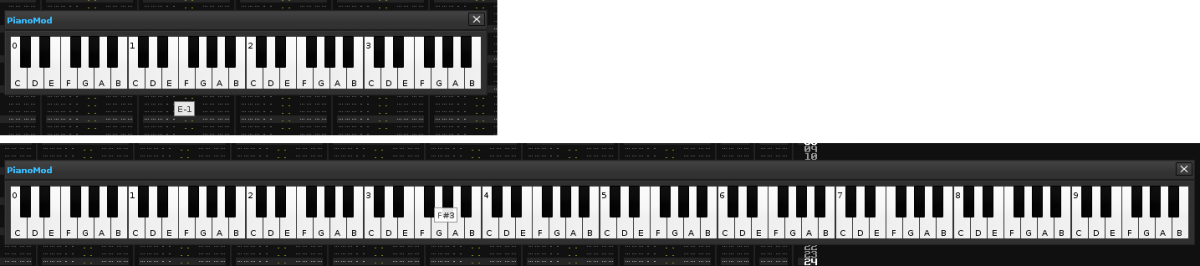
The crude result (with 5 octaves. The black keys use color = { 0,0,0 } to respect the theme):

7443 virtual_piano_ulneiz.gif

With the properties of each button (pressed, released, notifier), key_handler, midi and mouseis possible to control this virtual piano and build very interesting tools, with a more pro look.

Notes 1:

  1. It is possible to modify the size of the buttons and accompanying the spacing.
  2. Is possible to modify the colors of the buttons grouped in octaves or groups of octaves.
  3. You can add the right and left scroll buttons to display only the desired octaves (a tool that takes up little space, using only the negative or positive spacing.
  4. Use “spacing” inside the “row” (horizontal scroll) and “spacing” inside the “column” (vertical scroll).
  5. You can build a virtual piano vertically, using “column” and “spacing”, with the same results…

Notes 2:

  1. Another trick is to call the id of each button as well: id = “KEY_0” , id = “KEY_1” , id = “KEY_2”id = “KEY_10” , id = “KEY_11” , id = “KEY_12”…In this way, we can call a group of buttons as well:
function change_color_octave_0()
  for k = 0, 11 do
    vb.views["KEY_"..k..""].color = {x70,x00,x00} --red
  end
end

function change_color_octave_1()
  for k = 12, 23 do
    vb.views["KEY_"..k..""].color = {x00,x70,x00} --green
  end
end

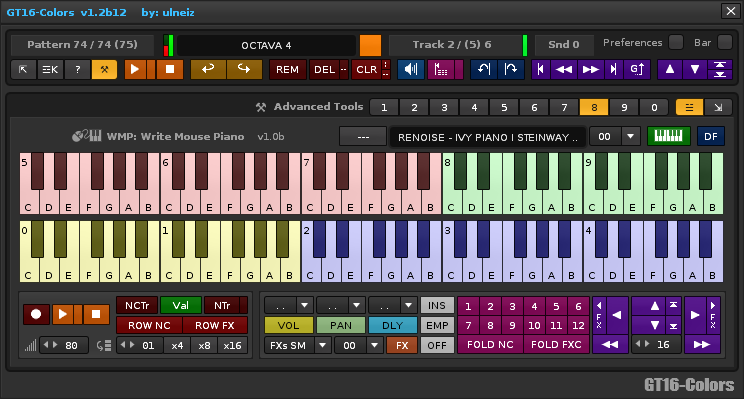
Using this trick you can modify properties of each button in a group. For example, offer the user 2 or 3 different virtual piano sizes, adding an id to each row to resize it as needed.In my GT16-Colors tool, I was able to add a button that returns the last note pressed, to remember it. Pressing this button points the corresponding key back on the piano.With a little creativity, you can build wonderful things…

Enjoy and build your tools!!!

Applying this method in my tool:

7444 wmp_ulneiz.png

Beautiful! :wub:

Great work Raul!

thanks for sharing

Great work Raul!

thanks for sharing

Thanks Ledger!I forgot to comment on another detail.The code can be optimized by saving many lines because the key buttons use equal values (same with, height, color, etc.). Actually, only 2 types of buttons are defined, with id, notifier, pressed, released, tooltip, bitmap, text differents. We can get great tools this way.

By the way, the button overlay allows you to create another class of interesting utilities to improve the appearance.One option is to create 2 buttons, the first a little larger than the second, and overlap the second button above the first in a centered manner.When you press the second button, you can color the first color so that a color selection frame appears. I have not yet built it, but I’m sure it’s possible, and it’s very easy. This would allow you to use buttons with text and forget the checkboxes.When I have time, I will share an example here.

Looking good!

PS.

  1. color = { 000,000,000 } should be changed to { 1, 0, 0 } for true black. 0,0,0 will only be black in certain color themes.

  2. there is a dedicated vb:space class that can be used instead of vb:row { width = 7 }. Good to know, but it probably doesn’t matter here in practice.

Thank you! I updated the comment #1 with the changes.I think I remember seeing some Danoise tool that represents some virtual piano, but it does not overlay buttons. So the virtual piano look strange.

Here would be beneficial a specific code to compact lines or save lines of code by avoiding to write continuously height = 66, width = 23, color = { 255,255,255 } or height = 40, width = 15, color = { 1,0,0 }.That is, a little optimization.I still do not know what would be the best way to do it…

Topic aside:I miss some code to be able to put the text in vertical, turned 90º.To do this I have to use the bitmap and I do not like it very much…Is there any way to do this?

When I have time, I will try to build a vertical piano, like this one and also a compact virtual piano with octave scroll buttons, for example: [<] [octave 3][octave 4][octave 5] [>].

Wow, that’s cool. Like you said: simply the perfect looking piano widget.

I think I remember seeing some Danoise tool that represents some virtual piano, but it does not overlay buttons. So the virtual piano look strange.

You’re right - I didn’t know about the negative margin/spacing technique back then. I think credit goes to afta8 for discovering that?

And, just to confirm since I heard a few concerned whispers: negative margins are a valid design/layout technique - also in other languages. It’s NOT going away from the Renoise API :slight_smile:

You indeed must use bitmaps for the text, as far as I know. Just the fact that you can’t set text color makes this the only good option for predictable results independent of color theme. Rotating vb:text or button text certainly isn’t possible.

If you’re building scroll buttons, you should imo make a piano widget class. It’s much easier and more compact to handle dynamic behavior like that in a “self-contained structure” that a class is.

Wow, that’s cool. Like you said: simply the perfect looking piano widget.

You’re right - I didn’t know about the negative margin/spacing technique back then. I think credit goes to afta8 for discovering that?

And, just to confirm since I heard a few concerned whispers: negative margins are a valid design/layout technique - also in other languages. It’s NOT going away from the Renoise API :slight_smile:

Yes. I know CSS3 quite well. Here you can use negative margins too.I suppose it is an almost universal method for any type of code used to represent a GUI.But, certainly, I was surprised to see no piano tool with this aspect until now. And he told me over and over, that there had to be some way.

I invite anyone to take the code and wring the maximum.I would like to see tools with a more professional look in general.I have seen some really amazing, looking tools, one of them was of afta8, that managed dynamic points, I believe.

You indeed must use bitmaps for the text, as far as I know. Just the fact that you can’t set text color makes this the only good option for predictable results independent of color theme. Rotating vb:text or button text certainly isn’t possible.

I will explain the procedure I follow to do it. Build vertical text :

  1. Create a button with large height and width and pure white color.
  2. Type in the text of the button the word you want to use.
  3. Capture the image and paste it into an image editor. I use paint.net
  4. Rotate the image 90º, invert the color, reduce the distance between letters and crop to create an icon in bmp or png format.
  5. Finally use it inside a :button or a :bitmap using bitmap…

Too bad there is no better way to control the text. This method is a bit prehistoric. :slight_smile:

If you’re building scroll buttons, you should imo make a piano widget class. It’s much easier and more compact to handle dynamic behavior like that in a “self-contained structure” that a class is.

I will take this topic to develop it later.The idea I have is to share several examples of different virtual pianos, to have examples available in the forums.

You’re right - I didn’t know about the negative margin/spacing technique back then. I think credit goes to afta8 for discovering that?

I believe that these details should be well explained in the documentation in ViewBuilder.API.lua…

  • For colum: .spacing → [positive or negative number]
  • For row: .spacing → [positive or negative number]
  • etc

Or also in practical basic examples.

I believe that these details should be well explained in the documentation in ViewBuilder.API.lua…

Well, maybe. I think it’s fine that we’re sharing these tips here in the scripting forum.

Another tip : did you know that printing the following in the console yields colored text?

print("*** Oops! An error occurred") -- this will be grey
print(">>> Processing....") -- this will be green

Pretty useful if you’re doing a lot of console tracing while developing :ph34r:

:smiley: :smiley: :Dthanks! True!!! I had seen it in some of your tools, that the green text came out on the console, but I did not bother to see how it was done.Then there are 3 colors, right?

print("info!") - white text
print("*** error!") - grey text
print(">>> applying!") - green text

What would be very useful is to create a timer in milliseconds to determine how long a particular function takes, and to display the value printed on the console at the end of the process:

  • Function “XXX” processed in 450 ms

or

  • Function “YYY” processed in 6213 ms

This would be very useful!!!

Timing your functions can be done by using os.clock(). Example: https://forum.renoise.com/t/renoise-tools-speed-optimization-initiative/45510

Timing your functions can be done by using os.clock(). Example: https://forum.renoise.com/t/renoise-tools-speed-optimization-initiative/45510

:blink:I read over the whole topic to tools speed optimization, but I did not remember that you just used that, thanks!I will definitely use this os.clock() to optimize my tools…

local x = os.clock()

function name_func()
  --content  
end

print(string.format("elapsed time: %.2f\n", os.clock() - x))

This is very interesting!!!

Then there are 3 colors, right?

You could probably get more colors out of strings if you were to run Renoise under a color terminal and output (debugging) strings directly to stdout using ANSI escape sequences:

io.stdout:write("\27[33;1mThis is yellow!\n")
io.stdout:write("\27[31;1mThis is red!\n")
io.stdout:write("\27[35;1mThis is magenta!\n")
io.stdout:write("\27[34;1mThis is blue!\n")

Thinking more Linux here though, don’t know about Windows :slight_smile:

Good little piano ‘button’ keyboard btw Raul :slight_smile:

Thanks 4Tey!I am using windows at all times and linux for boot with USB.So I do not have a proper machine to try Renoise under Linux or Mac.

I keep thinking things with colors.I have not seen the specific documentation, but there should be some way to detect that the selected instrument uses samples (not VSTi).Considering the keyzones.There should be a simple way to colorize gray (or active = false) the keys that do not have any associated samples.Disable non-serving keys…With this, in addition to adjusting the size of the piano, and being able to control the keys through MIDI (especially), USB keyboard and mouse, would be a frankly useful and attractive tool.

MIDI pressed and MIDI released to control the “note buttons”???I mean all the notes of the 10 octaves, the 120 notes.The virtual piano would control the 120 notes, but visually only the necessary octaves would appear. I think 3 octaves would be enough.

I have used to call a function:

renoise.tool():add_midi_mapping {
  name = THE_NAME,
  invoke = function(message)
    if (message:is_trigger()) then
      name_func()
    end
  end
}

MIDI is_trigger() is equal to button released… InRenoise.ScriptingTool.API.lua:

class "renoise.ScriptingTool.MidiMessage"
    
      -- returns if action should be invoked
      function is_trigger() -> boolean

      -- check which properties are valid
      function: is_switch() -> boolean
      function: is_rel_value() -> boolean
      function: is_abs_value() -> boolean

      -- [0 - 127] for abs values, [-63 - 63] for relative values
      -- valid when is_rel_value() or is_abs_value() returns true, else undefined
      property: int_value

      -- valid [true OR false] when :is_switch() returns true, else undefined
      property: boolean_value

is_swith() act like a button, with pressed, and released?What I would like to build is a way to control the virtual keyboard with the MIDI keyboard, all notes.Since there are 120 notes, you really only need to deal with one note.The rest is repeat.My final idea is to build a virtual piano that can control notes with the midi keyboard, but also to be able to edit in the pattern editor the notes directly with the mouse on the virtual keyboard.

  • With the mouse the sound can use the osc server.
  • With the midi keyboard I understand that the sound should “go alone”.

If you want to do a virtual-midi keyboard alike thing with MIDI input, you’ll need for the tool to configure it’s own MIDI input.

There is an example on how to do this here:

https://github.com/renoise/xrnx/blob/master/Snippets/Midi.lua

It lets you receive raw MIDI data, which you can then do whatever with you want.

All the basic MIDI messages (so, not sysex and such stuff) is really just three bytes of data - so quite simple to process.

(check the MIDI input panel to investigate incoming messages)

  • With the mouse the sound can use the osc server.
  • With the midi keyboard I understand that the sound should “go alone”.

If you want to trigger notes in realtime, this is done through the OSC server, no matter what

Remember, you tool defines it’s own MIDI input port - independently of Renoise.

You can send messages using the OSC server in two ways:

  1. “Raw” midi message which is received by whichever instrument is selected

  2. “Extended” message which targets a specific instrument and/or track

The “extended” message is dealing with triggering notes only, so if you want to pass CC data from the keyboard (mod wheel?) to Renoise (or other tools), then you need to send as “raw” midi

Raw MIDI works like incoming midi message and can be MIDI mapped to any element that light up when pressing CTRL+M (MIDI mapping mode).

Hope this helps!

@Raul,
Here is the way to build your widget programatically, done for the fun of it :slight_smile: This will also let you decide how many octaves to build.

(A version that would render from any key to any key would be a bit more complex/different than this, but this is a first step)

Click to view contents
function pw_build_octave(octave)
  local intervals = { 1, 0, 1, 0, 1, 1, 0, 1, 0, 1, 0, 1 }
  local black_spaces = { [2] = 8, [4] = 22, [7] = 7, [9] = 7 }
    
  local white_keys = vb:row { spacing = -3 }
  local black_keys = vb:row { }
  local octave_content = vb:row {
    spacing = -131,
    white_keys,
    black_keys }
  
  for key = 1, 12 do
    if intervals[key] == 1 then
      white_keys:add_child(
        vb:button {
          height = 66, width = 23,
          color = { 255, 255, 255 },
          id = "KEY_" .. (key - 1) + (12 * octave),
        })
    else
      black_keys:add_child(
        vb:button {
          height = 40, width = 15,
          color = { 1, 1, 1 },
          id = "KEY_" .. (key - 1) + (12 * octave),
        })   
      if key <= 9 then
        black_keys:add_child(vb:space { width = black_spaces[key] })
      end      
    end
  end
  return octave_content
end

function pw_build(octaves)
  local piano_widget = vb:row { margin = 5, spacing = -2 }
  for octave = 0, octaves-1 do
    piano_widget:add_child( pw_build_octave(octave) )
  end
  return piano_widget
end
local my_pianowidget_content = pw_build(4)

@Joule, thank you very much! :slight_smile:

I added a bit of layout:

Click to view contents
function white_tooltip (key, octave)
  if key == 1 then return "C-"..octave.."" end
  if key == 3 then return "D-"..octave.."" end
  if key == 5 then return "E-"..octave.."" end
  if key == 6 then return "F-"..octave.."" end
  if key == 8 then return "G-"..octave.."" end
  if key ==10 then return "A-"..octave.."" end
  if key ==12 then return "B-"..octave.."" end
end
---
function black_tooltip (key, octave)
  if key == 2 then return "C#"..octave.."" end
  if key == 4 then return "D#"..octave.."" end
  if key == 7 then return "F#"..octave.."" end
  if key == 9 then return "G#"..octave.."" end
  if key ==11 then return "A#"..octave.."" end
end
---
function white_bitmap (key, octave)
  if key == 1 then
    for i = 0, 9 do
      if octave == i then return "icons/c-"..i..".png" end
    end
  end
  --if key == 1 then return "icons/c.png" end
  if key == 3 then return "icons/d-.png" end
  if key == 5 then return "icons/e-.png" end
  if key == 6 then return "icons/f-.png" end
  if key == 8 then return "icons/g-.png" end
  if key ==10 then return "icons/a-.png" end
  if key ==12 then return "icons/b-.png" end
end

  function pw_build_octave(octave)
  
    local intervals = { 1, 0, 1, 0, 1, 1, 0, 1, 0, 1, 0, 1 }
    local black_spaces = { [2] = 8, [4] = 22, [7] = 7, [9] = 7 }
      
    local white_keys = vb:row { spacing = -3 }
    local black_keys = vb:row { }
    local octave_content = vb:row {
      spacing = -131,
      white_keys,
      black_keys
    }
    
    for key = 1, 12 do
      if intervals[key] == 1 then
        white_keys:add_child(
          vb:button {
            height = 66, width = 23,
            color = { 255, 255, 255 },
            id = "KEY_" .. (key - 1) + (12 * octave),
            tooltip = white_tooltip(key, octave), --<<
            bitmap = white_bitmap(key, octave), --<<
            pressed = function(key, octave) end, --<<
            released = function(key, octave) end --<<
          })
      else
        black_keys:add_child(
          vb:button {
            height = 40, width = 15,
            color = { 1, 1, 1 },
            id = "KEY_" .. (key - 1) + (12 * octave),
            tooltip = black_tooltip(key, octave), --<<
            pressed = function(key, octave) end, --<<
            released = function(key, octave) end --<<
          })   
        if key <= 9 then
          black_keys:add_child(vb:space { width = black_spaces[key] })
        end      
      end
    end
  
    return octave_content
  end
  
  
  function pw_build(octaves)
    local piano_widget = vb:row { margin = 5, spacing = -2 }
  
    for octave = 0, octaves-1 do
      piano_widget:add_child( pw_build_octave(octave) )
    end
  
    return piano_widget
  end
  
  my_pianowidget_content = pw_build(4)
tooltip = white_tooltip(key, octave), --<<
bitmap = white_bitmap(key, octave), --<<
pressed = function(key, octave) end, --<<
released = function(key, octave) end --<<

...

tooltip = black_tooltip(key, octave), --<<
pressed = function(key, octave) end, --<<
released = function(key, octave) end --<<

7449 vb-perfect-piano-2.png

I think it would be all set to have a virtual piano as a base.From here, on the 10 octave piano, it is possible to add 2 side scroll buttons and display only 3 or 4 octaves to make a more compact tool. Another button on the left to deploy a bottom line with more buttons to trigger functions.

For now, I think I would be able to include 3 things:

  1. OSC Server for sound.
  2. Control writing in the pattern editor using the mouse with the virtual piano.
  3. Control writing in the pattern editor using the USB keyboard with the virtual piano, according the “Oct” value of Renoise.

I find it an unknown world yet for include control via MIDI input.This involves connecting a MIDI keyboard and pressing the keyboard notes that the virtual piano only can illuminate the keys (pressed and released).