Initial note: This article has been updated and corrected!
This is a short User Guide for listen tracks in true multi-channel 5.1 format, “just using Renoise”. To render a 5.1 multichannel wav file, you will need to use other software.
I will take the reference with Windows 10/11, but it has its equivalents for other Operating Systems and their versions compatible with Renoise (Linux or MAC). I will also take the 5.1 multichannel distribution as a reference, but it can be 2.1, 5.0, 4.0, 7.1, etc., depending on the characteristics of the sound card.
The process goes through knowing the requirements, producing a song with the Renoise, configuration for 5.1 distribution and later rendering the parts with Renoise to achieve a WAV file in 5.1 using other software.
1. Introduction
Generally, Renoise composers render songs in stereo, that is, in 2 channels front right (FR) and front left (FL), or 2.0 multichannel sound (two channels without subwoofer division). When rendering a song, Renoise will always render a wav file in 2 channels. With some steps and external software, it is possible to build a 5.1 channel WAV file. Let’s see how!
What if the composer wants to render a song in true 5.1 multichannel sound? Is it possible just using Renoise? You will be able to hear the result only with Renoise, but you will need external software to be able to render in 5.1.
2. Requirements to listen the song with real 5.1 multichannel sound.
Basically you will only need two things:
- Renoise Full Version. The demo version does not support ASIO. You can buy Renoise 3.3.2 or future version here: Shop | Renoise
- Sound card compatible with 5.1 multi-channel sound, compatible with ASIO and compatible with Windows 10/11.
- Obviously, a machine compatible with these things …
There are a multitude of sound cards, both integrated into the motherboard, as well as dedicated PCIe or USB. For example, I use a PCIe Sound Blaster ZxR sound card, which is ASIO 5.1 compliant and offers very low latency. You can look for a similar sound card.
The important thing is that it is ASIO compliant. Focusing on my sound card, its ASIO support allows up to 6 channels to be used:
- Right Front (FR)
- Front Left (FL)
- Rear Right (RR)
- Rear Left (RL)
- Central (C)
- Subwoofer (Sub)
Pay attention! When Renoise is properly set to ASIO, it will detect the following for routing tracks (remember this for later):
- Track Routing → Master (if the track is different from the Master track).
- Track Routing → Front L/R
- Track Routing → Rear L/R
- Track Routing → Center/Sub
If you have a different sound card, the names (like Front L / R) may vary.
3. Configure Renoise. Setup to listen true multichannel 5.1 sound.
You already have the sound card drivers installed and you also have the Renoise 3.3.2 or higher version software installed within Windows 10/11.
- Run Renoise. To start your project you can use a preconfigured song template with your tastes…
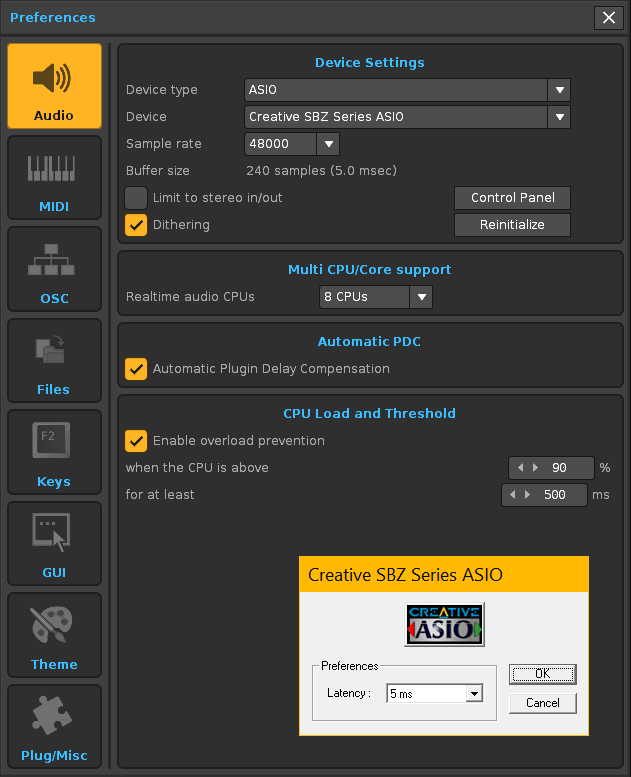
- Go to Renoise: Edit/Preferences/Audio
- Select: Device type → Asio
- Select: Device → Creative SBZ Series ASIO (or the name of your sound card)
- Sample Rate → 41000 or 48000 (…also depends on the size of the buffer high enough)
- Buffer size → go to “Control Panel” Button. A window appear. Configure the ASIO Latency here → 5 ms, 10 ms… The longer in ms, the more buffer size and vice versa.
If you have doubts about the terms “sample rate”, “latency”, “buffer size”, etc. please refer to the Renoise User Manual or or check out the Renoise forums.
After understanding and setting up all these settings in Renoise, you can now route your tracks to each channel.
4. Route tracks to independent channels in 5.1 configuration
Renoise has 4 types of track:
- Note track
- Group track
- Send track
- Master Track
By default, the first 3 are routed to the Master Track.
By default, the Master Track is routed directly to the sound card input. Being ASIO it is routed to “Front L / R”. If it were Direct Sound, it would be routed to the name of the sound card, which is equivalent to “Front L / R”, but there would be no possibility of routing to other channels.
So you can force any track to be routed directly to the sound card, ignoring the Master Track, with all that that entails.
Let’s see how to distribute 6 Note Tracks, each one to a different channel to obtain 5.1 multi-channel sound, with the following distribution:
- First track, right front channel: In track DSP Routing change to → Front L/R; Panning → 50 R.
- Second track, front left channel: In track DSP Routing change to → Front L/R; Panning → 50 L.
- Third track, right rear channel: In track DSP Routing change to → Rear L/R; Panning → 50 R.
- Fourth track, left rear channel: In track DSP Routing change to → Rear L/R; Panning → 50 L.
- Fifth track, center front channel: In track DSP Routing change to → Center/Sub; Panning → 50 R.
- Sixth track, subwoofer channel: In track DSP Routing change to → Center/Sub; Panning → 50 L.
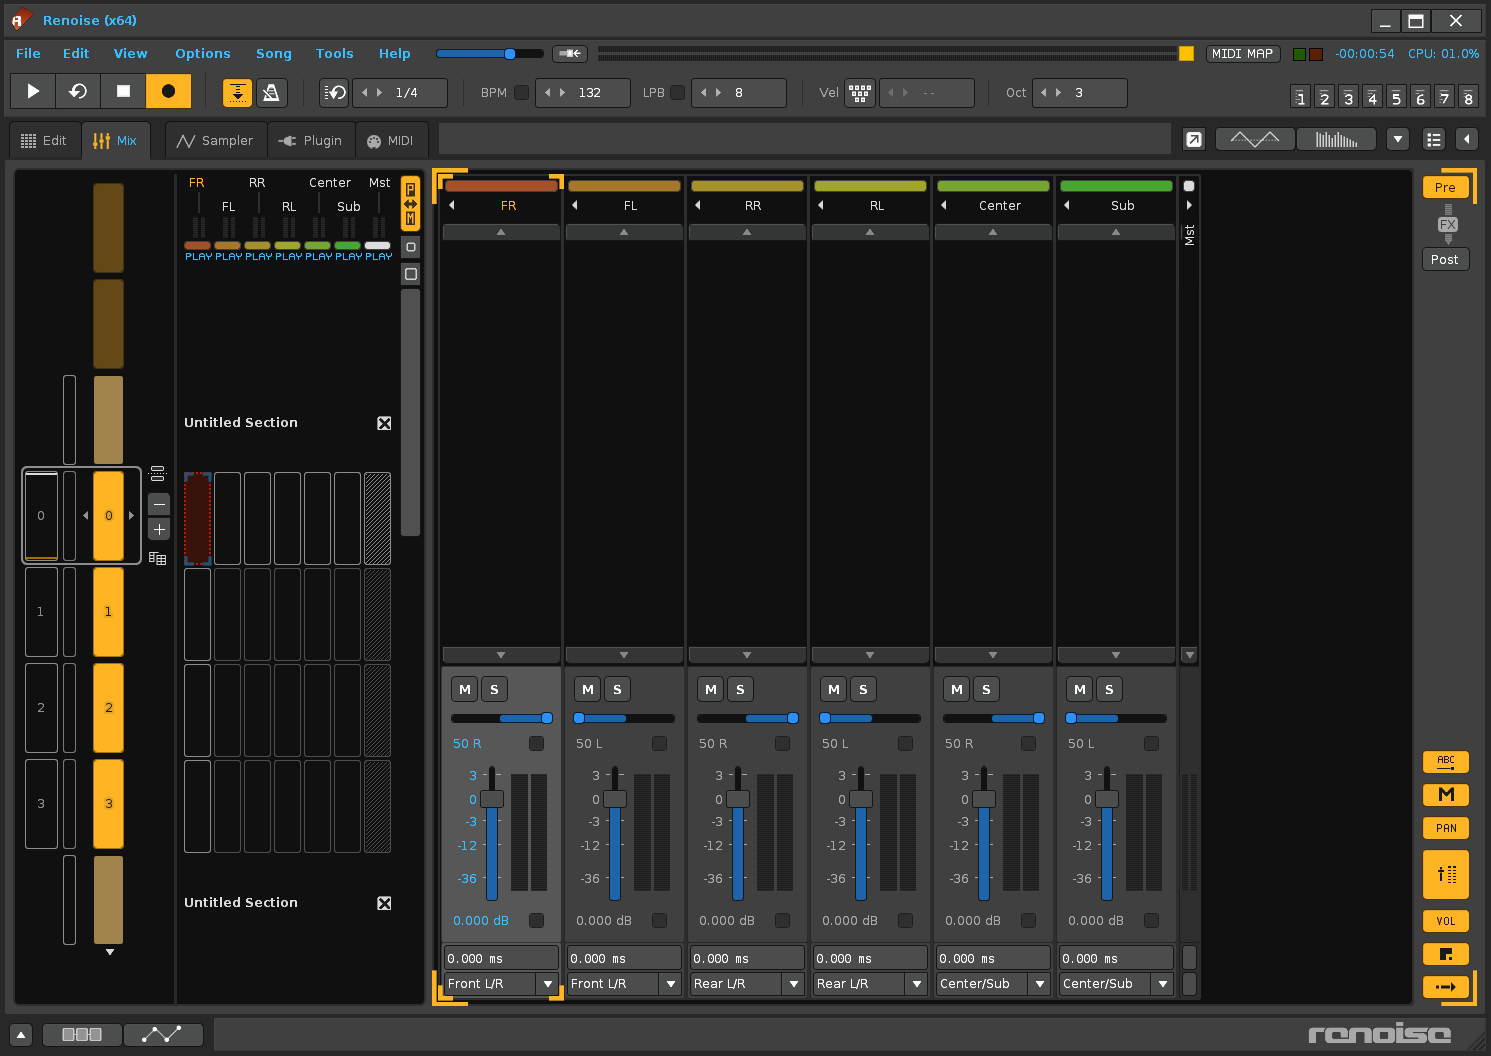
This distribution redirects the sound signal completely separated to 100% to each corresponding channel.
If your song project has 32 note tracks in total, you can redirect all these 32 tracks independently to the desired channels.
5. Working with the panning of the tracks and volume control
Now if you want to change the panning to partially redistribute the sound on 2 channels, you are really playing with three 2-channel systems:
- system 1 front: Front L/R
- system 2 rear: Rear L/R
- system 3 center/subwoofer: Center/Sub
Maybe sharing the sound between the center channel and subwoofer channel doesn’t make much sense. The subwoofer channel is intended to receive desirable low frequencies and ignore all mid and high frequencies depending on the cutoff.
So you can play with system 1 and system 2 to redirect the sounds. And even do it between the two systems and center channel by working with some automation tricks with several tracks to simulate those “crossover pannings”… This is magnificent!
In addition, you can use the group/send tracks as tracks routed to the 3 channel systems of the sound card. To redistribute sound, you must think of each “system” as a group of two channels (left and right).
Important! Keep in mind that when directing the sound of each track directly to the input of the sound card ignoring the Master Track, you must control the volume of each track to avoid cuts in the audio waves. In practice it is like mastering several tracks separately, because they are tracks that do not flow directly to the Master Track, which is the usual one to control the final volume levels. Control the volume of each track!
6. Render the song in true multi-channel 5.1 sound, WAV form (Renoise + other software)
Once you’ve finished the song and saved the project, you can render it in multichannel WAV 5.1 format.
Renoise’s Song Render feature only outputs a 2ch or 2.0 WAV file. This is apparently due to the redirection of all tracks to two channels in the rendering process. Actually, this is a sad limitation of Renoise, which forces you to use other software to build WAVs with more than 2 channels of audio.
The process is indirect. It involves rendering separately the tracks that we have separated from all the channels.
Later, load all these tracks in other audio software that accepts audio tracks to save the final result in a WAV 5.1 file, such as Audacity (Free), Sony Vegas Pro or Adobe Audition, Nero WaveEditor (Free), among many others.
In summary. If you want to listen to your songs in 5.1 multichannel audio, you only need Renoise and an ASIO compatible sound card for Windows 10/11 (or its equivalent for other O.S.).
If you want to save the result in a WAV file in 5.1 multichannel audio format, you will have to use other software to join the result of the tracks.
With Audacity. Convert to 5.1 channels
For example, Audacity is a free software and multilanguage (Download Audacity here):
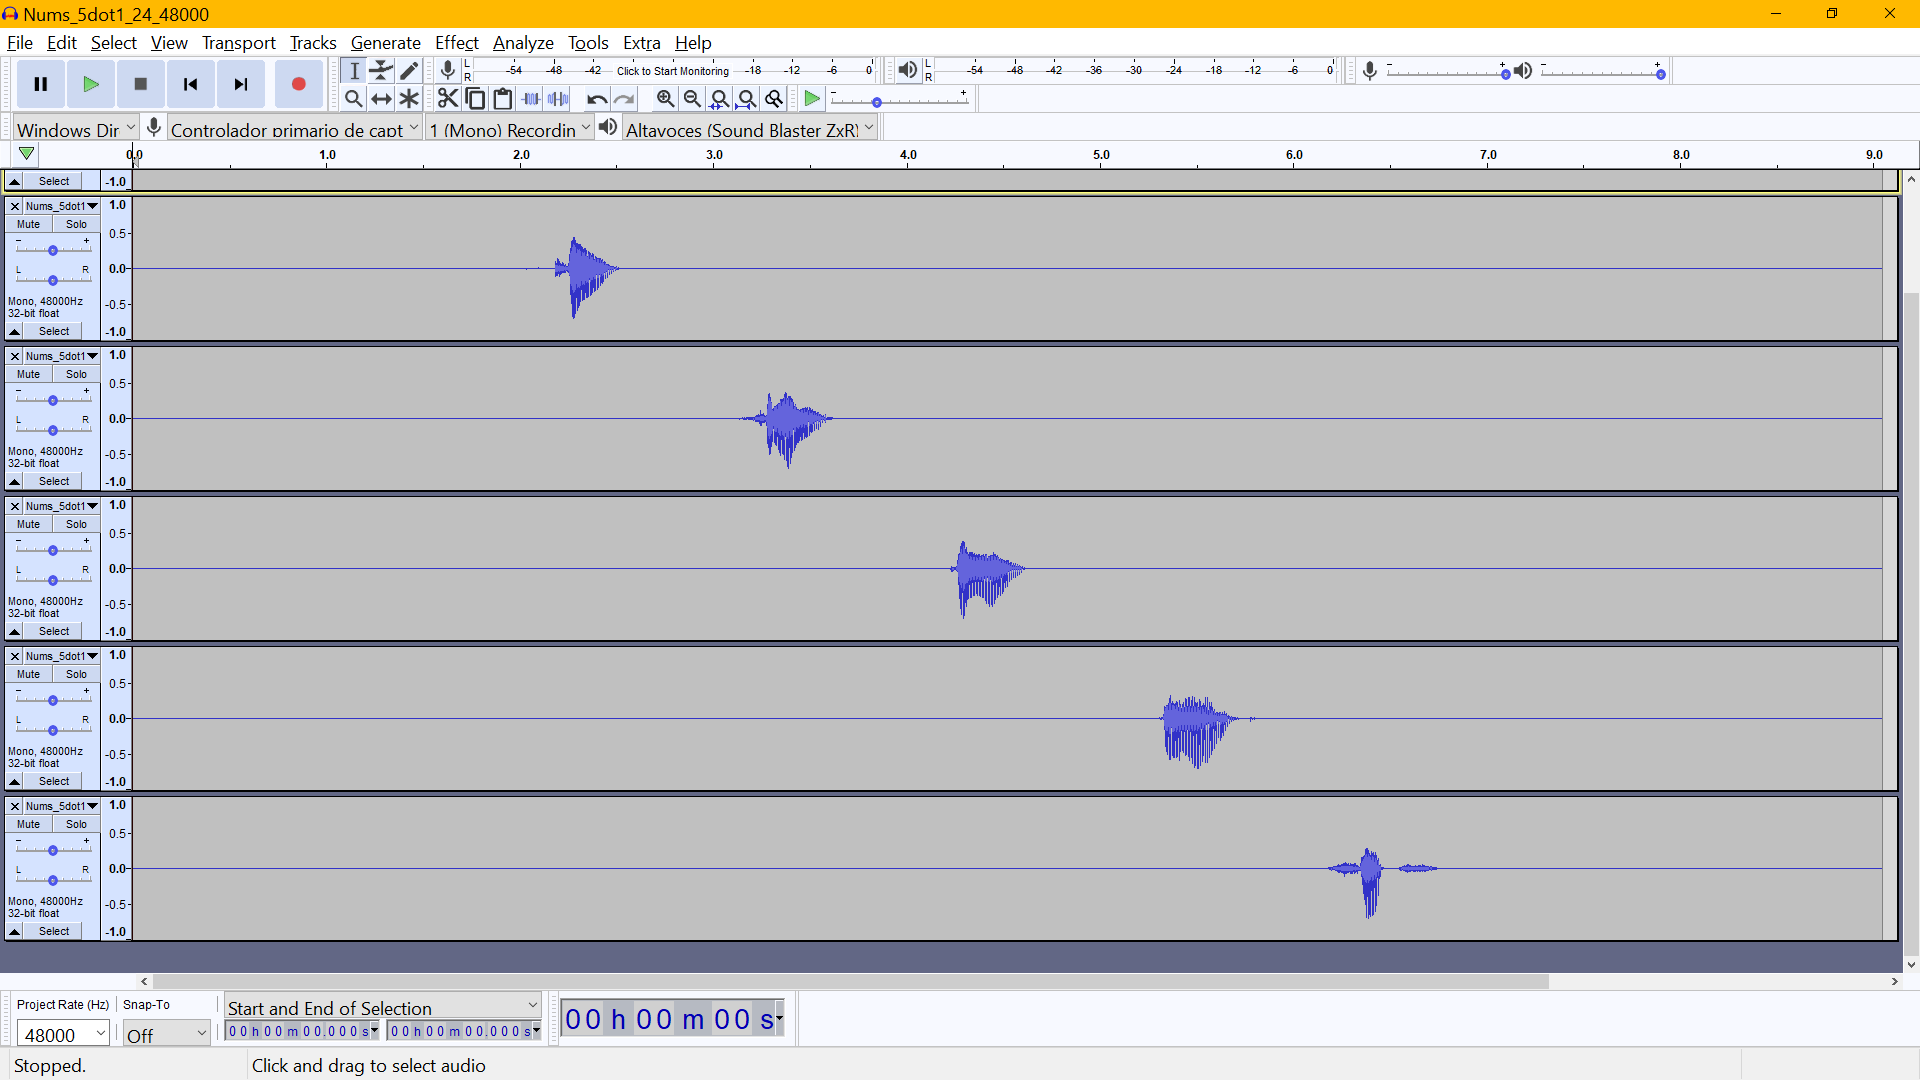
- Load all tracks separately (single wav files). You can drag and drop the files onto the Audacity window.
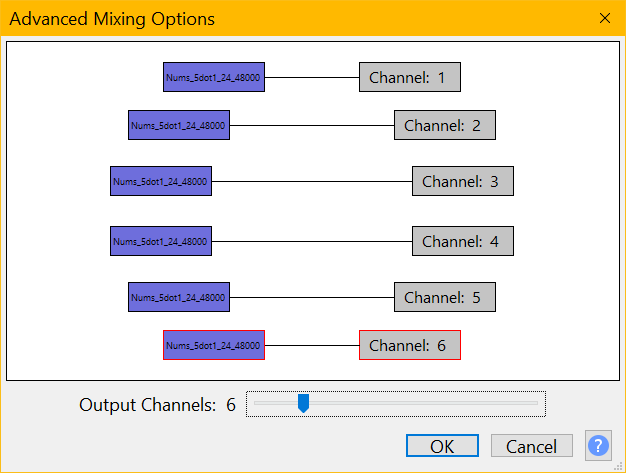
- Go to Audacity: Edit / Preferences: Import / Export and check the box for “Use Advanced Mixing Options.” This will allow you to save the WAV file in 5.1 format or even higher number of channels.
- Finally, go to Audacity: File / Export: Export as WAV and save (here you can change the encoding beforehand). An “Advanced Mixing Options” window will appear. With mouse clicks you can redirect each channel to each audio track. Mixing allows for mono up to 32 separate output channels. 5.1 corresponds to 6 Output Channels.
Voilà, that’s it. After all this process you will get your WAV file in real multichannel 5.1 audio.
Each audio software will have its peculiarities. Consult the user manual of each program for details on how to convert to WAV 5.1.
Remember this is a guide for 5.1 multichannel. It has its equivalents for another number of channels.