Otherwise the volume of the rendered WAV file is too small.
Of course you have to control so that the master level meter does not exceed 0 dB.
It took me a long time to find this simple answer, so I write it down here.
Yes, it’s probably not the worst idea. Nevertheless I somehow still use the default settings. The volume of my songs usually is between -8 and -9 LUFS und there’s a TP of -1. So imo the volume isn’t necessarily too soft. Or do you think something like this (MP3) is too soft? I could push the volume even more. ![]()
does this mean that the “render selection in track” will also be of “actual volume”, not some toned down volume?
and what does this mean for “render sample with fx”, does it do it in actual volume instead of toned down volume?
asking for a friend…
I think there are cases like that, but I would like to render song whose levels(LUFS, TP, etc…) are same as levels I confirmed in making music, to disk. Thus I set track headroom = 0 dB.
“render selection in track” renders a sample toned down by the level of track headroom. however the volume of rendered sample in sample preferences is setted + the level of track headroom, so you dont feel the difference by listening. but amplitudes of sample waveforms are different by the level of track headroom.
I think that it doesn’t affect “render sample with fx”.
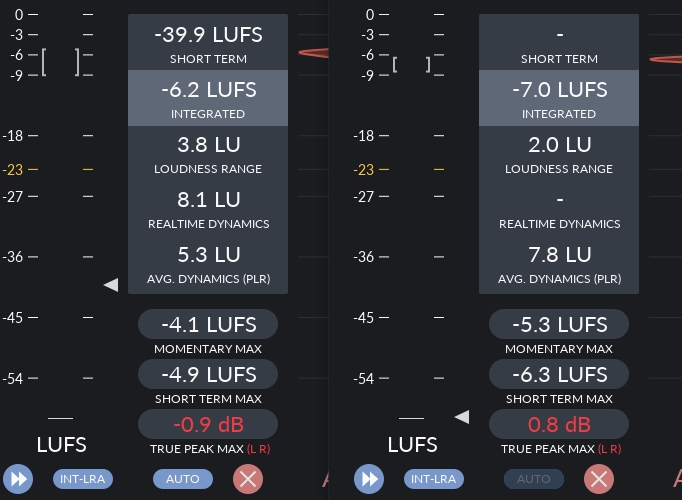
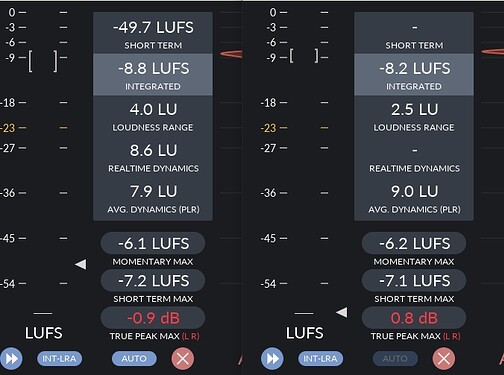
Out of curiosity I’ve checked the values of my recent song (again). Therefore I’ve used two instances of the same loudness meter at the same time, on one hand as an internal plugin and on the other hand as an external standalone version. And the results differ. On the left you can see the results of the plugin and on the right you can see the results of the external standalone version.
Headroom -6 dB:
Headroom 0 db:

As you can see there’s no difference in terms of TP, but LUFS, loudness range etc. are different when using 0 dB headroom instead of -6 dB headroom. And I also noticed a slight “wind sound” in the back when headroom is set to 0 dB. Pretty strange (ok, I didn’t change anything but the headroom value at this point). I wonder what cause the differences between internal and external measurement, especially in terms of TP (it’s always above 0 when measuring external, but it should be -1). And I also wonder why there’s a difference in terms of LUFS of round about 2 dB when you set headroom from -6 dB to 0 dB. If there’s a difference, the difference should be 6 dB and not 2 dB, right? Damn, I have to think about how to master in future. I’ll probably try going with 0 dB headroom and look what happens.
@taktik it feels like this is what afx was talkin about. would be nice if we could get matching results instead of “non-matching”. esp when rendering effects to samples
As far as I understand, Renoise’s track headroom option is applied to the input of a track. So by later changing it, it will totally alter the sound and how dynamic effects will process the audio.
I would consider this option only for total beginners and leave it off always, i.e. save it disabled into the template song. Also there is no such thing like gain staging in a digital daw, most modern plugins also allow audio being over 0dB, as long as the resolution is float32. You can simply lower your master input then.
I will try this next time. But I’m pretty sure it doesn’t affect the issues regarding the differences of internal and external measurements. What I can say for sure: It’s impossible to remix an already mixed song that has a track headroom of 0 dB if you’ve used a value of -6 dB track headroom in the original mix. Impossible! You will have to start from scratch again. If I’ll face any problems while trying, I’ll post it here.
I think I meant more that you shouldn’t care too much about volume range, as long as the meter is not obviously red or barely readable… If your signal is fullly digital you can adjust on the master, or post-gain.
Of course if you use track templates as it is possible in Bitwig, it would then make a lot of sense to use a standard/convention. Btw. I see a lot of people in Bitwig tutorials these days who aim for 0dB on every track and then even hard-clip each by purpose…
I am kind of confused currently which saturation type represents the typical saturation in an analog mixing console, if you drive it “hot”. Recently I heard that it is similar to a soft clipping, so a very simple waveshaping. I somehow doubt that, but no idea. Certainly most brands actually use softclipping for mimic analog hotness. So MWaveshaper might be an interesting try.
A sound of a sample of a instrument flow is like
| Instrument |
↓- HR dB
| Track 1 |
Some effectors
↓
| Master tack |
Some effectors (EQ, Comp and Maximizer, etc…)
Analyzer
Master output gain
↓
| Headphones, Speakers or Rendered wav file |
When no effect, the volume of the rendered wav file from a sample of a instrument is HR dB smaller than the original sample. if you checked the waveform of the sample directly or listened the sample outside of Renoise, they confuse us a bit. From that perspective, I think it’s better to set the HR to 0dB. Of course a feature preventing clipping is lost, and we have to volume down a sample maximized to 0dB everytime.
idk, but I guess a reason of the TP level difference between plugin and standalone may be that you change the master output gain to adjust the volume to a comfortable listening level. The difference of LUFSs between HR=-6dB and HR=0dB is due to the effector’s influence at different HR levels, as @ffx said.
Yes, probably compression and limiting also affects that LUFS value with different HR levels. But there shouldn’t be any difference between internal and external measurement, because it’s the same output with the same values. Months ago I also checked professional productions (some favorites from my collection) with the same standalone loudness meter, and every single one had a TP value above 0, mostly around +2. Furthermore a very low LU range of between 0.5 and 2. So it seems this phenomenon affects every single song in general. Have you ever checked your songs with an external standalone loudness meter? And what’s your average TP in this case?
So you’re talking about sampling now? In case of sampling a track headroom of 0 dB is necessary indeed, but I was thinking about mastering a song. If the track headroom only affects the input signal just like @ffx was saying, it shouldn’t be a problem in any case, whether track headroom is set to -6 dB or 0 dB, right? The output is crucial here, right? Nevertheless I will check what happens when mixing with a track headroom of 0 dB. I’ll see If it really make a difference or not.
Idk, but I can say that I always have to decrease the volume of almost every instrument for mixing reasons by between 8 and 25 dB. The only instrument that usually keeps 0 dB volume is the kick. And I never changed the default settings in case of track headroom within 13 years.
It would be interesting to know how many users changed track headroom from -6 to 0 dB because of mixing and mastering. To see some reviews about the experiences. Anyway, in my experience Renoise always has very good and optimized default settings in general, and I would be surprised if the track headroom value of -6 wouldn’t make any sense in case of mixing and mastering. But I will find out. ![]()
I set mine to -12. That gives me more headroom and i often end up with volumes too loud due to effects and such anyway.
