I have been using Blender for a while now and i think it’s a fantastic piece of software that just keeps getting better and better. My goal is to be able to make some tutorials especially directed to Renoise users, different techniques to make animations react to your music without too much effort.
First i will try to make something similar to this:
Does any of you have a request to what they want me to make as a tutorial?
A banging cat perhaps? Or a spacship in outer space? Logo animations? Abstract animations?
Very cool. I would like to know how to get Blender to respond to different MIDI messages.
I made a video using Processing that had different events triggered by MIDI messages sent by Renoise, would love to see how to do that in Blender (or Unity, for that matter : ) )
I don’t know about any way to use MIDI from Renoise to use in Blender, but i will look into it as that seems pretty handy.
The technique i use is simply to render the stems i want to animate and use the audio curve to control just about anything in Blender. By switching out the instruments before you bounce the tracks, with a single cycle wave you can use a AHDSR to get some control of the animations and avoid uneven spikes in amplitude.
That sounds doable, some fractal-ish color stars perhaps and maybe some liquid simulations…i think i should be able to make a simulation of liquid swirling down a drain. Radially symmetric patterns should be quite easy. There are also an addon that makes gears, could be nice for some mechanical animations.
For the video above i used the Eevee renderer which is way faster, but it can’t do as realistic shadows or raytracing like cycles. Using Cycles i’d say you need at least 30 seconds of render time per frame all depending on how complex the scene is. Without a decent GPU it will probably take a lot longer.
Do you want me to focus on Eevee renders or Cycles? Cycles is a lot easier to make things look great, but stylized stuff like the example above could work well using Eevee.
I sort of assumed it would be built-in (because it seems to do everything else), but apparently not. However, I came across this add-on that allows for MIDI and OSC input:
I don’t know all that much how MIDI works, but i think it would be a bit tricky to use to animate things in Blender. You could use volume pots or pitch wheel to move things around, but if you just hit a key it will only send one specific code value while at least most Blender animations needs two or more values to interpolate between.
There aren’t any on/off operations that i can think of in Blender that is useful for animations. I think it would be fairly easy to make a script that takes the single value and turns it into a curve that you could use to animate stuff, but i don’t know much about scripting so i can’t really say.
I might be wrong though, i haven’t put much effort into figuring out how it works.
Fractals are possible in Blender, actually you can make fractals in 2D, 3D and even 4D, but that is quite complicated and i would only be able to copy someone elses tutorials if i was going to try this and i don’t see the point in doing that. There are plenty of fractal tutorials on youtube, but i would think that you probably need a basic knowledge of how blender works before you dive into that.
I think there are some addons that creates fractals in blender, but i haven’t looked into those.
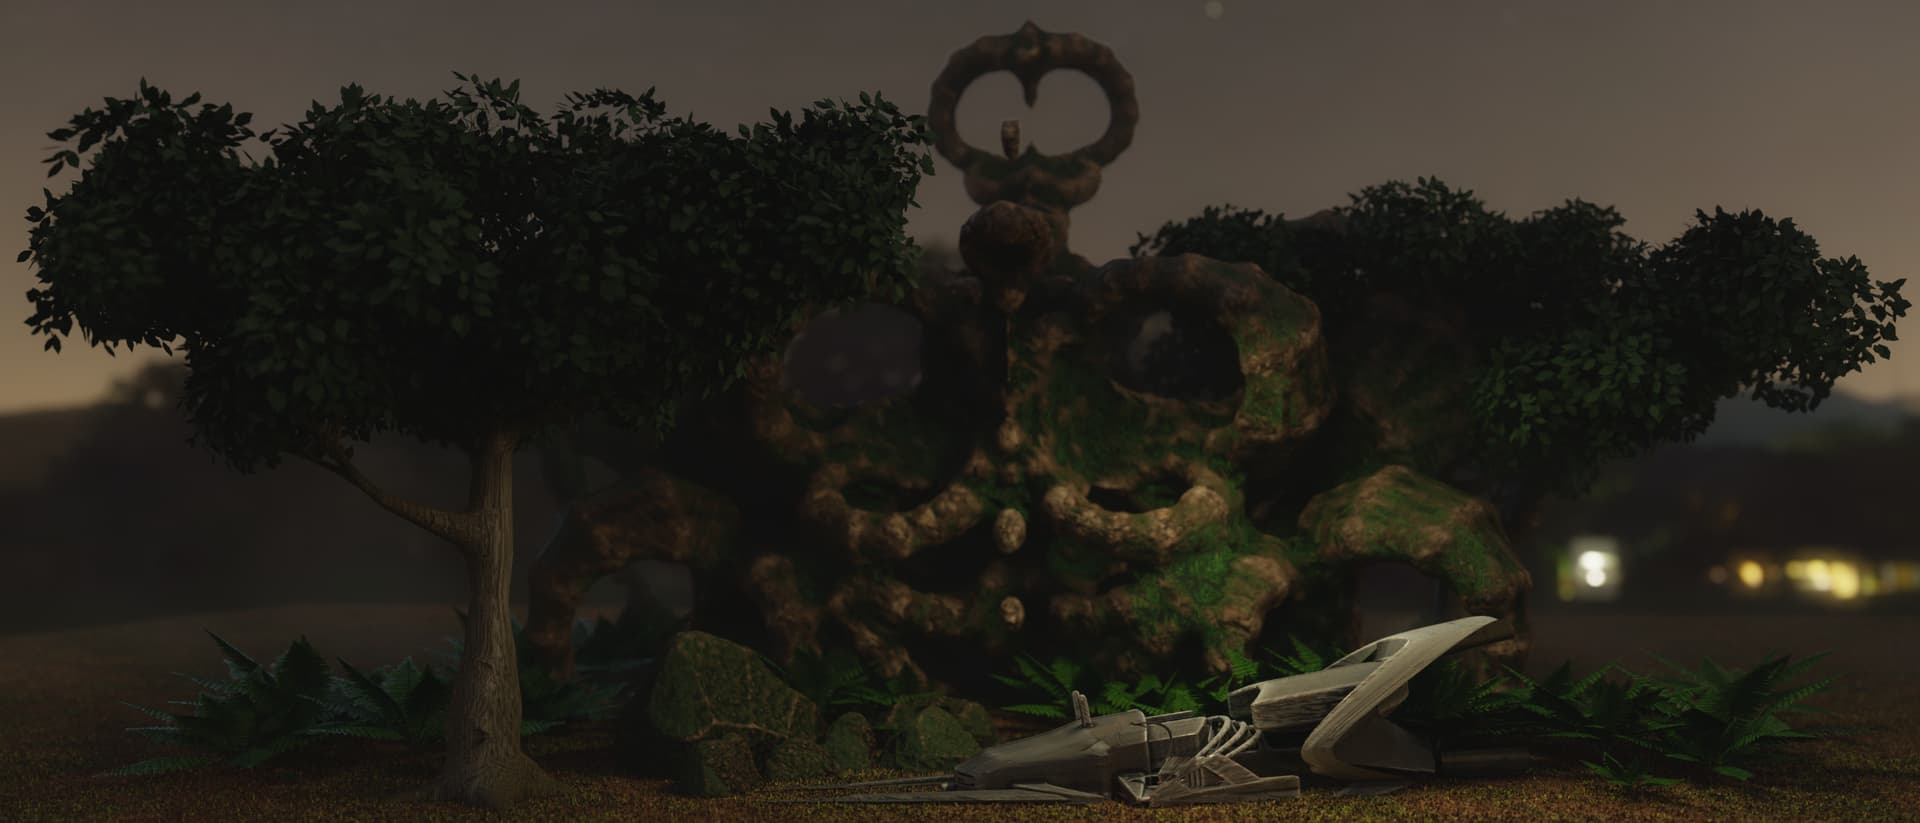
I suggest looking into the free software Mandelbulb 3D if you want to make fractal animations as that is an app that is specifically designed for making all kinds of fractals in 3D space. It’s a great app imo and can make some very stunning images and animations if you put some effort into it. Not the best GUI, but it gets the job done. You can actually also use it to create a fractal 3D object that can be used in Blender, but it has its limits as it gets very large and resource intensive with high detailed fractals and you can never make a mesh object that is a proper fractal with endless patterns. It only captures a fraction of a 3D fractal and turns it into a mesh object.
Here is an image i made in Blender and the rock formation thingy in the background was created in Mandelbulb 3D:
Anyhow i don’t want to make very complicated stuff, i want to keep it fairly easy so that you don’t have to be a math genious to understand what’s going on. Tricks to make some fancy imagery without too much effort.
I’m sorry for the delay, but i have tried to comment along so many times now and i end up using 3 times as long and it’s just a mess, so i will start without commentary and this is probably one of the easiest things you could do to get started:
If you have any questions just ask in this thread and i’ll try to answer the best i can.
In the next one i plan to use variations of this animation as parts of a new animation
Is it easy enough to understand what i do without commentary? I will do some more attempts where i explain why i do the different things. Maybe i should make a separate video just explaining some of the most important things you should know in blender?
I realised that making the tunnel would be a little too long and advanced for the first video, but i will get to that later.
This first video shows many things that is good to know, but it’s not really proper 3D work and it use the light output and the cycles renderer. The reason why i do this is because cycles is the only renderer that can do proper reflections that is needed for simulating a real kaleidoscope and the light output allows us to reduce the render calculations to the bare minimum.
I also use the glossy shader and emission shader to reduce the calculations as they are more light weight than the principled bsdf shader even though you could use it to produce the same result.
The reason why i can set the “max samples” to as low as 1 sample is because the glossy surface of the triangular prism is completely white. When it is completely white and the roughness is 0 the reflection will be absolute and will not fade anything no matter how many times it reflects back and forth. This is not possible in real world of course, but blender is not the real world.
The darker you set the color of the glossy surface the more samples would be needed to make a smooth render of the reflections.
Here’s a list of key commands and bindings i use in this video:
Shift + a = opens the add menu
X = opens the delete menu/deletes selected object
G = move selected - press “g” and then “y” and you move selected along the y axis, “x” moves along the x axis and “z” moves along z axis. Press “g” then “y” then “5” and it will move 5 units along the y axis or “-5” to move 5 units in the other direction along the y axis. 1 unit is 1 metre by default. This principle also applies to the “s” (scale) and “r” (rotate)
Ctrl + alt + 0/ins (on the numpad) = moves camera to current view
If you have no numpad you can find it in the view menu under “align view”
To navigate you can use the numpad: 1 to front view, 3 to side view, 7 to top view and 9 to flip
If you don’t have a numpad you can click on the navigater on top right of the viewport.
Almost any function in blender is possible to hide or disable, so if you are missing something it’s most likely it’s just hidden.
If you’re stuck on something don’t be afraid to ask. I can’t count have many times i’ve been stuck on something just to find out the fix is super easy.
I think it’s clear enough what’s going on in this video that i can follow along – it was definitely enough information to get me experimenting on my own and tweaking some of the nodes that you used and extrapolating on it. Thanks a lot!
That’s good to hear.
You can use any type of texture on the plane emitter, i only used the voronoi texture as an example. You could use images as textures and even animations too and i will get a bit into how to use animated textures in the next video.
The bake to audio function works for just about anything and the principle is always the same, select whatever you want to animate, go to frame one, insert keyframe on the property and bake sound to f-curve in the graph editor.
When you unbake the curve you can do various things to manipulate the curve like decimating it, which can be useful to reduce the amount of keyframes in the curve. A little about that in the next video.