Potentially embarassing list of things I'm still not sure about in Renoise

Hello,

I have a few questions that I still haven’t found a satisfactory answer to or otherwise was unable to process properly following a review of the manual/tutorials. Don’t judge me!

  1. I have tried to use the glide command to control a VST plug-in’s notes and the glide does not happen, I know that this is listed as a sample command so is it simply that anything under that header will not apply to MIDI? For example, the retrigger command and the U and D commands?

  2. When in the sample waveform editor, which ruler option is best for cutting samples to precise lengths relative to the song tempo? Beats? If so, I do struggle to parse the numbers and quite what they mean.

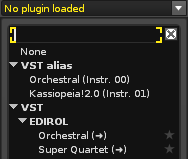
  3. What is the use case for VST aliasing?

  4. I like to use the Cut command in the format “C0x” where x is 0-F for the point in the line where I want the sample sound to cut to zero, but this doesn’t always work - sometimes I will type “C0F” and the sample keeps playing after receiving the command. If I change it to “C0B” it will work - any idea what the reason for this is?

  5. Am I missing out by not using the formula device? I am intrigued by it but honestly, without knowing what is possible, I can’t even begin to comprehend what I could be doing with it.

  6. I enjoy using Signal Followers as an alternative to sidechain compression and also to musically relate two different tracks - however, why is it when I reduce the sensitivity the reaction speed of the device and it’s output increases?

  7. The automation window sometimes only shows the time period of the selected pattern, other times it shows the entire song length for the selected parameter and I am unsure why this is. I must be missing something.

  8. Phrases are something I am really under-utilising. For example, I have previously entered a short phrase to create an arpeggio using the phrase to define the relationship between the notes “C4 - D#4 - G4” and when I go back to the pattern editor and hold down, say, F4 I get an arpeggio of the correct F minor triad. However, let’s say I use a phrase to sequence the hits of a breakbeat - do I HAVE to map the phrase to a specific key or keyzone and if not, what key do I need to press to play it back correctly? I do get a little lost with phrases.

  9. Can I issue an LFO reset command in the pattern editor for an LFO that is part of a sampler-level modulation chain? I.E. so that the LFO correctly resets it’s phase at the start of a pattern? Currently, I just assign a macro and LFO modulate that instead.

I don’t have Renoise open right now, but I think these are the main questions I have for now.
1 Like

For Q4, possibly the reason why C0B works and C0F doesn’t might have something to do with the ‘Ticks Per Line’ setting in the Song Options dialog → (Song Options - Renoise User Manual)

By default it is set to 12, your ‘C0F’ command would probably start working if you were to set that to 16. In other words the 'C’ut (and probably others that work with ticks per line) effect command is also dependent on that setting.

1 Like

Of course! Yes, thanks.

please provide screenshot

I will later on today when I can access Renoise.

  1. Yeah that’s only working for samples. You have to use portamento for VST/Midi or maybe automate pitchbend with “Instr. MIDI Control”.

  2. Beats are split into Lines Per Beat (LPB). Try change the LPB while in sample editor and see.

  3. I just read an old explanation that it’s useful if you want to sent midi/note-data to the aliased instrument, I don’t use it.

  1. From the Manual

“These commands only apply to samples and will have no effect on the Plugin or MIDI components of an Instrument.”

Effect Commands - Renoise User Manual

  1. I would say that the Beats Ruler would probably be most useful for keeping aligned with Tempo. This ruler is relative to your Tempo and LPB settings, changing them will alter the display of the ruler. Also, remember that you have to keep in mind your LPB in realtion to the beats. Chopping a Sample to be 4 beats long (so right around the 5 on the ruler) will leave you with something that will need 16 Lines to play at 4 LPB.
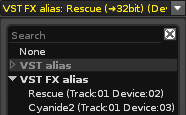
  1. Plugin Effect Aliasing

Most plugin effect parameters can be controlled by Automation or through MIDI Mapping. One of the things that cannot be changed by these methods though, is the effect’s preset (or program). Nor will a plugin accept note data. By treating a plugin effect like a plugin instrument though, these things are possible, and this is done by creating an Effect Alias.

Just put the effect into the track you want to use it on, same as usual, then go to the Plugin tab and select it from the FX alias list.

3.0 plugin-fxalias.png

Now you can use a MIDI controller or an *Instrument MIDI Control device to send MIDI data to the effect and change the preset as a song is playing. Very few plugin effects accept note data, but for those that do, you can now play and record notes to control how the sound is being processed. The most common example of this are vocoders, but it really just depends on the specific plugin and how it chooses to use incoming note data.

You may find it useful to watch a short video on the subject.

Plugin Aliases (multi-timbral plugins)

Some plugins allow the use of multiple MIDI channels to play different sounds from a single plugin instance. This is not absolutely necessary, as you can always load a separate instance of a plugin to use a different sound, but it can be helpful to save on CPU consumption. To find out if your plugin supports this, search for the keyword “multi-timbral” or “routing” in the plugin’s manual.

To create an alias, first load your chosen plugin into an instrument slot, use the Instrument Selector to select another instrument slot and then open the plugin list again. You will see at the top of the list is the new category, “VST Aliases” (or “AU Aliases” if you’ve used an Audio Unit). The aliases refer to the previously loaded plugin. Double-click on one of the aliases in the list to create it, then change the channel number to use it.

3.0 plugin-alias.png

The instrument is shown in the Instrument Selector with its alias name:

3.0 instrumentselector-alias.png

Note that any changes made to the options in the plugin properties panel, except for “Channel” and “Transpose”, will be applied to all of the aliases, as well as the original plugin. Furthermore, deleting the original plugin will also delete all of the aliases. The Audio Routing option is used to assign different plugin sounds to different outputs.

  1. Probably, but so are many of us. I’d recommend doing a search here in the Forum for “Formula Device.”
  1. Press Q (which is C-4, middle C). Specifying the sample in the sample column and adjusting the keytracking settings to “None” may help with the breakbeats.

Phrase Editor - Renoise User Manual

  1. Yes. Right Click the “Reset” button in the *LFO and the currently playing line in your Pattern with now have a command that resets your LFO.

“Moving a device’s slider will also show the Effect Command in the Lower Status Bar. Right-clicking a slider will automatically record the parameter changes into the track’s Master FX Column when pattern Automation recording mode is set record into the pattern.”

Effect Commands - Renoise User Manual

2 Likes

You can zoom in and out by using the mouse wheel. Also check the manual.

  1. asking questions, whereas answers can be found in the manual (Product owners invested awful lot of time into creating such a great documentation for Renoise)
  2. you could invest less time into testing stuff that you asked about - and answered them yourself both much quicker, and with much more understanding…

RTFM should be an organization these days…

i think this is related to the ‘lock’ button, which locks to specific pattern (which is beautifully demonstrated with the GIF in the documentation)
3.2_automation-zoomlevels
taken from Graphical Automation - Renoise User Manual

1 Like

I understand that, I do suffer with some neurological stuff and there are times I literally can’t get a handle on stuff without asking questions. Sorry.

5 Likes

This is just an option. You can also use the mouse wheel.

You can zoom in and out of the Automation envelope by placing the mouse pointer over the grid and scrolling the mouse wheel. The default zoom level is a single pattern, with the x-axis showing the full range of the pattern’s line-numbers

1 Like

Thanks for the detailed response.

1 Like

This topic was automatically closed 2 days after the last reply. New replies are no longer allowed.