Piece made with Renoise, Analog Lab, Synthmaster, and some samples. I hope you enjoy it. Happy listening….
Good instrumentation, I get the idea. But I suggest a quicker buildup. Don’t wait too long until you add new instruments. Drop 1:14-1:21, that part isn’t necessary, use the following part 1:21-1:35 as the intended break. There’s no variation from 1:35 to 2:49, at 2:50 only a clap was added and it takes another 30 seconds until you finally added some melody related stuff, which is way too long. And on top of that it doesn’t last long, it disappears shortly after that insted of adding more melody related stuff. So basically almost the whole tune is a drumbeat. You should speed up your buildup, increase variations and bring more sounds in general. And follow the 2-instrument-rule, which means when you add instruments while building your song, add at least 2 at the same time. Faster buildup, more variations, more options.
2 Likes
Hello
First of all, thank you for taking the time to listen…
It’s true, I let some time pass in the song; maybe I was lacking inspiration…
I wanted to create a dynamic with the bass, then I had the late idea to include a synth, but I’m getting a bit lost in all that…
I’m going to shorten the song and review my synth leads
maybe change the spirit of the song…
In any case, I’ve taken note of your suggestions; that’s how we move forward…
hi,
Here is the improved version of ‘The Sound of the Forest.’ I made a few changes and I hope you will like it.
Enjoy listening, and feel free to leave a comment.
1 Like
The buildup is much better and there’s more variation. Well done. But you didn’t follow the two instrument rule consistently and imho there are still too little instruments. You could keep it simple and quite monotone, but in this case there should be more instruments in the background to fill the gaps, for example some arpeggiated short synths, plucks, effects or whatever. The part between 1:43 and 2:12 works best, that’s the right direction. Nevertheless the style isn’t “Electro”, “Electronic” as you stated before fits better. Anyway, your track is a good “template” for a remix. You could post your file, people could remix your song and get those files back to you, and you could analyze those files and learn something from it. Are you using VSTs, and if yes which ones?
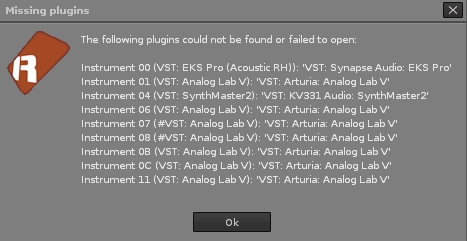
Hello, I did use VSTs, Analog Lab 5, SyntheMaster 2, and Synapse’s EKS Pro for the punchy kick
the rest is samples
Here is the track in xrns format.
If you want to remix it, no problem.
have a good day
That’s not possible due to too many missing plugins. Half of your instruments including all the “main stuff” of the song are missing. I can basically only hear kick, hat, open hat and clap, that’s it.
But I can see why your sound sounds the way it sounds. You’re not using any track effect chains and there aren’t any devices in almost all of your tracks, instead you’re trying to manipulate the sound by three devices in a wrong order in the master track:

That doesn’t make sense. Don’t EQ and compress stuff in your master track, use effect chains including EQ and compressors in your instrument tracks and/or groups/busses instead. If you’re using a native Renoise filter, use the digital filter. Rename your tracks in order to keep the overview (kick track = “kick”, and so on).
You can have a look at my template in order to get an idea if you want:
TNT template.xrns (17.0 KB)
Of course this is just a very basic setup to begin with and one of many options how you could do it. If you don’t know how to continue just ask. Or provide a file that doesn’t include too many VSTs, in this case someone could do some works and send the file back to you, so that you can see how it was done. Good luck and have a nice day too.
Hello,
Yes, I know, actually I focused on the composition instead of focusing on the tracks…
I know it’s not organized or intuitive, and I didn’t create a send track to unclog the master. I’ll have to look at your example to see how to organize it.
Here’s a beginner template in case my personal template is “too much” for the moment:
beginner template.xrns (5.4 KB)
No sends, no fx tracks, no specific fx devices, just the very basics. All you need to do in order to use it is to download this free plugin, everything else are native Renoise devices. This setting is the minimum requirement for a reasonable good result imho. So all you need is an EQ, filters and a compressor in each instrument track. The master track contains a monoizer and a maximizer, and additionally a stereo expander in mono for checking the balance while mixing (turn it on while mixing, otherwise turn it off). That’s it.
1 Like
Hello,
thank you for making this beginner template. I tested some stuff and I only put samples… you can continue the track if you want or improve it.
Enjoy listening, it’s just a draft.
Have fun
On my side, I will try to improve myself. Thanks again.
Interesting approach. 10/4 time and an offset clap. What’s the idea?
So according to your note this is intended to be a collab project. If you’re looking for a collab, one need to know which VSTs you’ve got in order to find matching VSTs with the potential collab partner. Personally I only use samples when it comes to drums. I don’t even have any samples that aren’t drums anymore.
Anyway, here’s an improved version:
beginner temp.xrns (1.6 MB)
I improved the mix (volume of instruments), I’ve deleted the silence at the beginning of the hihat’s waveform (they were slightly out of sync), I’ve corrected the EQ and filter settings of synth and bass and last but not least I’ve added a sidechain device on the kick track that affects the compressor in the bass track.
In general: Don’t boost low ends on synths, you should do the contrary instead. Otherwise you’ll get a muddy mix that’s too quiet.
Edit:
I’ve forgot to turn off the stereo expander in the master track. So just turn it off in order to hear stereo sound again. ![]()
Hello, I would also like to get some feedback on this track in terms of mixing and mastering to get an idea of the work I need to do on my tracks…
I’m sharing the XRNS file, it’s just samples.
Have fun
Enjoy listening
Hi,
- Take a look again at the beginner template and put those track devices in the same order with the same basic values in each track (EQ, LP filter, HP filter and compressor). You can only almost always spare the HP filter for the kick, mostly also for the bass (unless the bass is rumbling or too heavy).
- Put a monoizer, maximizer and stereo expander (mono) in the master track.
- Adjust values of the effect devices in the track effect chain to your needs, but don’t overdo filtering, and especially in your case EQing
- Turn on “Auto gain”, turn up the volume to the max and play the song (gain will be automatically reduced until it doesn’t clip)

- Turn on the stereo expander (mono) in the master track and start mixing (adjusting loudness of instruments)
- If necessary or if you’re unsure repeat point 4 after mixing
- Make sure that kick and snare are always prominent (louder than everything else)
- Add a sidechain device to the kick track effect chain and link it with the compressor in the bass track effect chain
- If you want to add more instruments, duplicate a track that contains the same type of instrument to avoid manually adding the same basic effect devices to the track effect chain (which means less unnecessary work).
- Have fun
hi,
I tried to do as you told me, I tried to put myself on auto gain but it doesn’t have the same result… I didn’t understand the sidechain… Here is the XRNS, take a look at it when you have time. Thanks again.
Hi,
I’m willing to help, but if you’re partially doing the opposite of what I told you, it doesn’t make sense. As I already wrote, the stereo expander in the master track ist ONLY for mixing and therefore it has to be mono! Turn it off if you’re not mixing! If you’re expanding the stereo signal in the master track, you’re ruining the whole mix. You also forgot to put a compressor and an HP filter in each instrument track. Instead you’ve put a bus compressor after the maximizer in the master track, but you shouldn’t do that, especially not in that order. Just start a song by using the beginner template. And no worries about the sidechain at this point, you’re not using any bass in your track and there are only a few instruments, so at the moment sidechaining isn’t necessary. If you want to know how it works just have a look at the other song I’ve edited for you. In the current song I’ve added those basic devices (see beginner template) again (also the monoizer in the master track) and adjusted the mix. Here you go:
wind of rock 2 edit.xrns (5.0 MB)
Thanks again, but I’ll manage on my own, you’ve already helped me quite a lot. I will try to make other songs in the future with your recommendations. Thanks and see you soon.
All right, that’s the best way for sustainable learning anyway. Good luck! ![]()
Just keep in mind to manage the instrument’s frequencies by EQing and filtering and to tame its peaks by compressing. In the master track you only need to limit in order to avoid clipping.
1 Like