Isn’t it just enough to hardcode the appropriate midi messages in your tool? Given that the midi messages are in normal 7-bit { int, int, int } format.
Check what codes are being received in the Renoise midi monitor. Opening a MIDI device in LUA and receiving/reacting to the messages is pretty straight forward (I guess you’ve already done this?).
I think those 6 buttons, and others of the Keylab MK2 do not send MIDI messages, but they work with the MCU protocol (which I do not really know how it works). If they were normal buttons for the MIDI input, I would be no problem.
It seems that the way is to create a tool that detects MCU messages, such as Duplex. But I want to know how all that works and create a specific tool for this controller keyboard.
Duplex also works with messages for the MIDI input and also with the MCU protocol, both input and output (it is possible to make the physical keyboard buttons illuminate and coordinate with Renoise).
It would be necessary to develop all this to create a specific tool. Everything that I advance will be published here. Maybe other users can build their tools for other control keyboards that use MCU or HUI.
So far, I understand that there are 3 protocols:
MIDI. This one I have clear (at least the input).
MCU. This is the subject to deal with.
HUI. This one I discard.
With the Arturia Keylab MK2, 80% of the controls work with MIDI. The rest seem to work with the MCU protocol.
In 2003, the Mackie Control Universal (MCU) protocol was introduced, combining together functionality from Mackie Control, Logic Control and HUI into a single protocol. DAWs which support MCU (in addition to those which support HUI) include Ableton Live, Studio One, Cubase, and Reason.
I’m not an expert either, but unless I’m out of the blue, everything is MIDI messages (worst case sysex or maybe even multiple midi messages(?)). At least that’s true for my x-touch controller despite what fancy mode i set it to. From my understanding, MCU/HUI are just standardized interfaces using the MIDI protocol.
Given that it’s not a hardware issue (some hardware requires setup), and that you checked all ticks in the renoise midi monitor without receiving anything, I would make a simple midi debug tool printing all messages recieved. This is a good starting point (do note the separate callback needed to catch sysex data):
If duplex can do it, it should not be too tricky imo.
I have done some tests to print the MIDI values, testing this function inside TestPad.lua:
local ART_MIDI_IN_DEVICE_1=1
local ART_MIDI_DEVICE_1 = nil
function arturia_midi_in_pad()
  local ART_INPUTS = renoise.Midi.available_input_devices()
  local ART_DEVICE_NAME = ART_INPUTS[ART_MIDI_IN_DEVICE_1]
  if not table.is_empty( ART_INPUTS ) then
    if ( ART_DEVICE_NAME == nil ) then
      if ( ART_MIDI_DEVICE_1 and ART_MIDI_DEVICE_1.is_open == true ) then ART_MIDI_DEVICE_1:close() end
      return
    else
      local function midi_callback(message)
        assert(#message == 3)
        assert(message[1] >= 0 and message[1] <= 0xff)
        assert(message[2] >= 0 and message[2] <= 0xff)
        assert(message[3] >= 0 and message[3] <= 0xff)
        print(("%s: got MIDI %X %X %X"):format(ART_DEVICE_NAME, message[1], message[2], message[3]))
      end
      if ( ART_MIDI_DEVICE_1 and ART_MIDI_DEVICE_1.is_open == true ) then
        return
      else
        ART_MIDI_DEVICE_1 = renoise.Midi.create_input_device( ART_DEVICE_NAME, midi_callback )
      end
    end
  end
end
arturia_midi_in_pad()
Only print values with controls that work with MIDI directly. Transportation controls still do not work.
…
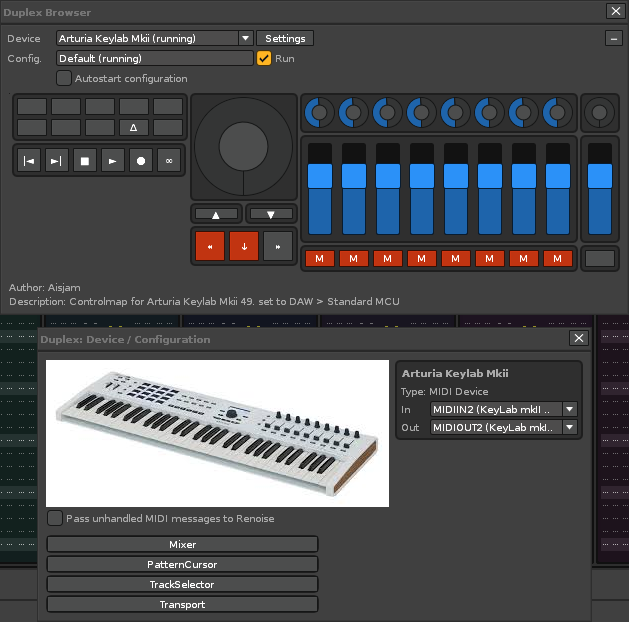
Here is a package that I have updated, provided by @Aisjam, so that the Keylab MK2 49 is compatible with Duplex:
It contains a folder called “Arturia_Keylab_Mkii_49” which must be in the following route:
"…Scripts\Tools\com.renoise.Duplex.xrnx\Duplex\Controllers\ ", that is, it would look like this:
“…Scripts\Tools\com.renoise.Duplex.xrnx\Duplex\Controllers\Arturia_Keylab_Mkii_49”
With this installed, Duplex works correctly with the 49-key MKII keylab. The transport buttons work and also the illumination of these buttons when activating the output. It is not completely complete. There are some things that need to be finished. But this works with Duplex.
The idea is to extract what is necessary to make a clean tool, which basically would be a small window with buttons and other controls, similar to the physical appearance of the Keylab MK2.
I do not know how Duplex works internally. It seems that the GUI of the control panel is an XML. The aspect is this:
The final tool would be something similar, but it would only work for the Arturia KeyLab mk2 49 and the Arturia KeyLab mk2 61 (only change the name of the device, I think). I think it could achieve more flexibility with the controls, to have more control options.
The tool should always work in the background when using the KeyLAB mk2 driver. In this way, other window tools can be used at the same time.
When I have time, I will contact @Aisjam to see if he can help. With knowing how to operate a single button, I think I could build everything else.
I still do not know how to do that. I have been looking at the Duplex documentation, but it only shows instructions on how to build an application for Duplex.
I really do not have any documentation to base myself on to start creating this tool. I do not know how to get the messages.
I suppose that, when obtaining the messages, functions can be executed through conditions. Basically I lack everything that has to do with the interpretation of messages.
As I understand it, MCU uses also note values as messages, and it may be the case to record those notes by accident in the pattern editor, if the entries are misconfigured.
Duplex is able to print those messages in Renoise’s MIDI panel. But looking at the code of the Duplex I’m in a mess. I do not know how he gets those messages. It seems that nobody has created a similar tool, except @danoise with Duplex.
At first, the questions are 2:
Regarding the sending of data from the hardware (KeyLab mk2 49) to the tool. How to print these messages? That is, how to obtain them? Thus, functions could be executed.
hardware (KeyLab mk2 49) -> LUA tool & Renoise [edit: this part is resolved!]
Regarding the sending of data from the tool to the hardware (KeyLab mk2 49). Thus, specific functions could be executed to change the status of certain controls of the tool (colors on the buttons, change its text, etc.).
LUA tool & Renoise -> hardware (KeyLab mk2 49)
I really do not know how Duplex deals with the bidirectionality of messages.
Duplex achieves that the hardware is synchronized with Renoise and vice versa. If you press the “play the song” button with the mouse inside Renoise, it also lights up on the Play button on the KeyLab and on the Duplex tool. And so with most controls.
It would be great to be able to document all this so that anyone could build their customized tool. Let’s see if @danoise reads all this and can help.
This case is the same as the application that @Aisjam contributed. It is an application for Duplex (which by the way, has returned some error).
I have not found any guide or documentation to create this type of tool. And certainly, I do not understand very well how Duplex is built to extract from it everything necessary to interpret these messages and thus be able to execute specific functions.
Hi Raul. Good to see another keylab user here and thanks for building the 49 version. i was unsure if they changed the button configuration. I built this as a fit for purpose as you may found out to that only the keyboard worked with Renoise.
I am no lua coder, My background is C# C++ for AR and VR. When i was building this I had to ask arturia for some of the sysex documentation that was confidential. I am unsure of the process of building a standalone plugin so someone else might have to help out there, or documentation. however I Picked MCU as the default as it was the first general DAW compatibility and it is just a standard guideline for connecting midi to a DAW.
if i was to break down how the transports work, Arturia_Keylab_Mkii_61.lua handles the colour lighting information. here are the notes, sysex ref and is monocolour reference.
I have been able to advance here. At the moment, I have solved the shipments for the MIDI input. I have already found a way to print these values.
For the moment I have noticed a difference of 12 notes on the transport buttons. In the KeyLab mkII 61 it seems that it uses the octave 6, while in the KeyLab mkII 49 the octave 7 is used. I am not sure because I do not have a KeyLab mkII 61.
What I have done:
Set the MIDI input to:
In device A: KeyLab mkII 49
In device B: MIDIIN2 (KeyLab mkII 49)
In device C: …
In device D: …
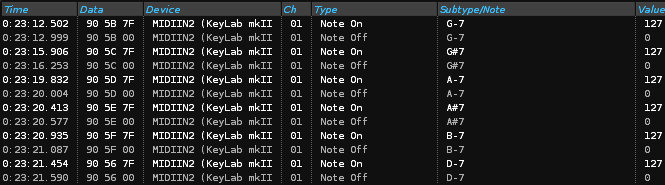
MIDIIN2 (KeyLab mkII 49) is responsible for sending the messages (for TRANSPORTS buttons and others…), and they also appear in the MIDI monitor panel.
TRANSPORTS buttons
Works in “ANALOG LAB”, “DAW” or “USER” mode. The precise information for TRANSPORTS buttons is the following (from left to right):
1 Reverse button data:
pressed: 0x90 0x5B 0x7F
released: 0x90 0x5B 0x00
2 Forward button data:
pressed: 0x90 0x5C 0x7F
released: 0x90 0x5C 0x00
3 Stop button data:
pressed: 0x90 0x5D 0x7F
released: 0x90 0x5D 0x00
4 Play/pause button data:
pressed: 0x90 0x5E 0x7F
released: 0x90 0x5E 0x00
5 Record button data:
pressed: 0x90 0x5F 0x7F
released: 0x90 0x5F 0x00
6 Loop button data:
pressed: 0x90 0x56 0x7F
released: 0x90 0x56 0x00
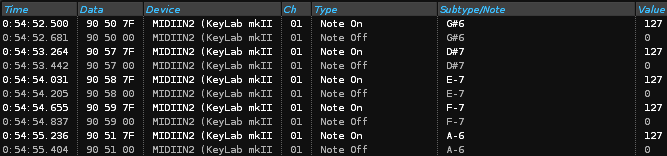
DIAL center control
Works only for “DAW” modes (I use “Standard MCU”) . The precise information for DIAL center control is the following (from left to right):
1 to the left dial data:
0xB0 0x3C 0x41
2 to the right dial data:
0xB0 0x3C 0x01
3 Dial button data:
pressed: 0x90 0x54 0x7F
released: 0x90 0x54 0x00
4 Left button data:
pressed: 0x90 0x62 0x7F
released: 0x90 0x62 0x00
5 Right button data:
pressed: 0x90 0x63 0x7F
released: 0x90 0x63 0x00
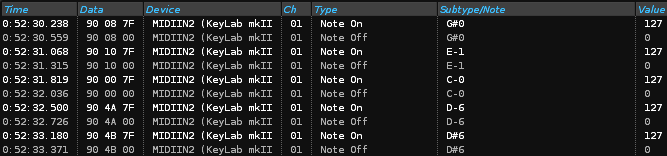
TRACK CONTROLS
Solo, Mute, Record, Read, Write (from left to right):
GLOBAL CONTROLS
Save, In, Out, Metro, Undo (from left to right):
Brief explanation of these sysex values (hexadecimal values): 90 is the MIDI channel for “note_on” (90=Ch 1, 91=Ch 2 … 9F=Ch 16). 16 channels.
… … … … … or (80 is the MIDI channel for “note_off” (80=Ch 1, 81=Ch 2 … 8F=Ch 16) ) 50 is the note value (G#6) 7F or 00 (or other) is the velocity value (127 or 00). The range is 0 to 127, 128 values.
… … … … … 127 seems to be assigned to “on” (pressed). 00 seems to be assigned to “off” (released).
With all this, I can already assign any function to any of these controls. Even with automatic repetition capabilities. For example, to move right between the tracks, it is not necessary to press 1 time for each track jump, but to keep pressed. This avoids wear down the buttons so much.
But this is only for the MIDI input.
To be perfect, I would need to know how to send the messages (MIDI Out) to synchronize the lighting LEDs for each control. For example, the PADs are multicolored, just like the buttons below the faders. The rest are monocolor. I guess they will have only 3 states, off, low brightness and maximum brightness.
To synchronize the state of the buttons, the tool needs to have a checkbox or on / off switch. When it is turned on, some API notifiers will always be in action. They will be responsible for detecting, for example, when the PLAY button is turned on or off, for a function to send an OUT message to the KeyLab hardware that instructs the Play / Pause LED to turn on or off. And so with the rest of buttons.
At least the explanation is that. What I have noticed, is that it is possible to create a very wide tool that when activated automatically, all the MIDI of the keyboard (input and output) will be completely mapped. It would only take a single click of the mouse or a keyboard command to activate / deactivate everything. It would be really comfortable.
@Aisjam, it seems that the data you have given me is so that it works with Duplex.
Following the API documentation, in … Snipers / MIDI.lua, we can create a function like this:
--OUTPUT DEVICE
local function arturia_keylab_mk2_output_device()
  local outputs = renoise.Midi.available_output_devices()
  if not table.is_empty(outputs) then
    print("\n\n\nASSIGN OUT DEVICE... (DAW: Standard MCU)")
    print("-----------------------------------------------------")
    print("Out device 1:",outputs[1],"\nOut device 2:",outputs[2],"\nOut device 3:",outputs[3],"\nOut device 4:",outputs[4])
    local device_name = outputs[3] --(1,2,3,4) select the number to "MIDIOUT2 (KeyLab mkII 49)" or "MIDIOUT2 (KeyLab mkII 61)"
    midi_device = renoise.Midi.create_output_device(device_name)
    print("-----------------------------------------------------")
    print("Out device selected:", device_name)
    print("-----------------------------------------------------")


    -- sysex (MMC start)
    --midi_device:send {0xF0, 0x7F, 0x00, 0x06, 0x02, 0xF7}


    --TRACK CONTROLS-------------------------------------------------------
      --note off (always midi channel 1)

        --Bank 1
        midi_device:send {0x90, 0x08, 0x00} --solo button off
        midi_device:send {0x90, 0x10, 0x00} --mute button off
        midi_device:send {0x90, 0x00, 0x00} --record button off
        --Bank 2
        midi_device:send {0x90, 0x09, 0x00} --solo button off
        midi_device:send {0x90, 0x11, 0x00} --mute button off
        midi_device:send {0x90, 0x01, 0x00} --record button off
        --Bank 3
        midi_device:send {0x90, 0x0A, 0x00} --solo button off
        midi_device:send {0x90, 0x12, 0x00} --mute button off
        midi_device:send {0x90, 0x02, 0x00} --record button off
        --Bank 4
        midi_device:send {0x90, 0x0B, 0x00} --solo button off
        midi_device:send {0x90, 0x13, 0x00} --mute button off
        midi_device:send {0x90, 0x03, 0x00} --record button off
        --Bank 5
        midi_device:send {0x90, 0x0C, 0x00} --solo button off
        midi_device:send {0x90, 0x14, 0x00} --mute button off
        midi_device:send {0x90, 0x04, 0x00} --record button off
        --Bank 6
        midi_device:send {0x90, 0x0D, 0x00} --solo button off
        midi_device:send {0x90, 0x15, 0x00} --mute button off
        midi_device:send {0x90, 0x05, 0x00} --record button off
        --Bank 7
        midi_device:send {0x90, 0x0E, 0x00} --solo button off
        midi_device:send {0x90, 0x16, 0x00} --mute button off
        midi_device:send {0x90, 0x06, 0x00} --record button off
        --Bank 8
        midi_device:send {0x90, 0x0F, 0x00} --solo button off
        midi_device:send {0x90, 0x17, 0x00} --mute button off
        midi_device:send {0x90, 0x07, 0x00} --record button off
        --- --- ----------------------------
        midi_device:send {0x90, 0x4A, 0x00} --read button off
        midi_device:send {0x90, 0x4B, 0x00} --write button off

      --note on (always midi channel 1)
        --Bank 1
        midi_device:send {0x90, 0x08, 0x7F}   print("Bank 1, solo on")   --solo button off
        --midi_device:send {0x90, 0x10, 0x7F} print("Bank 1, mute on")   --mute button off
        --midi_device:send {0x90, 0x00, 0x7F} print("Bank 1, record on") --record button off
        --Bank 2
        midi_device:send {0x90, 0x09, 0x7F}   print("Bank 2, solo on")   --solo button off
        --midi_device:send {0x90, 0x11, 0x7F} print("Bank 2, mute on")   --mute button off
        --midi_device:send {0x90, 0x01, 0x7F} print("Bank 2, record on") --record button off
        --Bank 3
        midi_device:send {0x90, 0x0A, 0x7F}   print("Bank 3, solo on")   --solo button off
        --midi_device:send {0x90, 0x12, 0x7F} print("Bank 3, mute on")   --mute button off
        --midi_device:send {0x90, 0x02, 0x7F} print("Bank 3, record on") --record button off
        --Bank 4
        midi_device:send {0x90, 0x0B, 0x7F}   print("Bank 4, solo on")   --solo button off
        --midi_device:send {0x90, 0x13, 0x7F} print("Bank 4, mute on")   --mute button off
        --midi_device:send {0x90, 0x03, 0x7F} print("Bank 4, record on") --record button off
        --Bank 5
        midi_device:send {0x90, 0x0C, 0x7F}   print("Bank 5, solo on")   --solo button off
        --midi_device:send {0x90, 0x14, 0x7F} print("Bank 5, mute on")   --mute button off
        --midi_device:send {0x90, 0x04, 0x7F} print("Bank 5, record on") --record button off
        --Bank 6
        midi_device:send {0x90, 0x0D, 0x7F}   print("Bank 6, solo on")   --solo button off
        --midi_device:send {0x90, 0x15, 0x7F} print("Bank 6, mute on")   --mute button off
        --midi_device:send {0x90, 0x05, 0x7F} print("Bank 6, record on") --record button off
        --Bank 7
        midi_device:send {0x90, 0x0E, 0x7F}   print("Bank 7, solo on")   --solo button off
        --midi_device:send {0x90, 0x16, 0x7F} print("Bank 7, mute on")   --mute button off
        --midi_device:send {0x90, 0x06, 0x7F} print("Bank 7, record on") --record button off
        --Bank 8
        midi_device:send {0x90, 0x0F, 0x7F}   print("Bank 8, solo on")   --solo button off
        --midi_device:send {0x90, 0x17, 0x7F} print("Bank 8, mute on")   --mute button off
        --midi_device:send {0x90, 0x07, 0x7F} print("Bank 8, record on") --record button off
        --- ---
        --midi_device:send {0x90, 0x4A, 0x7F} print("read on")   --read button off
        --midi_device:send {0x90, 0x4B, 0x7F} print("write on")  --write button off


    --GLOBAL CONTROLS-------------------------------------------------------
      --note off (always midi channel 1)
        midi_device:send {0x90, 0x50, 0x00} --save button off
        midi_device:send {0x90, 0x57, 0x00} --in button off
        midi_device:send {0x90, 0x58, 0x00} --out button off
        midi_device:send {0x90, 0x59, 0x00} --metro button off
        midi_device:send {0x90, 0x51, 0x00} --undo button off

      --note on (always midi channel 1)
        midi_device:send {0x90, 0x50, 0x7F}   print("save on")  --solo button off
        --midi_device:send {0x90, 0x57, 0x7F} print("in on")    --mute button off
        --midi_device:send {0x90, 0x58, 0x7F} print("out on")   --record button off
        --midi_device:send {0x90, 0x59, 0x7F} print("metro on") --read button off
        --midi_device:send {0x90, 0x51, 0x7F} print("undo on")  --write button off


    --TRANSPORT------------------------------------------------------------
      --note off (always midi channel 1)
        midi_device:send {0x90, 0x5B, 0x00} --reverse button off
        midi_device:send {0x90, 0x5C, 0x00} --forward button off
        midi_device:send {0x90, 0x5D, 0x00} --stop button off
        midi_device:send {0x90, 0x5E, 0x00} --play/pause button off
        midi_device:send {0x90, 0x5F, 0x00} --record button off
        midi_device:send {0x90, 0x56, 0x00} --loop button off

      --note on (always midi channel 1)
        midi_device:send {0x90, 0x5B, 0x7F}   print("<< on") --reverse button on
        --midi_device:send {0x90, 0x5C, 0x7F} print(">> on") --forward button on
        --midi_device:send {0x90, 0x5D, 0x7F} print("■ on")  --stop button on
        --midi_device:send {0x90, 0x5E, 0x7F} print("► on")  --play/pause button on
        --midi_device:send {0x90, 0x5F, 0x7F} print("● on")  --record button on
        --midi_device:send {0x90, 0x56, 0x7F} print("∞ on")  --loop button on


    --FADER BUTTONS (8+1)--------------------------------------------------
      --note off (always midi channel 1)
        midi_device:send {0x90, 0x18, 0x00} --fader button 1 off
        midi_device:send {0x90, 0x19, 0x00} --fader button 2 off
        midi_device:send {0x90, 0x1A, 0x00} --fader button 3 off
        midi_device:send {0x90, 0x1B, 0x00} --fader button 4 off
        midi_device:send {0x90, 0x1C, 0x00} --fader button 5 off
        midi_device:send {0x90, 0x1D, 0x00} --fader button 6 off
        midi_device:send {0x90, 0x1E, 0x00} --fader button 7 off
        midi_device:send {0x90, 0x1F, 0x00} --fader button 8 off

        --midi_device:send {0x90, 0xxx, 0x00} --fader button 9 off


      --note on (always midi channel 1)
        midi_device:send {0x90, 0x18, 0x7F} print("fd1 on") --fader button 1 on
        --midi_device:send {0x90, 0x19, 0x7F} print("fd2 on")--fader button 2 on
        --midi_device:send {0x90, 0x1A, 0x7F} print("fd3 on")--fader button 3 on
        --midi_device:send {0x90, 0x1B, 0x7F} print("fd4 on")--fader button 4 on
        --midi_device:send {0x90, 0x1C, 0x7F} print("fd5 on")--fader button 5 on
        --midi_device:send {0x90, 0x1D, 0x7F} print("fd6 on")--fader button 6 on
        --midi_device:send {0x90, 0x1E, 0x7F} print("fd7 on")--fader button 7 on
        --midi_device:send {0x90, 0x1F, 0x7F} print("fd8 on")--fader button 8 on

        --midi_device:send {0x90, 0xxx, 0x00} print("fd9 on")--fader button 9 on


    -- no longer need the device...
    midi_device:close()
  end
end
arturia_keylab_mk2_output_device()
If you want to try it, simply do these steps:
Make sure to connect your KeyLab mkII to work with Renoise (no matter the assignment in Preferences / MIDI!, this works with the MIDI Monitor of Renoise). Use “DAW: Standard MCU”.
Using the Renoise “Scripting Terminal & Editor”. Inside the “Editor” copy and paste the function into the TestPad.lua file (if TestPad.lua contains executable code, be sure to cancel it previously).
Press “Execute” (Bottom right)
See which buttons have been lit in the KeyLab.
“Scripting Terminal & Editor”, in “Terminal” read the last printed, similar to this:
ASSIGN OUT DEVICE... (DAW: Standard MCU)
-----------------------------------------------------
Out device 1:  Microsoft GS Wavetable Synth
Out device 2:  KeyLab mkII 49
Out device 3:  MIDIOUT2 (KeyLab mkII 49)
Out device 4:  nil
-----------------------------------------------------
Out device selected:  MIDIOUT2 (KeyLab mkII 49)
-----------------------------------------------------
Bank 1, solo on
Bank 2, solo on
Bank 3, solo on
Bank 4, solo on
Bank 5, solo on
Bank 6, solo on
Bank 7, solo on
Bank 8, solo on
save on
<< on
fd1 on
You must have “Out device selected”: MIDIOUT2 (KeyLab mkII 61).
You can try enabling and disabling the lines to test the lighting of the buttons.
These 16 buttons are already covered (although I still think that they have 3 states, and not only 2).
Things that are missing:
1| It would be necessary to know how to control the 8 + 1 buttons below the faders, which are multicolored. The API allows to send two data formats:
What table of values would it be to change the colors?
In DAW Standard MCU mode send data with type Note On/Off. With Note On/Off, is it possible to control the controls, in addition to the on/off? It seems that it only allows turning on one button at a time, of the 9 available.
In User mode send data with type Control Change (CC). But the rotation of the dial (right and left) and the left/right buttons stops working.
2| The same case for the 16 pads.
Can you think of any way to send the data to change the colors of these buttons? Any ideas?
Well, just comment a little bit that I have managed to do so far:
For the moment, I have managed to build a tool that works with the entire button section that surrounds the transport buttons, which are also included.
I also have the central control of the dial (left turn, right, middle button) and the right and left buttons, as well as the 3 circular buttons, and all eight selection buttons (below the faders).
For now I can shoot functions at my whim, and at the same time synchronize the status of the LED lighting of the buttons with Renoise, which is the most attractive and coherent for its correct use.
Strange things that I have detected. For some reason I can not illuminate the right and left buttons of the dial, when the output sends are correct.
How does this work? With the configuration in DAW Standard MCU, the KeyLab sends notes through all these buttons, and others send CC data. With the notes, the midi channel, the note and the velocity are sent. Each button has note_on (pressed) and note_off (released).
These notes are converted to sysex data, which is a table of 3 items of this format (0x90,0x67,0x7F) or (0x90,0x67,0x00), 67 would represent the note, and 7F is the maximum volume, that is to say the pressed, and 00 would be the released.
So I already know how to use the MIDI output. In addition, most of these buttons only work on a midi channel, number 1.
The final conclusion is that it is necessary that Arturia provide the sysex instructions of this particular keyboard model to know how to control the colors of some of the multicolored buttons. Actually, with everything I know, I do not know how to do that yet.
What is the main problem that causes having to build a tool? When the midi input is configured to be able to send notes with MIDIIN2 (KeyLab mkII 49), these notes are also recorded in the pattern editor when recording. Therefore, it is not possible to use Renoise’s MIDI input directly, but it is necessary to build a tool that, instead of recording the notes associated with each button, can launch specific functions, such as creating a stop button or similar.
In addition, using timers, it is possible to make a very smooth navigation between changing tracks, sequence or lines, without having to strafe each button.
If someone can help with the theme of how to configure the sysex of multicolored buttons colors, help here.
Thank you!
Note: I think these comments can also serve as the basis for building specific tools for other specific MIDI controllers.
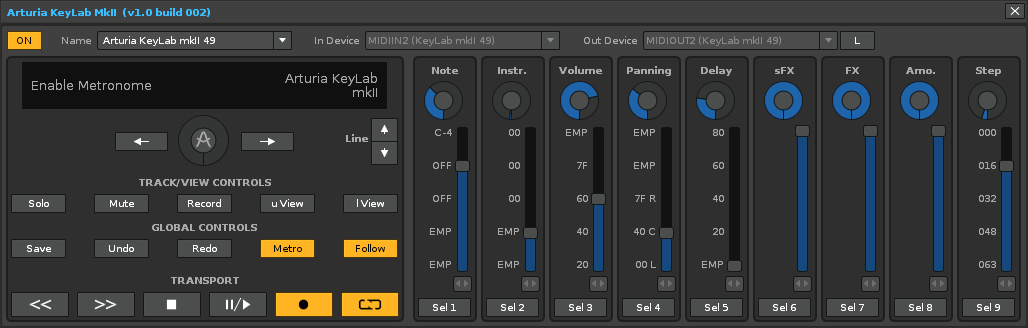
This is the look of the tool I’m building for the Arturia KeyLab mkII 49/61 driver.
(This tool works even if your window is closed!)
Practically I already have all the necessary information to control synchronize it with Renoise perfectly. I have needed a lot of trial and error to understand all this sysex and input / output messages.
Many thanks to the people who have helped here with guidance!
I am aware that almost nobody has this driver to control Renoise. However, if someone uses it and has a request to integrate it into the tool, it is time to request it.
As soon as I have a beta that I can publish, I’ll announce it in the tools section of the Renoise website and in the tool forums.
As it is designed, it allows to toggle between the DAW Mode (Standard MCU) and the 10 User modes.
In DAW mode, knobs and faders are used to manipulate / correct notes and all their parameters. However, in user mode all these controls can be mapped with the MIDI input, to control the volume and other things of the individual tracks.
I want to comment on my initial experience with this Arturia driver. When I started to manipulate it, I was frustrated because half the buttons and controls do not work with Renoise. It has been necessary to build a tool with a lot of research behind (on the internet there is no information about the sysex messages of this controller, it’s time to rehearse with it).
Any user who does not know how to build a tool with LUA will not be able to use this class of MIDI controllers with Renoise (the same case with other DAWs). Personally, I do not understand why Arturia (and other companies) do not design their products so that these buttons and controls are not orphaned.
Apparently, this problem is not isolated with Renoise. Other DAWs, even compatible ones, do not work correctly. For example, I could not operate the transport buttons with Studio One v4 or FL Studio v20. I think it’s a bit sad that a keyboard that sells for more than € 450 does not have that flexibility installed in the firmware so that all the buttons work in one way or another.
That said, once this tool is built, the KeyLab mkII is perfect for Renoise.
As a pretty new Owner of a Keylab 49 mkII myself i am really looking forward to this!
If you need a dummy user for testing, let me know. I myself have a programming background but have never fiddled around with any of these protocols, so not sure how much i could help at this point besides testing and providing feedback
I’m glad there are more users with an Arturia KeyLab MkII!
I still have to experiment a bit with the change of colors of the selection buttons (Select 1 to Select 8-9) and, for the moment, I am ignoring the control of the 16 pads (both the black and white keys of the piano and the 16 pads are assigned directly with the normal MIDI input). The rest can be commanded by the tool. Actually, the tool acts as a “bridge” between Renoise and the KeyLab MkII. It is only necessary to activate the button “ON” to work.
I still do not have a sufficiently finished version to publish it. Actually, you could only help me if you know how to interpret the SysEx data for the Renoise MIDI input and output (see documentation).
The only issue where I really need support from other users is that I do not have the 61-key version, I only have the version of 49. Then I can not test the tool with the KeyLab MKII of 61. I understand that both versions work exactly the same , that is, they communicate with the DAW through the same SysEx MIDI messages. The only thing that changes is the name of the device, a detail that must be defined in the LUA code of the tool.
Currently I have hardly any free time to devote to programming with LUA. I still keep the Piano Roll Editor tool (I’m preparing a new version). I’ll have to leave it a little aside to finish this tool. I’ll probably call it “AKM” or “AKM Bridge”
When I can, I will publish a version of the tool here.
I just wanted to point out an interesting fact here:
There is good news from Arturia. It seems that they have listened to the demand of the users and are working for a next and iminent launch of the KeyLab 88 MkII. I suppose it will be the same as the 61-key version, but with 88 keys.
I suppose that it will also share the same firmware for the 3 models. Therefore, it will be reasonable to think that the tool I am developing will also be compatible with the 88-key version, although I will not be able to prove it. What will the price be? € 699.90?
Following the ration for this MIDI controller, Arturia released a new firmware with the launch of the KeyLab 88 MKII. This new firmware adds another DAW mode that allows to control only the transport buttons (it is possible that someone read this forum). The rest of the buttons that are up are orphaned again. For Renoise it is still necessary to build a specific tool to control everything, the top 8 buttons as well as the transport buttons and the entire central panel of the controller.
However, I must say that I am delighted with this Arturia Midi controler (KeyLab 49 mkII).
By the way, the KeyLab 88 MkII costs almost € 900, for me, an excessive price, even if the keys have changed.
Just I say that if someone is interested in acquiring a keyboard KeyLab 49 mkII of these (even if it’s second-hand, how I did), you can use it with Renoise and the tool I’m finishing. The second-hand market is sometimes a great opportunity.


 . I suppose it will be the same as the 61-key version, but with 88 keys.