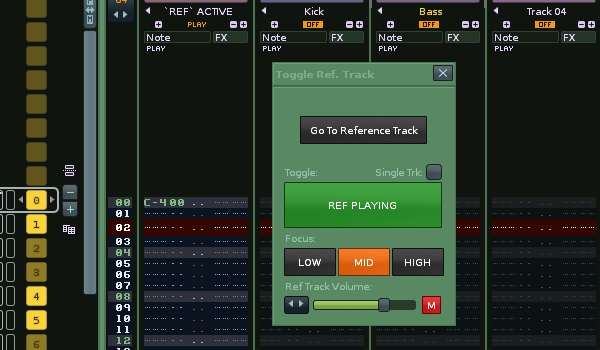
New Tool: Toggle Reference Track

Up on Tools Site:

33%20lrg

Latest beta 1.39 in this post: (can promote some renoise crashes due to renoise sampler bug)


NEW FEATURES SINCE 1.3


Now updated with a GUI and some new features:

Open the GUI with either:

  1. The Shortcut "Global:Tools: `TRT` Reference Track GUI"

Menu entries:

  1. Instrument box: Toggle Reference Track GUI
  2. Tools menu: Ledger`s Scripts >Toggle Reference Track GUI )

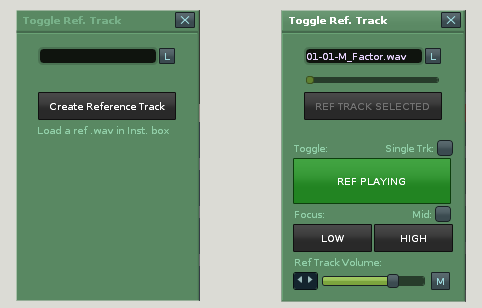
You will get the following left screen.

Either:

  • Load a reference track sample into the renoise instruments list and press the Create Reference Track button on the GUI (same operation as right-click menu does) .

or

  • Load a reference track via the L button, and browsing on your computer
forum trt

The active GUI should now appear (right pic above).

  • The Create Reference Track button changes into a Go To Reference Track/ Ref Track Selected button.

  • You can toggle the reference track with your song with the large button (there is a checkbox for single track operation too)

  • You can now focus in on 2/3 frequency ranges both your reference track and your song. These buttons control filters added to your ref track and the master track.

  • A volume slider underneath, controls the post volume of the reference track for easier balancing.

ledger.scripts.ToggleReferenceTrack_V1.36.xrnx


original post

click here

I always seem to find with my mixes that I scoop too many mids with EQs. When I compare them with professional tracks I’ve made them too bass heavy and high endy/ harsh.

I’ve tried working with reference tracks in renoise before but always found it too clunky as you have to watch what you’re muting soloing all the time and are bound to almost blow your speakers at some point as you blast two tracks out at the same time.

So…

‘Toggle Reference Track’ gives you a special track and shortcut for the job:

3.1 Beta Version :

–see changelog at end of post for latest update details

ledger.scripts.ToggleReferenceTrack_V1.22.xrnx

Description and How To Use:

  1. First load up your reference mix sample whether it be deadmau5, Daft Punk or Beethoven.

  2. Right click on it in the instrument list and choose the menu ~Create Reference Track

A new track is created at position ‘track 01’ and solo’d with the name ‘REF’ ACTIVE (Will become ‘REF’ MUTED on toggle)
The wav you just clicked will also have autoseek switched on now.
A C-4 is added to the first pattern to activate the wav.

  1. Now you need to toggle this track relative to the rest of your song or another track, so there are the keyboard shortcuts:

Shortcut:
`TRT` Toggle Reference Track
This will AB between the reference track and the rest of the tracks in renoise.

`TRT` Toggle Reference Track With Selected Track
This will AB between the reference track and the selected track in renoise.

The tool works by adding a gainer that is controlled with track mute states so even when you are soloing other tracks and adjusting your own mix, the reference remains silent.
The added track is automatically routed to the same destination as your master track so it bypasses master processing so you can get accurate AB testing.

If you don’t want to save giant wavs with each xrns you an either:
-delete the wav before saving (obvious but slightly annoying)
-cut the wav to a short section and loop it.
-Use a plug like eXT to host the wav - not sure of any free alternatives that will autoseek the timeline like XT does but would be very interested to know.

Extra Shortcuts:
**------------------------------------------------------------

`TRT` Adjust Song To Selected Sample Length**

If you select a long sample and press this shortcut, the renoise song length will be adjusted by either adding empty patterns at the end of the song or deleting them to match the wav length. It will not delete any patterns with data in them though.

Can be used for a reference track wav or any other long wav you want to adjust the song length to. I’ve separated it from the creation of a reference track as you may not always want that to adjust your song length to what your referencing. Plus it may be a useful standalone shortcut when working with long wavs anyway.

`TRT` Toggle Autoseek On Selected Sample

shortcut which simply toggles the autoseek state of the selected sample. Saves going to instrument properties.

`TRT` Go To Reference Track

Will simply navigate you to the reference track .

`TRT` Toggle Mix Output Stereo To Mono

For quick mono-ing of a whole mix by use of a custom Stereo Expander called “Mono Mix”. It is added the Master track and the Reference track (if present).
This shortcut can be used without a reference track to just to check your mono compatibility while mixing.


My other scripts:


changelog:

Click to view changelog

1.34

-Minor GUI Changes
1.33
-Fixed GUI which was slightly wonky
-Fixed bug when deleting ref-track while GUI was still open
-Tidy code

1.32
-Adds Menu Entries for showing the new GUI (Tools Menu: Ledger`s Scripts and Instrument Box)
-Adds a M Mono check button
Version 1.31:

1.31
-Fixed a few bugs
-Instruction text added to start screen of tool, notifying to load a .wav first
-When in single track toggle mode the toggle button disables with message when the ref track is selected (“Can’t toggle ref with itself”). Simply switch to another track/ disable single track mode, to resume
-Menu + sub menu added for “Adjust song To Selected Sample Length” + original “Create Reference Track” entry

1.3

-GUI Added
v1.22
status added for when there is no sample selected in the instrument list
v1.21
status update error fixed, and mono is the default first state for the new toggle shortcut
v 1.2
Shortcut `TRT` Toggle Mix Output Stereo To Mono added for quick mono-ing of a whole mix by use of a custom Stereo Expander. “Mono Mix” is added the Master track and the Reference track (if present).
Can be used without a reference track to just to check your mono compatibility while mixing
v 1.0
- -new shortcut
`TRT` Create Reference Track
Same as menu
0.76
– Fixed a bug for ‘Adjust Song To Selected Sample Length’ that occured where lpb was set to different than 4
0.75
New shortcut:
Adjust Song To Selected Sample Length
If you select a long sample and press this shortcut, the renoise song length will be adjusted by either adding empty patterns at the end of the song or deleting them to match the wav length. It will not delete any patterns with data in them though.
Can be used for a reference track wav or any other long wav you want to adjust the song length to. I’ve separated it from the creation of a reference track as you may not always want that to adjust your song length to what your referencing. Plus it may be a useful standalone shortcut when working with long wavs anyway.
0.74
-Trying to toggle the reference track with itself will now do nothing and give a status message to save confusion
-New Shortcut: Go To Reference Track : Will simply navigate you to the reference track
0.71
-added a second shortcut: Toggle Reference Track With Selected Track
–This will toggle between soloing the currently selected track and soloing the reference track, for when working on an individual element of your mix.
0.78
–All shortcuts prefixed with `TRT` (for toggle reference track) so easier to find and assign all together.
–New shortcut which simply toggles the autoseek state of the selected sample. Saves going to instrument properties.
`TRT` Toggle Autoseek On Selected Sample
– Toggle reference track shortcut no longer does a renoise mute on the reference track as it is unnecessary. The reason I changed this is that I find it useful to put a frequency analysis VST on the reference track to compare with one on my own track. If the VST is inserted before the ‘Reference Gainer’ you can still see the signal playing though it is muted by the gainer.

Toggle ref sml.png

1 Like

0.71 added a second shortcut:

Toggle Reference Track With Selected Track

This will toggle between soloing the currently selected track and soloing the reference track, for when working on an individual element of your mix.

0.74

-Trying to toggle the reference track with itself will now do nothing and give a status message to save confusion

-New Shortcut:
Go To Reference Track
Will simply navigate you to the reference track

0.75

New shortcut:
Adjust Song To Selected Sample Length

If you select a long sample and press this shortcut, the renoise song length will be adjusted by either adding empty patterns at the end of the song or deleting them to match the wav length. It will not delete any patterns with data in them though

0.76
– Fixed a bug for ‘Adjust Song To Selected Sample Length’ where lpb was set to different than 4

0.78

–All shortcuts prefixed with TRT (for toggle reference track) so easier to find and assign all together.

–New shortcut which simply toggles the autoseek state of the selected sample. Saves going to instrument properties.
TRT Toggle Autoseek On Selected Sample

– Toggle reference track shortcut no longer does a renoise mute on the reference track as it is unnecessary. The reason I changed this is that I find it useful to put a frequency analysis VST on the reference track to compare with one on my own track. If the VST is inserted before the Reference Gainer you can still see the signal playing though it is muted by the gainer.

Up on tools page:

http://www.renoise.c…reference-track

v 1.0

Pretty happy with how this tool works now so going up on the tools page

-
-new shortcut
TRT Create Reference Track

Same as menu

Something I realised recently with this tool is:

[s]If you are trying to match absolute loudness levels with the reference, you will need to add a gainer that compensates for the renoise Track Headroom setting.

So if your song Track Headroom setting is at -6dB then you need to add a gainer at +6dB on the reference track. This will make the reference song play at it`s normal level if the master track fader is set to 0dB.[/s]

edit: please see following posts

I thought the Headroom counts for the mastertrack only, so everything you play and compare is with the same -6db head room.

Hmm, I may have to get my head around this better:

-The tool routes the track to the same output as the master bypassing the master fx, except for the master fader.
-Due to the auto-adjustment function on the master, if you drive the mix past 0dB, the master gainer will bring down the reference track aswell as all others. You can be pushing your mix to 0dB in this situation while your reference has been attenuated by whatever the master has gone down by.

So if you are mixing with the auto-gain reduction disabled then yes it looks like the compensating gainer would not be necessary, If you want to mix with the autogain reduction enabled and end up pushing your mix to 0dB absolute peak output, then you need to compensate the reference track to get an accurate volume comparison, though I guess by the level the master is below 0dB and not the headroom level…

If I`ve got this right

You don’t need a compensating gainer on the master, because you can simply set the track headroom to 0 db.
Simply sliding down the fader on your reference track:that only gives you a slight idea of the peak dB that your own track hardly reaches.
I’m not sure why you would desire to use gainers to compensate loudness:it is about the depth of your mix and allowing more dynamic space in the power range so that your instruments give their distinctive output that are part of the composition. Not overwhelming the user with the wall of sound…

You don’t need a compensating gainer on the master, because you can simply set the track headroom to 0 db.

The gainer would not be on the master but on the reference track to normalise it. It is also worth being aware of this if you want to use the headroom feature but are aiming to mix at peak 0dB (a normalised wav). Like I was trying to figure out/ flesh out in my last post the auto-reduction feature on the master seems to be the main factor as it is the thing that modulates all signals, reference and whole mix to 0dB max output (or whatever exact value it is set to aim for.) If the mix becomes to hot, and the AD kicks in, your reference is reduced also.

Simply sliding down the fader on your reference track:that only gives you a slight idea of the peak dB that your own track hardly reaches.
I’m not sure why you would desire to use gainers to compensate loudness:it is about the depth of your mix and allowing more dynamic space in the power range so that your instruments give their distinctive output that are part of the composition. Not overwhelming the user with the wall of sound…

The aim of all this is to get an accurate reference, nothing to do with how you use it or what perceived loudness you are aiming for. You can use a reference track to match loudness to a commercial track of the same genre, (jazz, classical, hiphop…), another track in your own album you want to check against, or reference against a mix you think sounds bad in any way to avoid getting close to that. If your reference level is jumping about the place (becoming non normalised) then this becomes harder and can defeat the point of using it in the first place.

Edit: a good little vid on the Fletcher Munson curve, a good reason to keep your ABing at similar dB:

Awesome Tool Ledger, now in my default template I have 3 small ref loops. I have a problem though Its not playing nice with this tool:

After loading a new song or restarting RNS the graphics seem to be stuttering. KMaki’s tool creates a track called MNTR in the sends which is part of my default template, if I delete this track all is ok and all is ok if I use KMaki’s tool after the delete of the MNTR track (it creates the track again).

This sounds like it could be a notifier being retriggered constantly. The only notifier I have in this tool attaches the menu entry to the instrument box. This is triggered on renoise start-up or a new song being loaded but should/ will only trigger once. It seems with kmaki’s tool there is an idle notifier running . These will trigger regularly and I suspect something could be happening there, though I`m not sure. I have only had a short chance to look at kMakis code, have you contacted him aswell?

Hello! Chiming in here - I do indeed have idle notifiers there. My memory fails me but at least I’m following the selected track constantly, when monitor tool is active.

Though I’m not really sure how that could choke the startup routine. Maybe I’ve defined the new_document_observable notifier in some weird way… I think I’ll have to test this myself before I can get a hold of this issue. I’ll try to do this soon and get back.

Cool,

was just thinking it might be useful if Dunks can provide the template xrns that causes the problems? to help narrow it down on both sides here.

Here it is:

Thanks, I can`t seem to replicate the GUI stuttering here, I can however crash renoise completely just by using the Monitor - Exit shortcut from kMakis tool.

I guess this may be to do with the fact I don’t have the plugs installed from the template, I’ll at least pass this crash report on the devs as they will be sure to want to know about this. This may be unrelated to the issue you are experiencing though.

Maybe kMaki might be able to reproduce it?

I’ll check this asap…


No Gui Stutter here either. But crashing… - yes. Maybe we’ll let the German headquarters sort this one out… Added my log to your crash report, Ledger.

Good stuff, I`m sure HQ will be onto it shortly!