Hello, everyone! Yes, another parallel processing thread.
As you probably know, native parallel processing is somewhat limited in Renoise. Some DAWs implement it with “racks” (such as Ableton Live and Bitwig) or even containers (Reaper). In Renoise, however, a few tricks must be used in order to achieve such thing, the first and most obvious one being the Sampler FX tab - now hang in there.
After a short discussion with some folks in the Facebook group chat (yes, some people still use Facebook), I decided to build a couple example projects to explain how parallel processing can be achieved natively.
My goal with the current thread is to sum up that discussion, serving as a reference for the future - at least until proper “effect racks” are (hopefuly) implemented in Renoise.
Feel free to complement this post with your own thoughts. And devs, check this thread for more ideas.
–
Method #1 - Sends and Returns
parallel processing example #1.xrns (778.6 KB)
Limitation 1: Cannot send signal to previous groups/tracks, only from left to right.
Limitation 2: Requires an extra Return channel for summing/bussing.
Explanation:
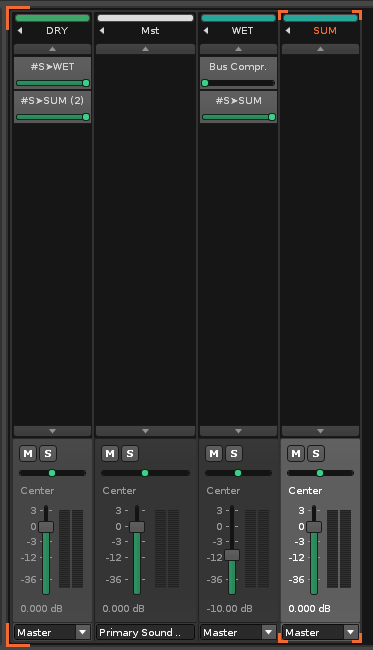
- Create a Return channel (I’ll call it Wet).
- Place your desired effect with 100% wet (if possible).
- Place a send in Dry track. Keep the source.
- (Optional) Create another Return track (I’ll call it Sum) to process the Dry+Wet signal together. Place a send on the Return #1 (Wet) AND another on the source track (dry). Mute source on both. Continue processing in Return #2 (Sum).
–
Method #2 - Sampler
parallel processing example #2.xrns (778.7 KB)
Limitation 1: Not compatible with VST plugins, only instruments/samples. You can also render your VST to samples to bypass this limitation.
Explanation:
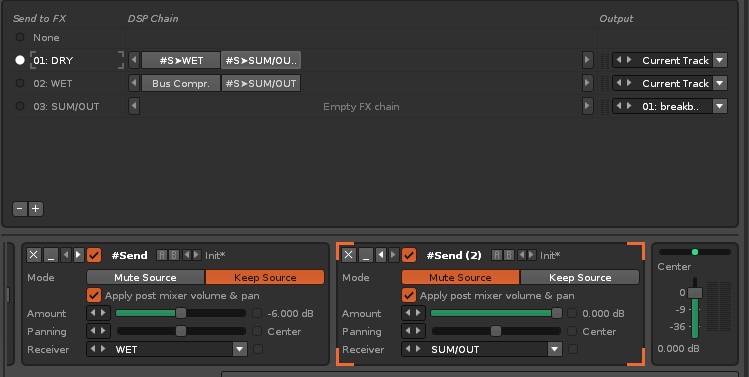
- Create a new instrument
- Create a FX Chain in the Sampler window (F6)
- Create one “lane” for your dry signal, one lane for your effect (wet), and one for summing. That’s a total of 3 FX chains.
- Place two sends in lane #1 (dry): the first send with “Keep Source” enabled (goes to lane #2) and the second one with “Mute Source” (goes to lane #3).
- Insert the desired effect in lane #2. In this example, we are using a compressor. Insert a send after the effect with “Mute Source”. Route it to lane #3.
a. Lane #3 is going to be the sum of dry + wet signals (lanes 1+2), and your main output. Adjust sends in lane #1.
–
Method #3 - Sampler + Groups [my favorite]
parallel processing example #3.xrns (778.8 KB)
Limitations: Same as Method #2.
Explanation:
This is a variation of Method #2.
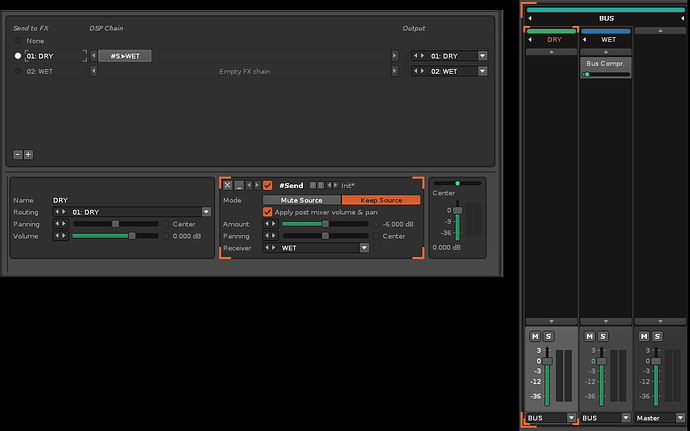
- Insert two tracks in the mixer. Name them “Dry” and “Wet”. Group these.
- Create a new instrument.
- Create a FX Chain in the Sampler window (F6).
- Create one “lane” for your dry signal and one lane for your effect (wet). That’s a total of 2 FX chains.
- Place a send with “Keep Source” in lane #1 and send it to lane #2. Keep the second lane empty.
- Route each lane to a separate track (the ones you created in step 1, Dry and Wet).
- Place the desired FX on the “Wet” track that is receiving from Lane #2. If it has a dry/wet control, set it to 100%.
- Adjust the faders to determine the balance between Dry and Wet. In this example, I reduced the Wet track -10db to match the volume with the dry uncompressed signal. Mute the Wet track to bypass the FX. Peak volume stays almost the same, but more ‘body’ is added to the signal.
- Profit.
–
Suggestions? Critique? Notice any problems? Feel free to discuss.
Cheers.


