MIDI Universal Controller Download “Demo Version” & “Image Capture Album”:
Download the Demo Version here
![]() MIDI Universal Controller v3.2.374 Demo (January 2023, Recent Release)
MIDI Universal Controller v3.2.374 Demo (January 2023, Recent Release)
MIDI Universal Controller (Old Versions):
- MIDI Universal Controller v3.1.369 Demo (January 2023)
- MIDI Universal Controller v3.0.361 Demo (December 2022)
- MIDI Universal Controller v2.1.344 Demo (November 2021)
- MIDI Universal Controller v2.0.327 Demo (August 2021).
- MIDI Universal Controller v1.2.255 Demo (July 2021). Not published.
- MIDI Universal Controller v1.1.252 Demo (May 2021).
- MIDI Universal Controller v1.0.245 Demo (May 2021). First Release.
Update History
MIDI Universal Controller v3.2.374 (January 2023):
- Fixed: Track + DSP/Automation/Mixer: Parameters with an index greater than 35 (“Z” value) are marked with a green light when automation is enabled for the parameter editor. It is now displayed correctly with the pilot in red. In this case, these parameters are not automatable due to the limitation to 35 (1,2,3…8,9,A,B…X,Y,Z). This can occur with Multitap Delay devices, *Hydra, and other plugin effects devices with a number of parameters greater than 35.
- Fixed: Sampler Waveform: Wave Builder: Changing the “Wave Banks Chooser” (list 5) does not update the Wave Builder panel of the sliders & your values. By changing this list, it should update.
- Added: Sampler Waveform: Wave Builder: New waves in bank 2 (muc_waves_2.txt) have been included.
- Modified: Sample Recorder: Now the “Sample Recorder” window will be displayed even if the “View/Focus Control” switch inside the “General Preferences” is disabled.
- Fixed: Bottom buttons [-] [+]: the repeat loop on mouse hold could return an infinite loop when displaying a instrument plugin window that is pinned to Renoise. Now there is no loop for the mouse anymore, only for MIDI input.
- Modified: Some tooltips have been modified.
- Improved: Some features have been improved and polished.
MIDI Universal Controller v3.1.369 (January 2023):
- Improved: Loading of all panels is now done with a short delay to speed up any changes in Renoise. This allows for much smoother loading when changing things, like navigating between instruments, plugins & so on.
- Improved: Instr. Plugin: now reloads faster when there are many parameters (sliders) visible.
- Fixed: Instr. Plugin: the “Plugin Sel.” list does not update its state when Renoise does not have instrument plugin detection enabled. This could cause an already loaded plug-in to be improperly loaded into an instrument slot from the “Insert” button. The criteria is: never allow to load a instrument plugin if Renoise doesn’t have plugin detection enabled.
- Fixed: “Track + DSP”: the “Effect Sel.” list does not update its state when Renoise does not have effect plugin detection enabled. This could cause an already loaded plug-in to be improperly loaded into an dsp slot from the “Insert” button. The criteria is: never allow to load a effect plugin if Renoise doesn’t have plugin detection enabled.
- Fixed: Sampler Waveform: Wave Builder: may return an error when loading your panel or controlling some sliders when the maximum visible number of sliders is less than 100. Now Wave Builder will always show all your sliders.
- Modified: The initial popup window panel has been visually modified.
- Modified: New logo style & effect.
MIDI Universal Controller v3.0.361 (December 2022):
- Added: New custom routing feature for instrument plugins. It is now possible to route each parameter from the Slider Master using «Rou» mode.
- Added: Instr. Plugin: new switch [Mst|Rou] to route each parameter in a customizable way, with «Rou».
- Added: Instr. Plugin: The Slider Master reroute the parameter index when «Rou» is on.
- Added: Instr. Plugin: The right button of the sliders for each parameter allows you to reroute the selected index of parameter in the Slider Master by pressing and holding when «Rou» is on (click to select, clic & hold to reroute).
- Added: New folder «ins_plugin». It stores custom routings for each parameter for each instrument plugin.
- Added: Preferences: new button «Restore Custom Routing» to restart the original index order of the parameters of the current instrument plugin.
- Added: Preferences: new button «ins_plugin folder» to open it directly. This folder contains the parameter routing files of instrument plugins.
- Added: Sampler Modulation: new button «As» to assign this «set modulation» to the current sample.
- Added: Sampler Effects: new button «As» to assign this «FX chain» to the current sample.
- Added: Pattern Editor (list functions): new function «Hide rest columns» to hide the note columns or effect columns to the right.
- Fixed: Sample Waveform: Wave Builder: Initially inserting a wave could return a file load error for invalid name using «Insert» button.
- Fixed: Sample Waveform: Wave Builder: The switch of «Insertion Modes» does not update the state of the sliders (maximum values), when the checkbox of «Auto Insert» is disabled. This can cause an invalid maximum value error on some sliders.
- Modified: Some tooltips have been modified.
- Modified: the integrated Basic User Guiide has been updated with new information.
- Improved: Some of the code has been revised.
MIDI Universal Controller v2.1.344 (November 2021):
- Improved: Sampler Waverform, Wave Builder: Optimized navigation via drop-down list for MIDI input. Now the presets will be loaded when the presets list panel disappears. This allows you to conveniently navigate between the different preset names from a knob or fader.
- Improved: MIDI, SysEX In->Out: MIDI Output Data Send: now MUC automatically detects the connection/disconnection of devices, updating the device drop-down lists and remembering the last selection of the device that was connected.
- Added: Wave Builder: more presets added.
- Fixed: GUI: small visualization issues fixed when loading a panel.
- Fixed: MIDI Input: some functions could be executed from MIDI input when certain graphical interface controls that control these functions were hidden.
- Fixed: when turning ON the tool, the first load in the area does not load the upper icons correctly.
- Improved: the renaming and saving sections of data tables for envelopes and wave presets it is now easier. Now it is possible to insert with name, overwrite existing name or delete existing name from the container TXT file.
- Modified: the sliders panel of “Track + Automation” has been remodeled.
- Modified: Envelope & Wave Presets: it is now possible to classify envelope and wave presets into separate text files.
- Added: MIDI Mapping: new access for Slider Master Default Value.
- Fixed: Hiding parameter 0 prevents negative index navigation of the Slider Master.
- Added: new “Routing*” parameter for “InstrumentVolPan” device of FX Chain inside the “Sampler Effects” area.
- Added: new “Plugin Properties” area.
- Fixed: Instr.Plugin: the program index returns an error when it is 0 (when the plugin does not have programs). Always this index must be greater than 0 (>=1) for being a drop down list.
MIDI Universal Controller v2.0.327 (August 2021):
- Added: New «Wave Builder», the magnificent audio wave generator for digital audio synthesis that works with the Renoise Sampler Waveform.
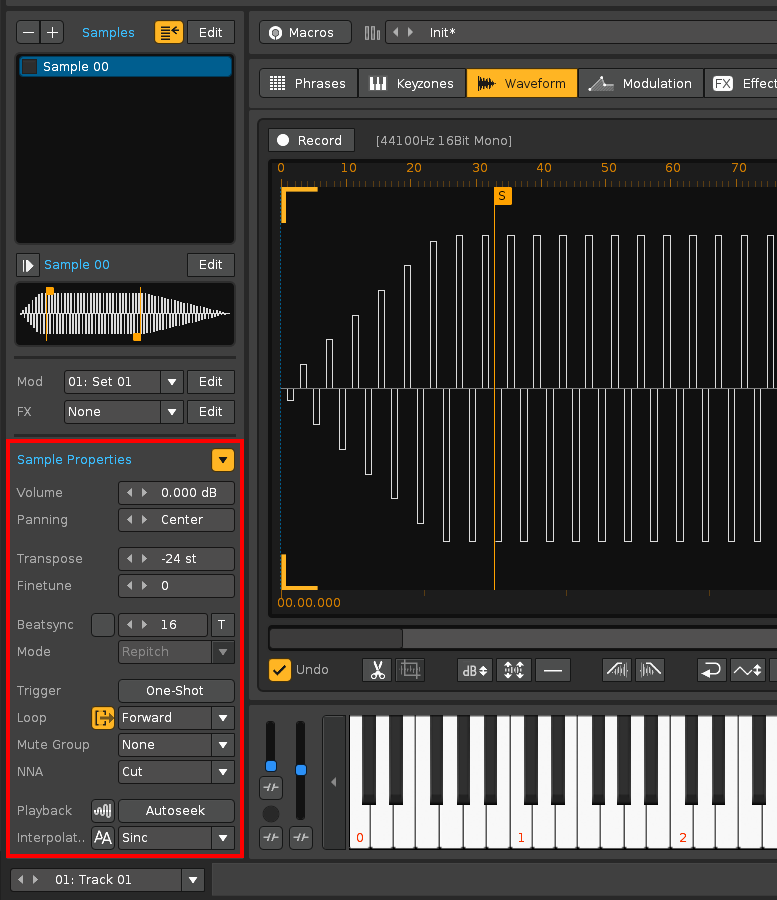
- Modified: the old «Sampler Waveform» area has been updated with the name «Sample Properties».
- Modified: the Wave Builder panel has been transferred to the «Sampler Waveform» area.
- Added: New section to edit and save audio wave presets. Include a new folder named «waves» to save the audio wave presets and other configurations.
- Modified: the Slider Master also show the parameter name when the options panel is visible.
- Added: new View Value Status for «Sampler Waveform» (Wave Builder), «Sample Properties» or «Sample Recorder» area.
- Fixed: Sample Properties Slice 1 to Slice 4: when loading the area this sliders erroneously moved 4 frames.
- Moddified: Reordered the Options Panel.
MIDI Universal Controller v1.2.255 (July 2021):
- Fixed: Sampler Keyzones/Distribyte Type: «Distribute» returns an error when the number of samples is >120.
- Added: Sampler Keyzones/Distribyte Type: «88 Piano Vel». This distribution classifies the samples accumulating every 88 notes, starting from A0. You can classify up to 440 piano samples in 5 pitches (up to 5 stacked velocity ranges).
- Added: new area: «Sample Recorder». Include start/stop recording button, cancel recording button and show/hide Sample Recorder window checkbox.
- Moddified: «Options Panel/List Customization» updated: Area Preset B & Area Preset C.
MIDI Universal Controller v1.1.252 (May 2021):
- Added: “Device Panel” of Pattern Editor/Pattern + Matrix area: new slider bar “Note End RDM”.
- Moddified: “Device Panel” of Pattern Editor/Pattern + Matrix area: the slider bar “Note” is now “Note/Start RDM” (predominates over “Note End RDM”).
- Added: “Edit List” of Pattern Editor/Pattern + Matrix area: new operation “Randomize Notes (RDM)”, with a range between “Note/Start RDM” & “Note End RDM”. Obey the Step Length value.
- Added: “Edit List” of Pattern Editor/Pattern + Matrix area: new operation “Insert Lines (Step Length)”, will add number of lines based on switch selection (Row-Lne-Col-PtTr-Ptt-Sel) & Step Length value.
- Added: “Edit List” of Pattern Editor/Pattern + Matrix area: new operation “Remove Lines (Step Length)”, will remove number of lines based on switch selection (Row-Lne-Col-PtTr-Ptt-Sel) & Step Length value.
- Modified: “Edit List” of Pattern Editor/Pattern + Matrix area: the names with “Delete…” are now called “Remove…” for consistency.
- Updated: “Edit List” of Options Panel/List Customization has been updated with new operations.
- Updated: “Edit List” of Options Panel/List Customization: the default lists of the 3 Edit Presets (A-B-C) have been updated.
- Improved: Options Panel/List Customization: the panel that contains the lists has been remodeled and rearranged to occupy less height because of the large number of operations available.
- Improved: Options Panel/MIDI & SysEx In ➜ Out: the panel that contains more information can now be hidden to occupy less height. It now supports older resolution laptops that are at least 768 pixels high.
- Modified: [-] & [+] bottom buttons of Pattern Editor/Pattern + Matrix area can now add or remove lines (allowing also press & hold) when edit mode is enabled.
- Modified: The text of some tooltips has been updated.
- Improved: some editing operations functions have been revised.
MIDI Universal Controller v1.0.245 (May 2021):
- Initial Release.
How to start installing?
- Download the ZIP file. Please always download & use the latest version published.
- Inside is the tool in XRNX format. Install it like any other tool.
- The access link is at “Renoise: Tools / ~ MIDI Universal Controller…”
Image Capture Album. A first look!
You can see much of the content of the tool by looking at the captured images. You will see that there is a lot of content there. Many things will be familiar to you! Download the album and take a look!
![]() MIDI Universal Controller 2.0 - Image Capture Album
MIDI Universal Controller 2.0 - Image Capture Album
MIDI Universal Controller. Get the full version!
MUC is available as a Full Version, which requires a personalized user license, valued at € 20 (euros). If you are interested, please, contact the author «ulneiz» to get your personalized user license (send me a PM for more information).
Please, seriously consider supporting the development for this type of projects buying a license. Keep in mind that it takes a lot of time, effort and money to build!!!
…ulneiz
I also want to give a big thank you to all the users who are supporting the PRE tool and SMC tool. Thanks to this support, it is possible to continue developing complex tools such as MUC.
Enjoy it!
Concept of the MUC.
The MIDI Universal Controller or MUC allows you to control practically everything Renoise from the MIDI input, managing to unify the control magnificently.

Represented as a single dynamic floating window, the MUC works as a MIDI bridge between your physical MIDI devices & Renoise, controlling all operations. It offers access to a multitude of functions (navigation, transport, song characteristics, or instrument, sample, phrases, MIDI properties…), as well as unified control of all parameters (both for effects, modulation or VST/VSTi devices), editing features, automation, & other unique functions & controls not available from Renoise.
Use absolutely all of your MIDI routing for all your song projects without exception!
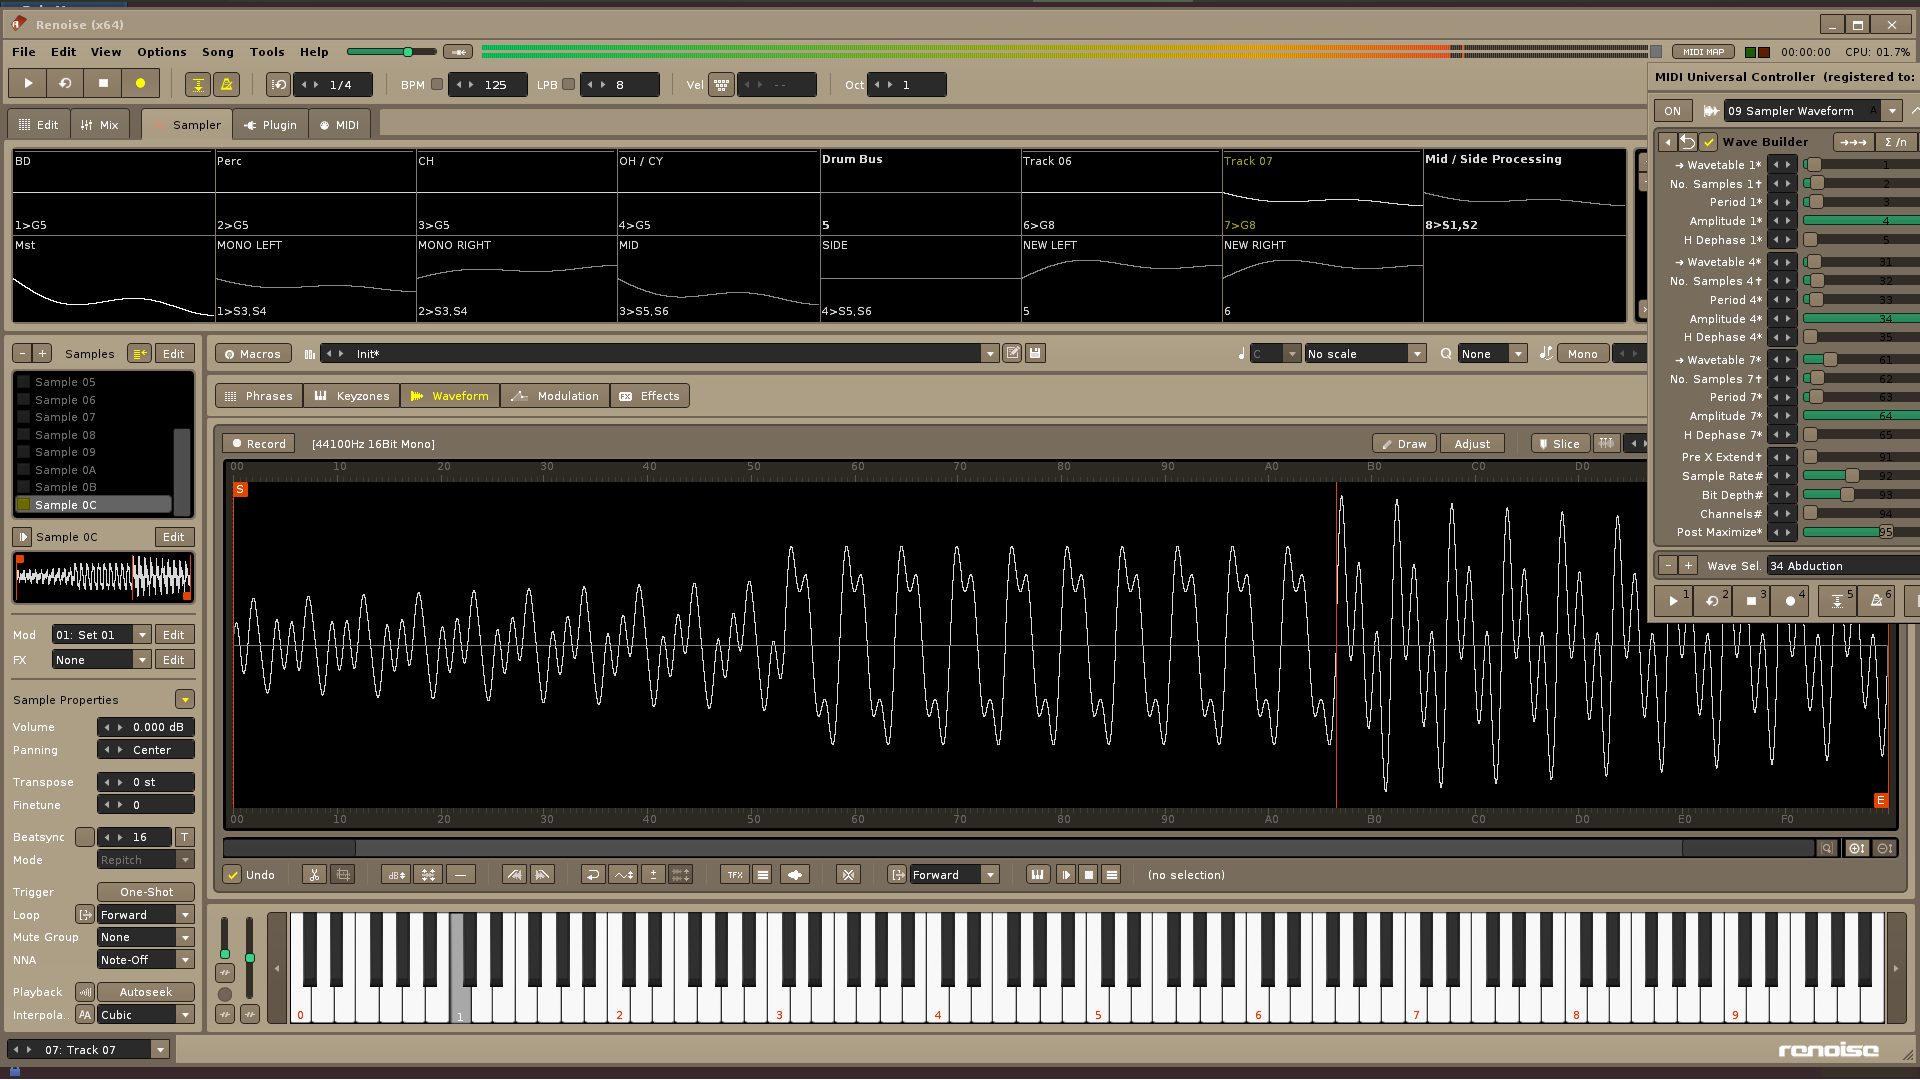
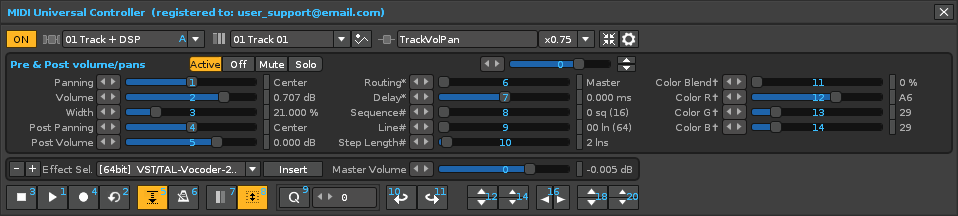
The MUC window. Controls distribution.
The main window is divided into 4 parts & will show a width & height determined according to the selected control area (List 1). To position it, use a strategic corner of your image monitor, or place it on a secondary image monitor. The window layout is as follows:
- Top bar for internal navigation & selection of main elements.
- Main device panel. Displays a multitude of sliders to control specific parameters or properties.
- Bottom bar for load or remove different elements.
- General button bar for transport & navigation.
How to start? Steps to MIDI Map.
As a general rule, you only need to do these steps once. The goal is to save the entire MIDI mapping somewhere. This way it will be possible to use it in a multitude of projects. Start a new project & immediately get to control the knobs, faders & buttons of your physical MIDI devices. The steps to map & save the mapping:

- Go to “Renoise: Edit/Preferences…/MIDI” & make sure you have your up to 4 MIDI devices enabled.
- Go to “Renoise: Tools/~MIDI Universal Controller…”. This operation will display the floating window of the MUC.
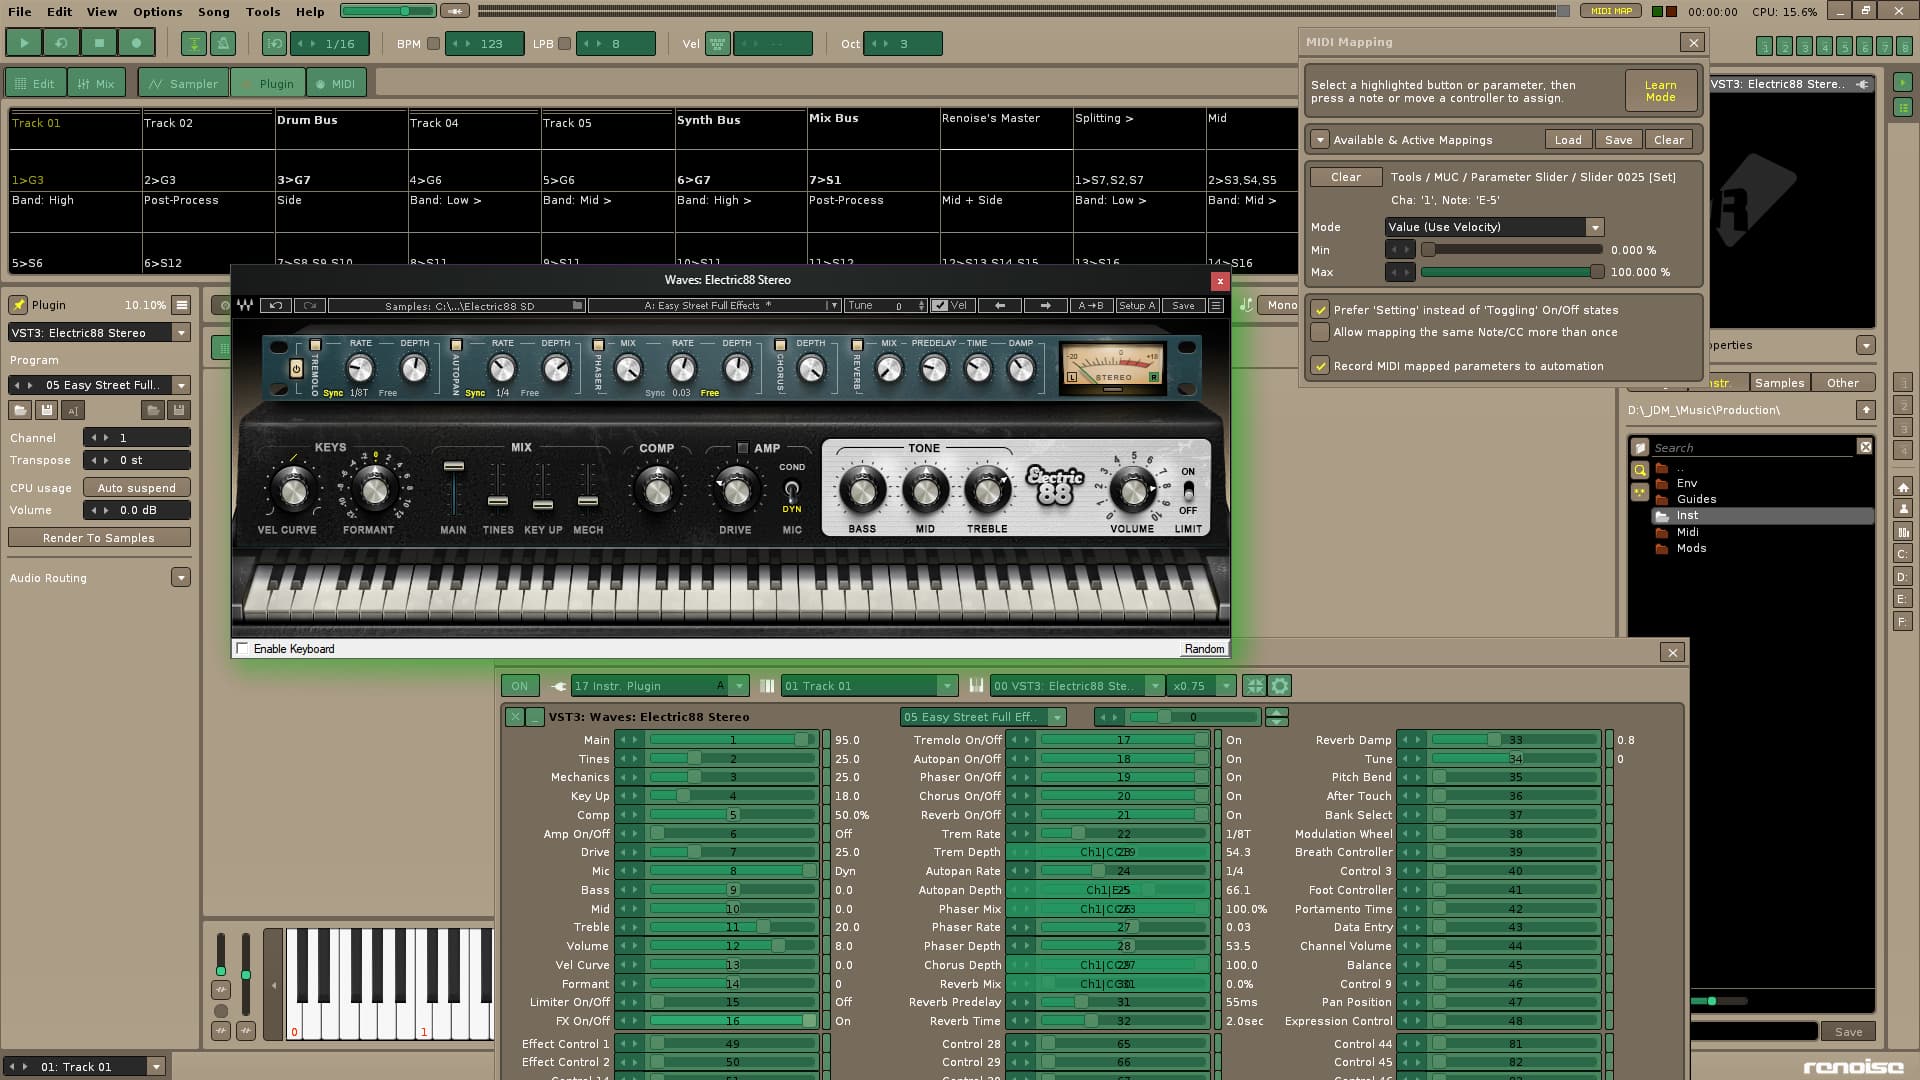
- Go to “Renoise” & press “MIDI MAP” button (top right), the “MIDI Mapping” window will appear… Keep “Learn Mode” on.
- Go back to the MUC window & go through each MIDI mapping by first clicking on each virtual control:
▸ Use the physical knobs, faders, or buttons on your MIDI controllers to map at least all of the most important controls of the tool window.
▸ In general, use the “absolute map mode” of the limited rotary knobs or faders for the drop-down lists.
▸ It is recommended to use the “relative map mode” of the 360° rotary knobs (if available) for all sliders.
▸ For most button or switch type controls, be sure to use physical buttons that output two MIDI push-&-release signals.
▸ Map all your physical controls strategically. Remember that you will need to do a short mental memorization exercise to associate the physical control with its corresponding virtual control. - Go to “Renoise: Song/Midi Mappings Info…”. Read & check that you have the correct mapping of all your controls.
- Save all your MIDI mapping somewhere. You can do it in 3 ways:
▸ Save it inside an XRNM file. Go to “MUC: show options panel: MIDI Map & OSC/MIDI Mapping Files”.
▸ Save it in the general “Template Song”, valid to start any project. Go to “Renoise: File/Save As Template Song”.
▸ Save it in a existing “Song”, in the middle of the project. Go to “Renoise: File/Save Song As…”.
Once you have saved the MIDI mapping, you can work with all your song projects. MUC allows you to always use the same mapping universally, regardless of what items are added or removed in each song project.
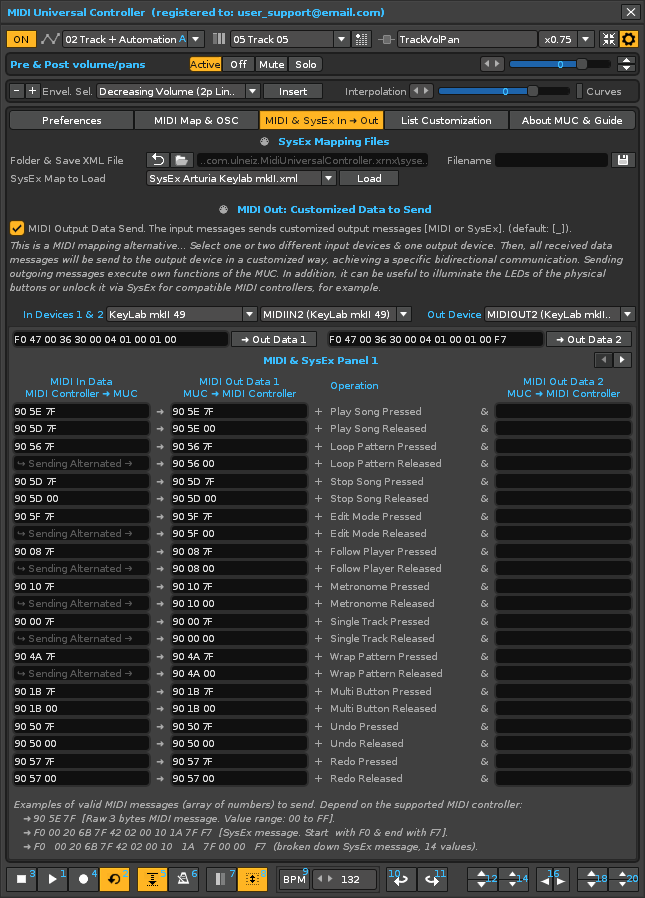
On the other hand, MUC offers a bidirectional MIDI routing alternative. Access “MUC: Options Panel/MIDI & SysEx In ➜ Out”. This is especially useful for communicating with the MIDI Controller, allowing you to send raw MIDI messages or SysEx messages compatible with the MIDI controller in a custom way.
Peculiarities of the MUC.
This advanced control tool offers exclusive functions & some unique ways of handling. Thanks to its design, it is possible to control much more than Renoise via MIDI input, using far fewer physical controls. Some peculiarities:
- With the window in “OFF” mode it is possible to change the Custom List 1, the Custom List 5, change MIDI mapping or access to Options Panel.
- The List 1 (Area Control) and List 5 (Edit Operations) are customizable, with 3 presets (A-B-C) to choose from.
- The automation switch (top bar) allows you to switch between the two automation modes with a simple click or toggle recording on/off, by press & hold.
- MUC can display up to 1000 parameter sliders, useful for VST and VSTi plugins.
- Customizable plugin routing! Inside «Instr. Plugin» is possible reroute each parameter of current plugin (use «Rou»). This works for every instrument plugin & is saved automatically for all sessions or song projects.
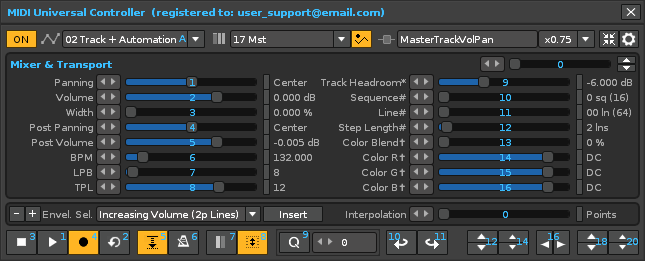
- The “Slider Master” can be individually bridged with all parameter sliders (positive indexes) or all drop-down lists & transport valuebox for song operations (negative indexes).
- Transport & Navigation button bar:
▸ [Stop] + [Play] buttons or [Stop + Collapse] button let you play the song from the current line or collapse only the selected track.
▸ [Stop] button will return a panic when the song is already stopped.
▸ The central switch (next to the transport valuebox), allows to switch between 6 different control song operations.
▸ The navigation buttons allow “press & hold” for repeat operations. - The “options panel” has several preferences & more information that can be turned on or off. This allows greater customization in the functions to be executed.
- Inside “Pattern Editor” o “Pattern + Matrix” area the List 5 It allows to directly execute a multitude of editing functions, combining them with the 6-position switch.
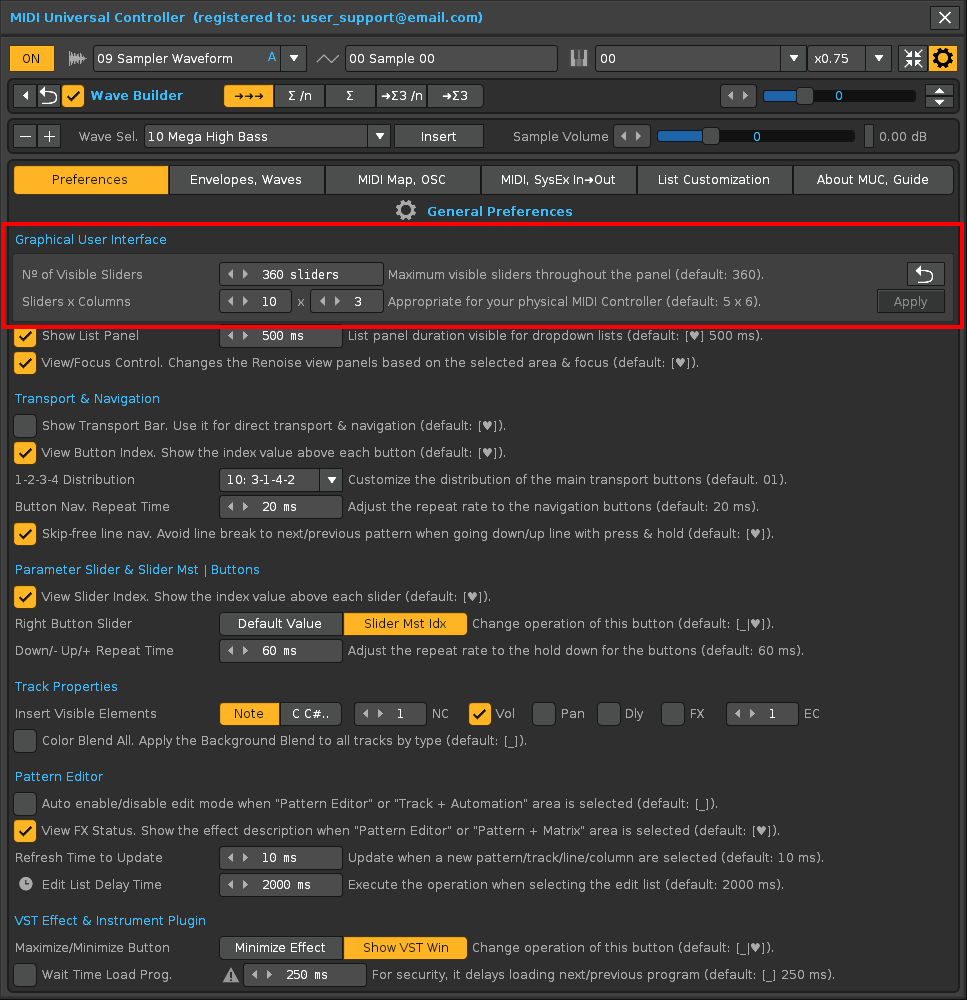
- Customizable device panel. It is possible to customize the distribution of the number of slide bars & number of columns, adapting to the physical MIDI controller.
- The layout of the 4 main transport buttons is customizable -play, loop pattern, stop, edit mode- (1-2-3-4 Distribution), adapting to the physical MIDI controller.
- It is possible to insert tracks with custom settings.
- It is possible to control the Distribution Type (Sampler Keyzones) or the Keymap Distribution (Sampler Phrases), using a rotary knob or fader only.
- MUC provides the ability to reproduce the sound of the instrument, sample, or phrase from a rotary knob or fader, via OSC.
- MUC includes envelopes for automation. Allows you to easily save, add or modify envelope points by text editing.
- MUC is bi-directional. It also allows you to send MIDI output messages (SysEx Data) to enable/disable transport or navigation buttons (LEDs) or others.
- The Section “MIDI & SysEx In ➜ Out” provides an alternative to custom bidirectional MIDI routing. Use it to gain more control of your compatible MIDI controller.
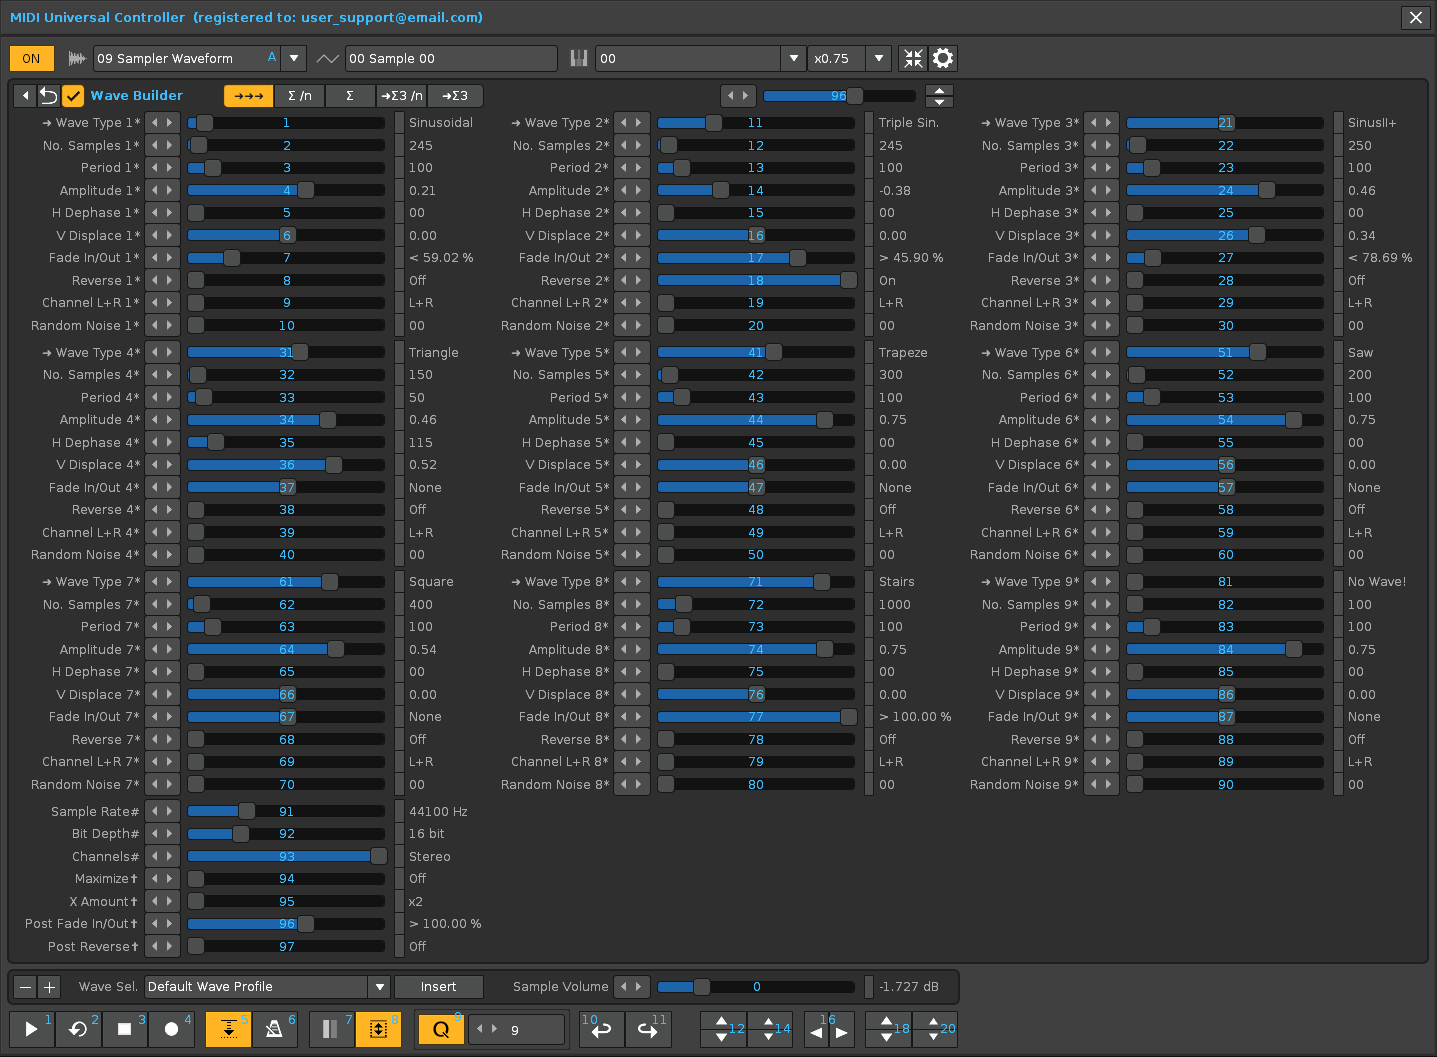
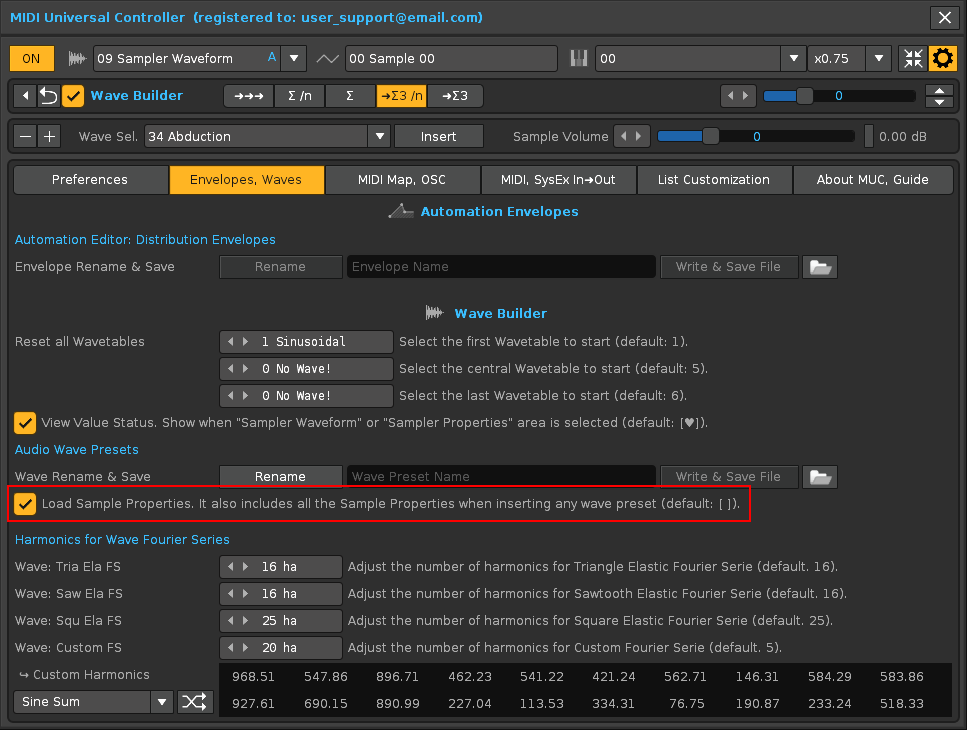
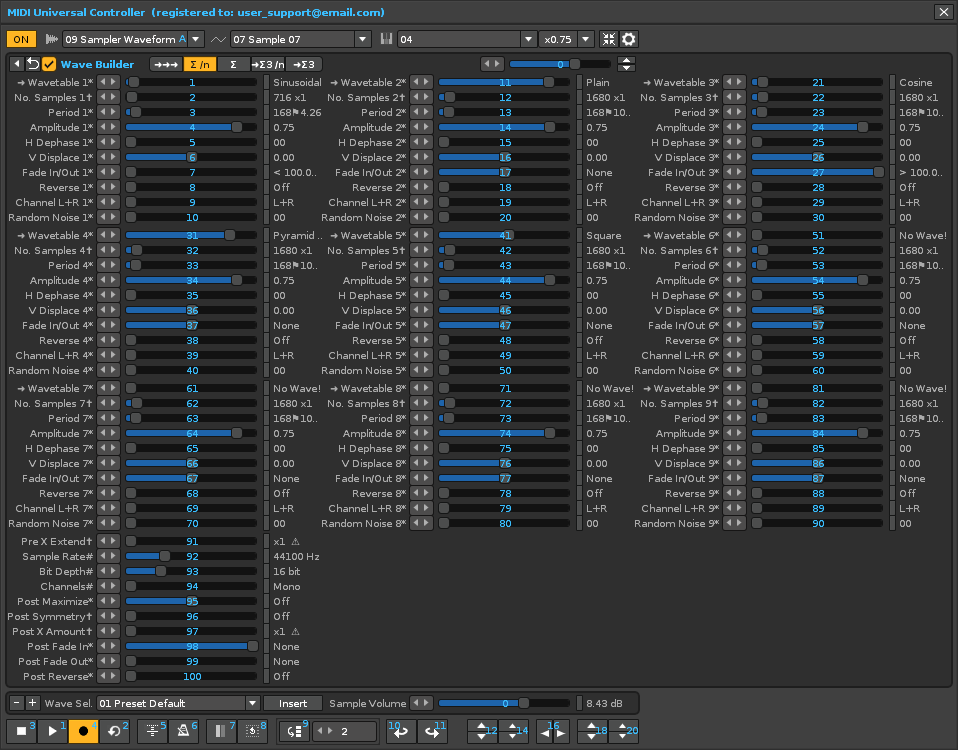
Peculiarities of the «Wave Builder».
The «Wave Builder» is a charismatic audio wave generator for digital audio synthesis. Works with Renoise’s Waveform Sampler:
- It uses specific mathematical formulas and variables controllable by means of sliders to construct audio waves of different kinds.
- It offers 9 blocks of audio waves with 10 parameters each (Wavetable, No. Samples, Period, Amplitude, H Dephase, V Displace, Fade In/Out, Reverse, Channel L+R, Random Noise).
- Includes more than 30 types of calculated audio wavetables that can be modified or combined.
- Includes a Custom FS wavetable with the possibility of manually or randomly setting up to 20 harmonic values with various mathematical formulas.
- The blocks can be added in series, one after the other, or added together to generate combined audio waves.
There are 5 different insert modes. This will add endless possibilities. - It includes some post-processing parameters that affect the final resulting wave.
- Wave Builder allows you to save and load audio wave profiles, without limits.
- Basically an audio wave preset saves settings for 5 features:
- The values of the parameters of all the sliders.
- The «Insertion Mode» (remember that there are 5 modes).
- The editable name of the audio wave preset.
- The Custom Harmonics values for Wave Custom Fourier Series.
- And also, all the Sample Properties (Volumne, Panning, Transpose… Loop, NNA, Playback, etc.).
- When inserting a preset from the drop-down list, the loading of the sample properties can be disabled from Preferences.
- Of course, all parameters are controllable via a USB MIDI controller or from the mouse.
- All wave presets are saved using tables in a single editable text file (.TXT). In this way, it is very easy to share everything with your friends.
Using the Wave Builder is the first step to using the sample Modulation Sets and Effects Chains. It allows full creativity from the start, without the need to load WAV or FLAC audio files.
In addition, it will help you learn how sound synthesis actually works, gaining a deeper insight into how to create the foundation for new sounds.
Also, MIDI Universal Controller offers some exclusive MIDI operations that are not available from Renoise, such as being able to change “presets” in the effects devices, or change “programs” in the plugins, & MIDI access to some specific parameters, such as the “Routing”, “Delay”, “Colors RGB”, “Color Blend” of the tracks, the “Track Headroom” parameter, or the main volume of different elements (song, tracks, instruments, plugins, samples, phrases…). This allows for faster & more direct control.
Use the MUC as a powerful interconnected network of controls for true MIDI control more easy, whether for any modest physical MIDI controller or a sophisticated mix of high-end MIDI controllers!