Hey all,
Just thought it might be useful to have a consolidated thread dedicated just to mixing. Share your wisdom, ask your questions, ruminate on strategies, ask for feedback on mixes here.
Let’s all get better at mixing!
Hey all,
Just thought it might be useful to have a consolidated thread dedicated just to mixing. Share your wisdom, ask your questions, ruminate on strategies, ask for feedback on mixes here.
Let’s all get better at mixing!
Is this intended to be a thread like this one?
Oh question place… neat! = )
Ok, so if im say remixing something, and have a bunch of stems in a group channel…
I’d like some device, similar to multi-band-send, which, would allow me to put specific
effects on sonics that are panned a certain amount.
Say, for example, 80% or more left goes to one effect and 70% or more right goes to
another effect, and the rest passes through untouched.
Wonder if this is currently possible somehow, perhaps formula device or signal follower?
Thanks!
no, it’s intended to be a much better thread than that one… J/K, of course! ![]()
It’s funny, I had searched the forum for mixing threads, and that one didn’t come up, and I didn’t see anything too similar, so I thought to start this.
My intention was more for this to be a place for basic mixing principles and discussion, separate from mastering. Of course there will be some overlap, as there always is. Just thought this could be a useful resource for new producers, especially.
I’d love it if you wanted to lay out your basic mixing principles in a concise format here. You consistently give good mixing advice, imo ![]() If not, I’ll lay out what makes sense to me, and all others are encouraged to do the same.
If not, I’ll lay out what makes sense to me, and all others are encouraged to do the same.
Just a consolidated thread for mixing info!
@Jek this is an interesting question, and I’m not sure that it can really be done the way that you’re asking (by percentage in the stereo field), because stereo position is largely a function of relative signal amplitude in a two channel (L/R stereo) sample. What you could do is to use the stereo expander device to select just the left or right signal for processing, like this:
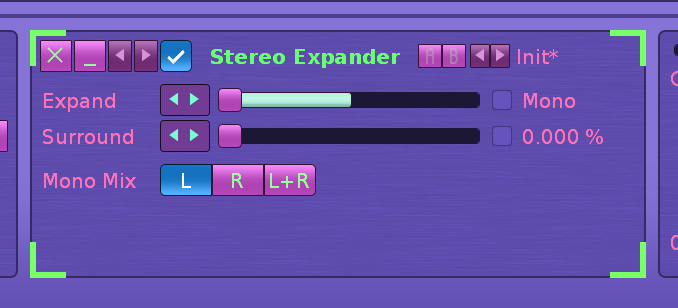
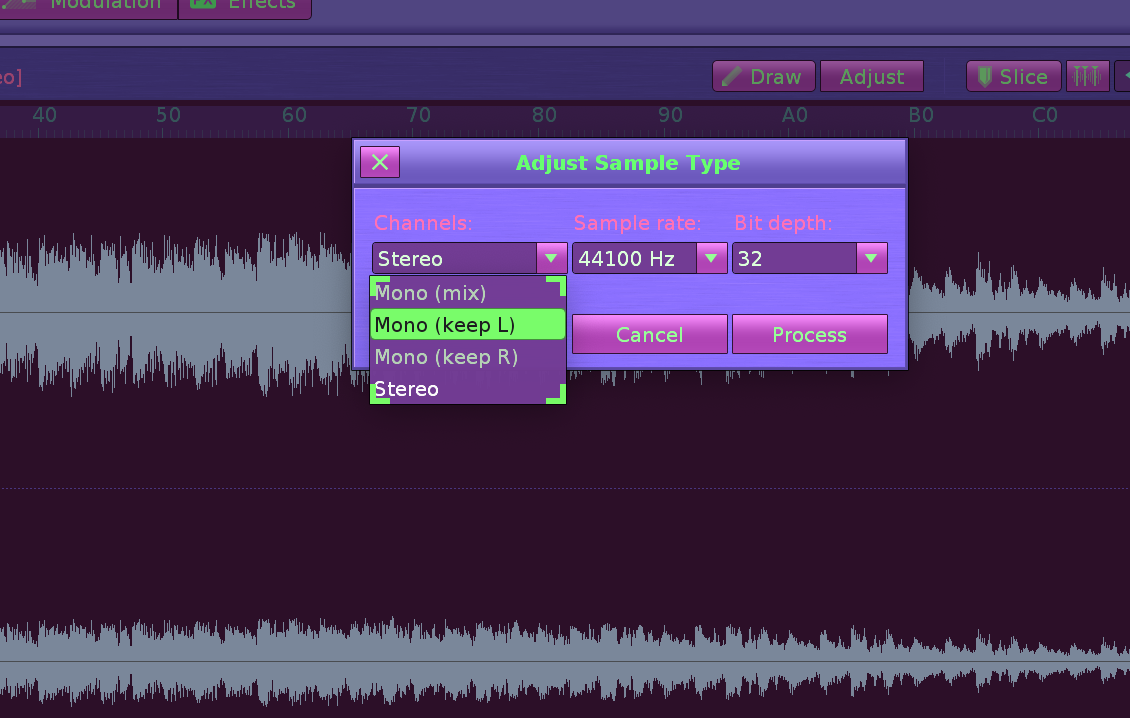
The left channel being selected in this case. But if you just want one channel, you could more simply just adjust the sample properties using the “adjust” button to select either the left or right mono signal, like this:
I don’t know of another native way to extract signals from the stereo field, but that doesn’t mean it doesn’t exist! Might be able to do some mid/side trickery to get what you’re after, but I’m just not sure about that. There are also AI tools online for stem/vocal signal extraction, some free to use.
HTH ![]()
Oh wait, I misread your question, @Jek… on rereading it, I see you’re after something different. You could do a split in instrument fx chains breaking a stereo signal into L and R mono signals, processing them independently, and remixing them in the proportion you want… I think. Let me try it, and post back in a minute…
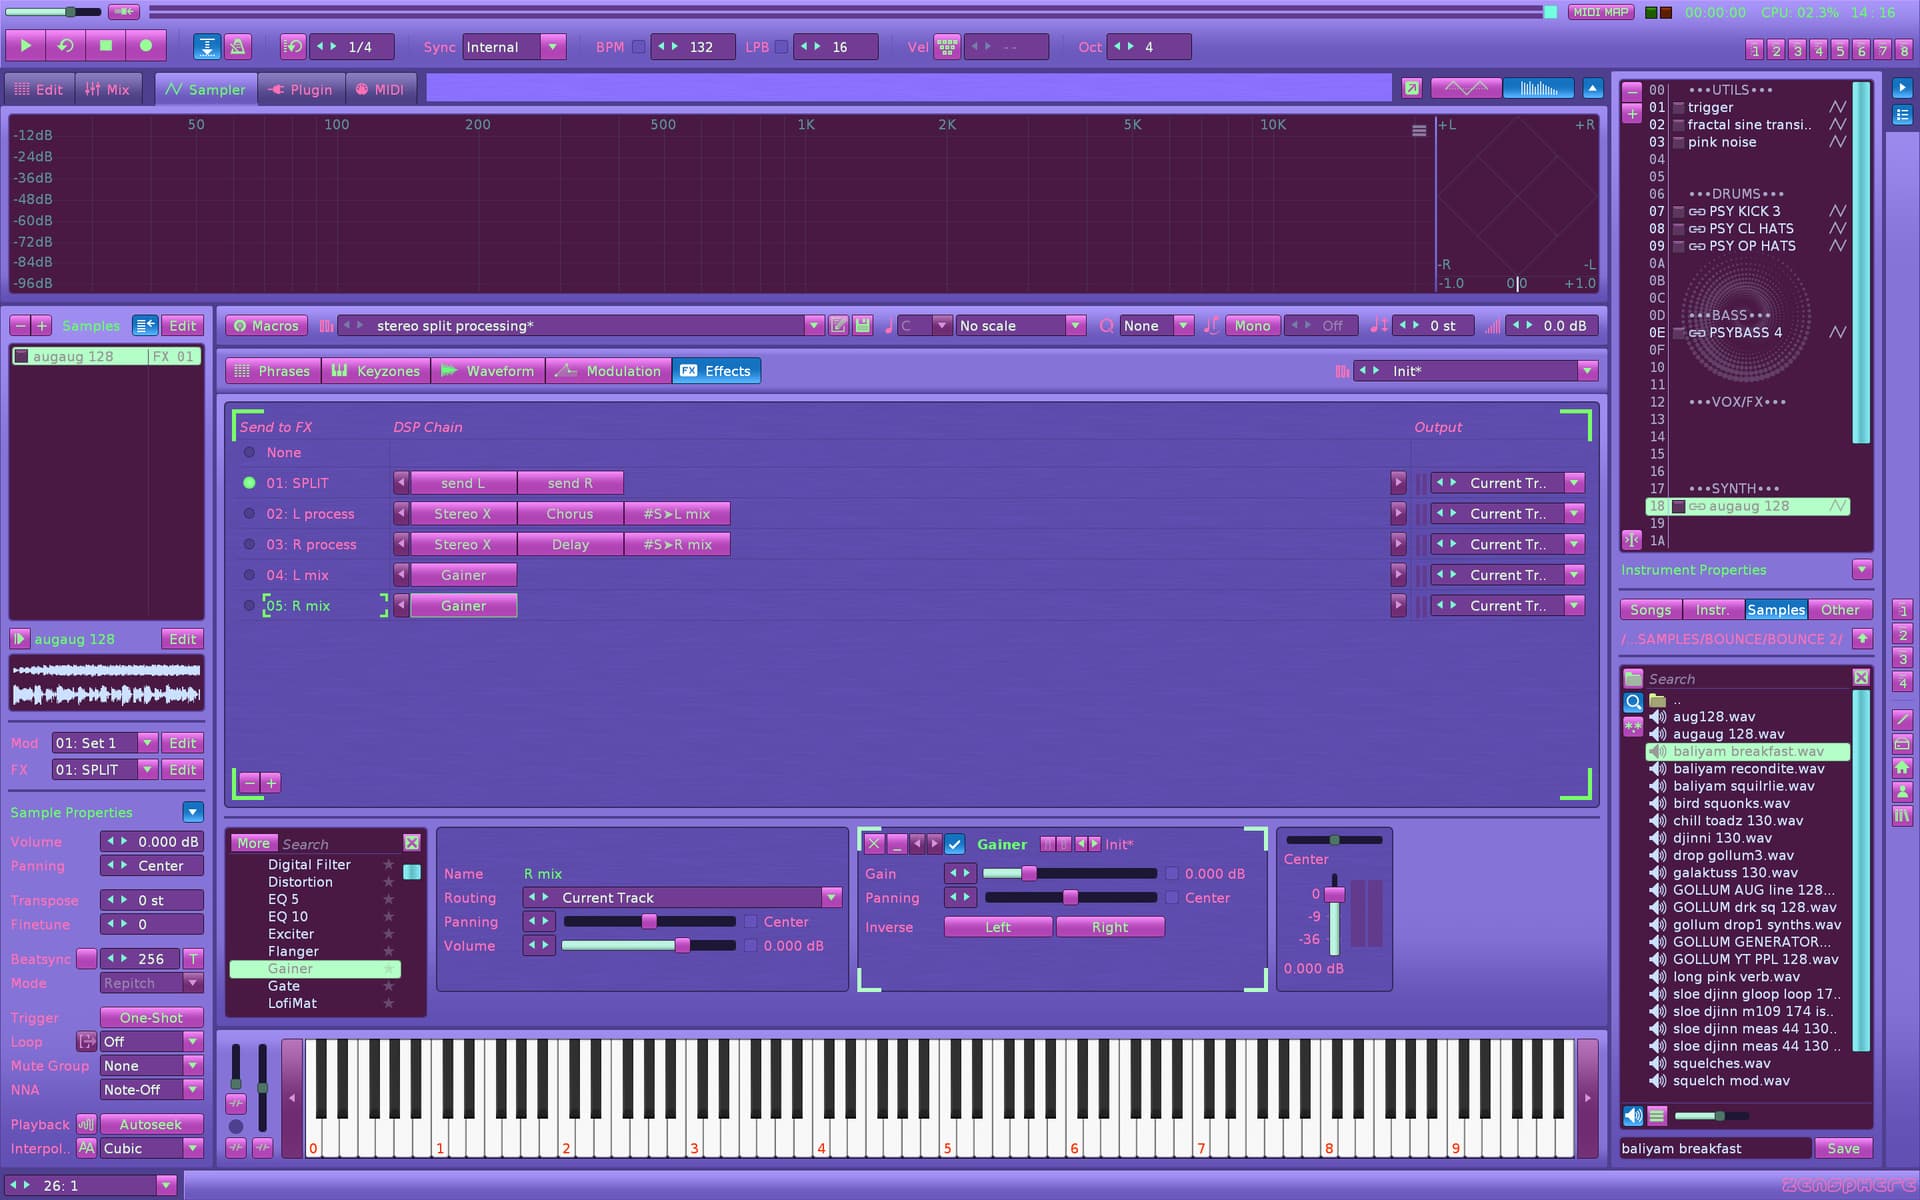
OK, check out this instrument:
stereo split processing.xrni (725.2 KB)
the left and right channels contain (in this case) completely different signals, which are then split using sends, monoed in their own fx chains, processed, then sent to their own respective chains for mixing back into a stereo signal using gainers.
Still not quite sure if this fits the bill for what you’re after, but it does let you process left and right channels of one sample separately, and then re-mix them in whatever proportion you want in the stereo field. A screenshot of the setup:
Cool thanks for looking into this; wonder if after splitting the channels it would
be possible to detect the db in that channel, and then compare that db value
to the db in the other channel; if >70% of the total db is just one channel then
send it.
Great instrument, useful for lots of things!
Wide basses, thick saw’s, making mono samps stereo, lots of stuff! ![]()
cool skin, can you link it here xD
I’m about to mix ~100 generative loops I’ve made between now and last august-ish.
I used some waves limiters but I’m thinking of replacing all non-native devices with native ones and then making all the xrns available for download.
Starting to think that making xrns files to share with other renoise users might be my preferred “release” format going forward.
There’s the question of what to do with the loops. . . it’s puzzling but I know on a personal level the contemporary bandcamp/soundcloud posting doesn’t exactly fill my heart with wonder if you know what I’m saying.
Lately I’ve been obsessed with parallel processing after spotting the multi-band send on an instrument effects section in a zensphere video. Would be glad to trade thoughts regarding that topic. I can’t get over how much life it brings to samples.
Thanks! I always help if I can. You can find my mixing tips all over the place within this forum. There’s not much I can say here. My basic advices for mixing are:
That’s it. Need more details? Or is there anything else I should mention?
Hey, great, that about covers it ![]()
@secondheat here ya go: Color Themes For Renoise - #836 by slujr
@Jek Thanks for asking these questions! Thinking about them gave me some stimulating new ideas! ![]()
The perceived left-right placement in a stereo setup can be manipulated in at least two ways:
When thinking about panning, one thing to notice is that a pan knob can work in a few different ways. As an example the pre- and post-panners in Renoise’s mixer/track DSP chains work differently. If memory serves me right, the pre-panner only controls the volumes of L and R channels, while the post-panner also includes crosstalk, so that in the extremities you essentially have a sum of the L and R panned to one channel. I have a collection of panning doofers with different panlaws that work similarly to the post-panner, since the post-panner is not automateable and I don’t know where I could set the panlaw. I don’t think there’s a setting for that in Renoise?
If you think about it, the “stereo field” is just an illusion of perception. It’s just two mono channels, no matter how you look at it. You can separately process left, right, sum (mono/mid) and difference (sides) of a stereo signal, and you can do some fancy spatial trickery with delays, reverbs, filters, convolution etc. But I really can’t think of a way to apply processing only to say material that’s panned >75% left. You would have to be able separate that somehow from the stereo signal. I’m not aware of any way to do that. As @slujr suggested, maybe some advanced mid-side wizardry could be used here? Or maybe someone could cook up some neural network that could pull it off in some way not humanely understandable? IDK, wouldn’t be the first time AI did something I didn’t think was possible. Or maybe some Dan Worral -type polarity flipping madness could be used here? Panning to the desired position and extracting the desired part of the signal with some polarity flipping trickery? That could very well be possible, and it’s probably the most fruitful direction to start poking at if you really want to do it. ![]()
Now, while I don’t know if what you’re after is possible, you can still use parallel processing in some fancy ways to effectively pan you FXs separately:
I haven’t ever actually tried this though, it just came to mind while reading your question. But I don’t see why it wouldn’t work. Though maybe it’s just a more complicated version of having a simple separate 100% wet parallel processing channel that you can pan where you want to. ![]()
![]() So maybe not worth the effort
So maybe not worth the effort ![]()
Yes, the formula device can be used to compare inputs and make the output do what you want based on the comparison. Basic mathematical comparisons can be done as you’d expect:
< and > work as expected. “Equal to” is == (returns true or false),
<= and >= work too (I’m not 100% sure which symbols comes first though). If you’re looking into specifically comparisons of amplitudes of two different signals, you can hook two signal followers to the A and B inputs of the formula device. I’ve found that “if-then-else” structures are a true do-it-all workhorse when comparing signals to each other. Wrapping everything into a function and calling that function as the output of the formula device has always worked wonderfully for me.
I’ve been messing with some native dynamic convolution this past year and I’ve split my signal with these basic mathematical symbols and "if-then-else"s, based on either the actual amplitude of the signal (signal follower), or the note velocity (velocity tracker), basically just setting up a single macro to control which FX chain is fed and how much. So yes, you can absolutely split your signal to different FXchains, even different tracks based on volume/velocity/some other parameter or rule you make up yourself. Some kind of comparison between L and R channels is one possible output, and you can also write very specific rules about how the comparison controls your sends or dry/wet percentages or whatever in each channel. If you figure out a way to separate the portion of your signal to which you want to apply your effects, what you are searching for (if I understood it correctly) could be possible.
OK, here are my general principles for mixing psytrance, applies to many other dance oriented genres as well, with some exceptions
•mono kick and bass, at least below 200-300Hz. Sometimes I will have stereo fx and width on my bass above this range. make sure your kick and bass aren’t competing with each other in time or frequency content by sidechaining/volume shaping/using syncopation/phase remediation - Mfreeformphase and an oscilloscope can help with this last part
•HP and LP (almost) everything except kickbass. I usually let synths play through from 200-500Hz on the bottom to around 9-11KHz on the high end, sometimes higher if I want the air. percussion like high hats get to ring through on the high end. this helps keep things crisp
•check the mix in mono vs stereo throughout. things can sound very different. make sure your mix sounds good in mono - especially if it’s meant for a big system. I have a dedicated midi trigger set to mono my master channel so I can check this easily and quickly
•anchor your most important elements and mix everything else up around them. I usually anchor my kick around -12 db and my bass around -13db, then snare against those, then lead synths against those… if you can get those 4 elements sounding good together, the mix is a long way towards being decent. mix other elements up to sit well within that framework. I use a lot of maximizers to control peaks at every stage. clippers and limiters can work well here, too. use your ears to make sure you’re not breaking up the sound too much, unless that’s what you’re after.
•minimize competition in the time and frequency domains. this can be done through arrangement, sidechaining, eq, volume automation, etc. be conscious of what parts of the frequency spectrum each element is dominating. eliminate mud and confusion as much as possible. still very much working on this one, lol
• it’s much easier (for me) to focus on a solid mix from the beginning of composition and make improvements as I go, rather than separating out composition from mixing, Other people like to write first and mix later.
•watch your peaks, use the spectrum analyzer religiously. compress, limit, eq, maximize, but keep it clean - unless you want it raw/crunchy/dirty - in which case, things become quite a bit easier ![]()
•mix at low volume, checking the mix on all your options for monitoring - headphones, monitors, auxiliary speakers, etc. different problems will become apparent with different listening setups. aim for balance, with the mix sounding as good as it can across different setups. if your mix sounds good at low volume in mono, it will likely sound great at high volume in stereo ![]()
I’m sure there’s much more to add, but this is a decent place to start, imo. like any rules (or guidelines/suggestions, in this case) know when to break them creatively ![]()
Yeah, I’ve made some channel strip doofers in the past, but prefer to have the devices more modular in each track these days
You nailed it with your tips. I would claim that this fits to any genre. ![]()
Shortlist of my tips, which are “surprisingly” pretty much the same than yours:
That’s the obvious stuff, right?! ![]()
Some of my personal rules:
I’m somewhere in the middle. If the beat is mixed well right from the beginning, all the rest is a “piece of cake” and will be mixed mostly automatically the right way without thinking about it. So I check the beat first (or at least kick and bass), then I focus on composing (headphones all the way) and at the end I switch to speakers and start doing the whole mix by mono mixing first. But sometimes I start composing through headphones and do the mix afterwards when the song is finished. But in this case it could happen that the low and high ends completely suck through speakers. In my opinion mixing through headphones only is fucking impossible, no matter what all the pros like Andrew Scheps are saying. There’s a big difference between headphones and speakers.
when you do parallel processing do you use eq or filters?
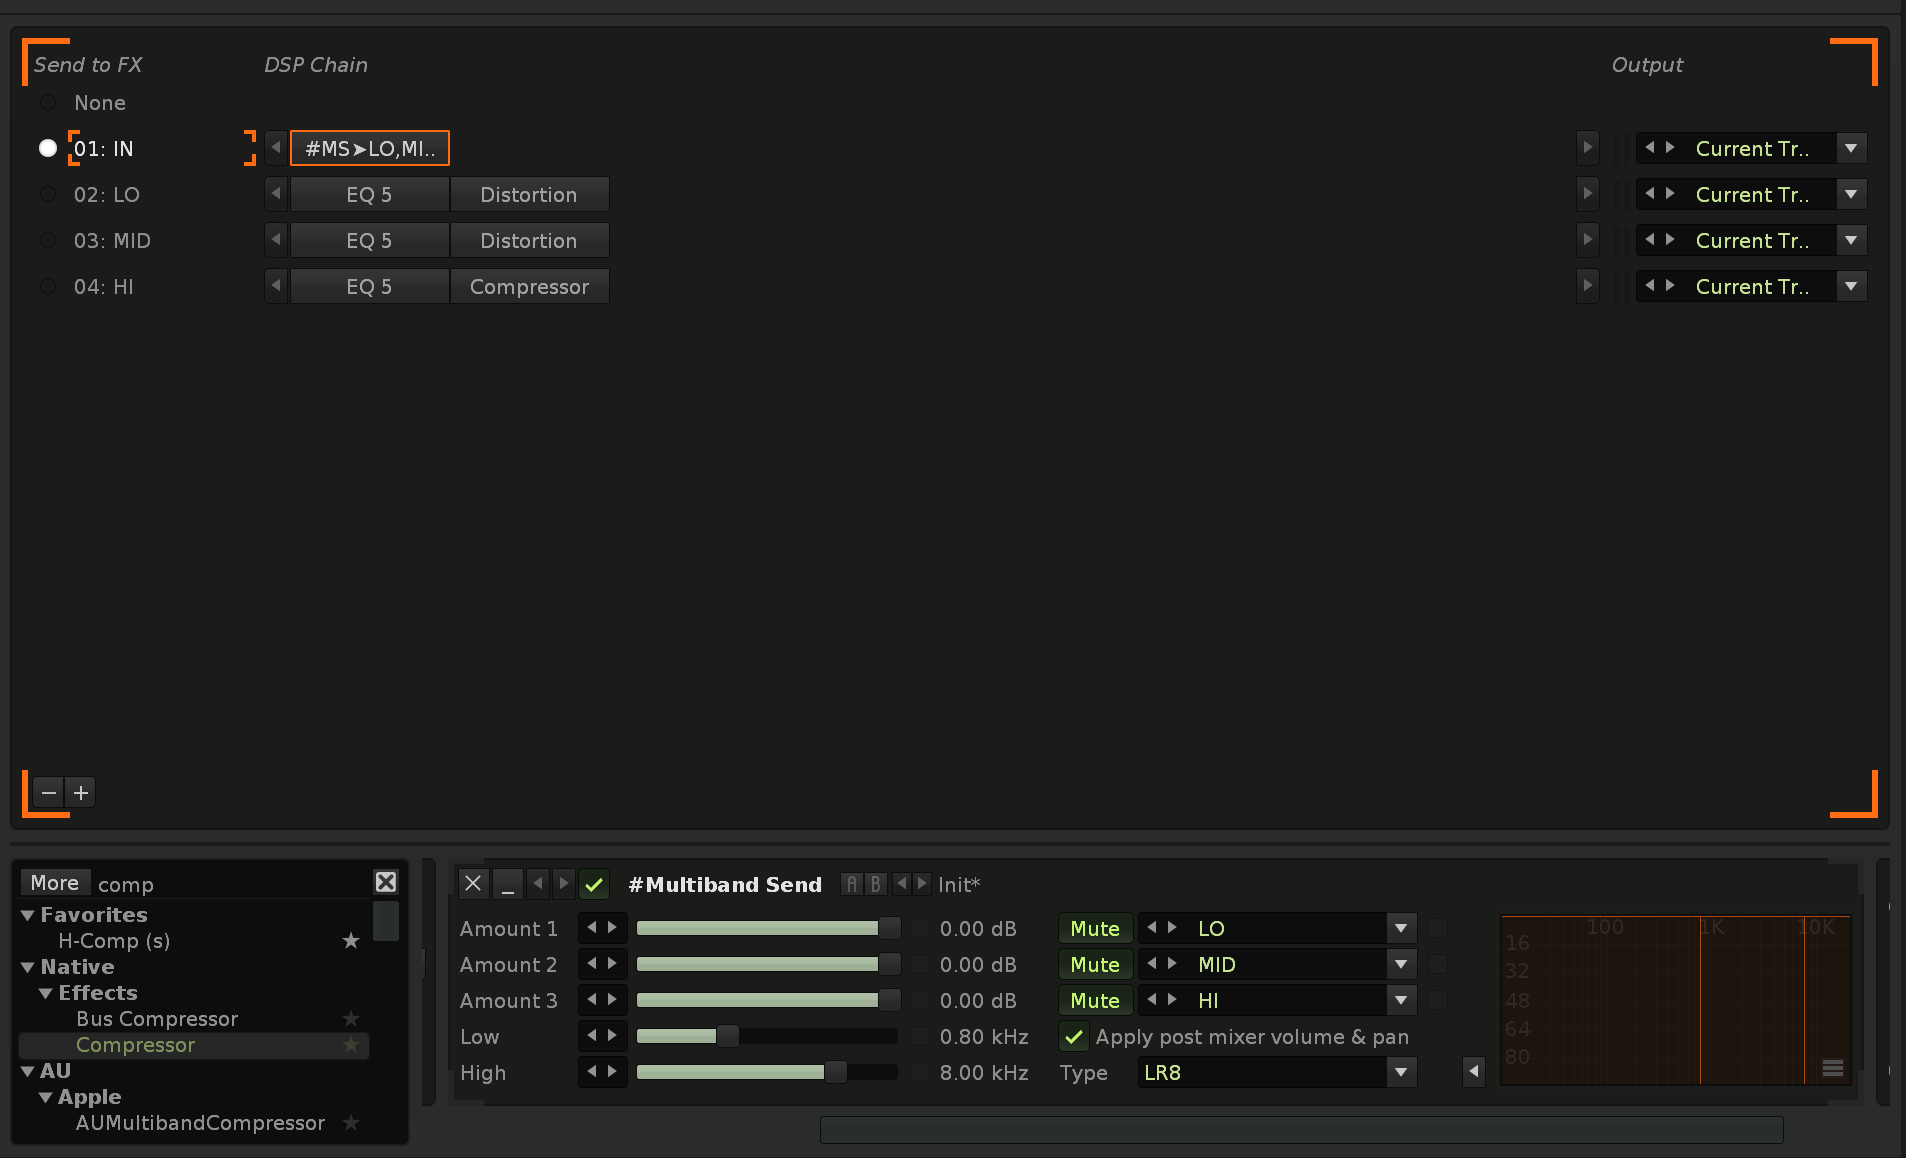
I usually use the crossover filters in the multiband send itself, dialing in crossover frequencies and send amplitudes to color the sound prior to further processing, where I might use filters or eqs, but more likely spatializing effects like chorus, phasers, and delays in conjunction with compression and distortion, depending on what I’m after. Oftentimes, the parallel compression is the thing I want ![]()
here’s what I mean by using the multiband send to color the sound:

you can choose different filter types in the “type” field.
obviously, each send would be going to its own fx chain…
I use them everywhere in mids and highs, lol ![]()
but if mono sounds good, I don’t sweat it
everything is a tradeoff, afaict ![]()
but yes, taming such dsp is an ongoing effort
Not sure if this goes here but needs to be talked about more:
(I mean, mixing starts at good sound selection)
I felt stupid finally answering my question as to why things like a saw wave sampled at C-4 loses the top end when pitched down, why aliasing happens, and why my instruments sucked. I was obsessed at first with sampling just certain notes of plugins (C-4, C-1, and C-0) when building instruments which is extremely restrictive as you are just sampling a certain limit, and if your sample has envelopes or a lot of harmonic movement, it may not end up with the right timing/env at the target keyboard section you wanna play your instrument.
So, audio with fewer harmonics can be sampled at higher notes than fuller audio without losing information when pitched down or introducing artifacts when pitched up
A few wee things, nothing major;
If you have weighty guitars in your mix, putting a signal follower on your bass and using that to drive a dynamic EQ on the guitar bus (as a gentle HPF) will tighten up low end in busy sections while letting the guitars sound full-bodied on sections without bass.
A single vox track often has more impact than double tracked vox.
If you have a car, you have a vocal booth.
Zensphere and TNT have provided brilliant advice above already. Particularly agree with mixing in mono. I think I saw a video years ago about mixing in Reason and the dude demonstrated mixing in mono using only HPFs, LPFs and the faders. Seems like a good way to start a mixing session in my opinion.
Finally want the ultimatively clean, defined reverb in a mix? Then I think there is no other way than isolating the wet sound of the reverb and to process it separately from the dry signal.
How to do this? I like to use groups for this. Put your tracks in a groups to be reverberated together. Make on each track a send to a dummy channel that will output to master. This is the dry signal without reverb. Make it a “keep source” send. You can put a gainer behind it to be able to control the send amount to the reverb, and at this place you can also later add EQs or filters to preprocess each track signal that would go to the same group reverb. Then on the group, put your reverb/convolver/whatever ambience you want to process in a wet isolated mode. Just make it 0%dry and XX%wet, the wet amount being the one you would have used when just using the reverb in a track passing through the dry signal.
So you will now see that the dry signal and the wet of the reverb add together on the master, and the sound would be like if you used it normally in a track. But now you can put an EQ or filters or any other effects on the group track to ONLY affect the reverb. You can heavily EQ JUST the reverb, to make it fit in the mix, i.e. removing all frequency parts of a reverb that make the mix muddy, or accentuate ranges that are desireable to “stick out”. You can use the stereo expander to control the width only for the reverb. You can put modulation effects like phaser or chorus before or after the reverb to add some depth and modulation. You can stack any amount of delay or reverb stages and have their effect isolated, just of course the last stage must pass through 0% of the dry signal. You can add exciters or other distortions to make the reverb more rich and stick out or shine, or to let the bass rumble and to extend that effect with harmonics. You can make a dedicated sidechain send channel just for the reverbs, and send the 0% dry reverb signals all from the group tracks to there, to make a sidechaing affect ONLY the reverb, but not the dry signal. Phew…lots of ways to shape an ambience so it fits just nicely into the mix.
Of course, if you do not like the group track solutions, you can just make an extra send channel for the 0% dry reverb, and send with “keep source” mode to there from your tracks. This is probably the more efficient solution if you want to reuse a reverb device from different tracks in your song, and if you do not want to use so many devices. I really like the freedom to use a custom tuned reverb device for every group of instruments that play together like a voice or in similar context, and really fine-tune it so each kind of sounds have their defined shape in the mix, and so that their ambience fits right in without obstructing other sounds too much.
Another pretty simple but useful tip I would give is to apply EQ on specific resonances on most of our instruments (mostly beats and particularly cymbals) both to clean out the sound, and leave space to other instruments that may have better sounding things at those frequencies.
To do it it’s very simple, just use a very-sharp EQ curve and put it all the way up, then browse every frequency level until you find that “harsh” resonance sound. Reducing it from only a few dBs is okay most of the time.
If you have trouble understanding what I’m talking about, just take any cymbal sample and try it out, you’ll find the specific resonance pretty easily. Then try cutting it out and see the difference. (Even better if part of a complete track to hear the space it leaves to other instruments/percs)